When it comes to online video content, browsers have historically relied on third-party plugins (remember Adobe Flash or Microsoft Silverlight?) to stream videos. This approach worked but had drawbacks – compatibility issues, many security vulnerabilities, and reliance on bloated external software.
This is why the introduction of HTML5 in 2008 was such a big deal. HTML5 includes a native <video> element that allows developers to embed and play videos directly within web pages, eliminating the need for proprietary multimedia plugins, and significantly improving the user and developer experience for video streaming.
But the <video> element alone isn’t a silver bullet. One must still choose the format to deliver an optimal video streaming experience. And to do that, it's important to consider the target audience, the browsers and devices they are likely to use, and the balance between video quality and file size.
In this post, we’ll cover HTML5 video encoding in detail, the role of HTML5-compatible video players, why you should use them, and how to do it all at scale. Let’s get started!
The most popular web video file formats
Having known the issues and challenges of HTML5 video encoding, it is important to make the right selection of video file format to make it cross-browser and cross-platform compliant.
Which could you use? Well, there are several video file formats in use today, but the most popular ones include:
1. MP4 (MPEG-4 Part 14):
By far the most widely used video format, supported by almost all modern web browsers, devices, and platforms.
Battle-tested, has plenty of developer-friendly tooling around it with built-in community profiles/settings, and supports multiple popular codecs, including H.264 (AVC), H.265 (HEVC), AV1, and VP9.
Widely used for online video streaming (YouTube, Vimeo, Netflix, and more), as the universal format for social media shares, and for native video in mobile devices (both Android and iOS).
2. MOV (QuickTime)
Video format developed by Apple and most used in Mac-based systems (as it was originally developed for Quicktime Player).
It supports multiple codecs, including MPEG-1, MPEG-2, H.264, and Apple ProRes.
Widely used in video editing and production, particularly when also using ProRes as a professional “visually lossless” solution.
3. WebM
Royalty-free video format developed by Google, and probably the most compatible one after MP4 itself. It is widely supported by modern web browsers and is becoming increasingly popular.
Frequently used as the go-to embed format (using the native HTML5 <video> element) seen in blog posts, product display pages on eCommerce sites, and more.
It supports AV1, VP8, and VP9 codecs and has comparable compression and quality to MP4 while providing the added advantage of being an open format.
4. OGG
Built by the Xiph.Org Foundation as an open and free container format that was primarily designed for audio, but can multiplex multiple different streams – video, audio, and subtitles – into a single OGG file.
Usually, Theora is the codec of choice for its video stream, and Vorbis or Opus are used for encoding the audio.
As one of the 3 video formats that are natively supported in the HTML5 video spec (along with MP4 and WEBM), it is a popular choice for quick and easy video embeds.
5. 3GP
Based on MPEG-4 Part 14 (MP4) and initially designed for use on 3G mobile phones, these days, it is fairly redundant thanks to higher bandwidths and higher-end devices
But it is a good choice for legacy compatibility and as the “minimum acceptable quality” fallback option for slower networks and older and low-powered devices.
Supports the H.264(AVC), MPEG-4 Part 2, and VP8 codecs for video and MP3, AMR, and AAC for audio.
These are just a few of the most popular video file formats in use today, and there are many others, but lack of compatibility might hold those back from being as popular as these.
HTML5: Video Players vs. Video Embeds
Both HTML5-compatible video players and direct embeds can be used to display video content on a web page using the HTML5 <video> tag, but knowing the difference between the two methods is critical.
First of all, let’s take a look at what the HTML5 spec says about the markup structure of the <video> tag.
The HTML5 Video Tag
<video
    src="video.mp4"
    poster="poster.jpg"
    controls
    autoplay
    loop
    muted
    preload="auto"
    width="640" height="360"
    playsinline
>
  Your browser does not support the video tag.
</video>
In this example, the <video> element is used to define a video player. Here are some of the available attributes inside the <video> tag that can be used for video encoding (attributes without an explicit value default to true):
- src: Specifies the URL of the video file to be played (in this case, "video.mp4").
- poster: Specifies the URL of an image to be displayed as a placeholder before the video loads (in this case, it’s "poster.jpg").
- controls: Adds the default video player controls, such as play, pause, volume, and full-screen.
- autoplay: Specifies that the video should start playing automatically when the page loads.
- loop: Specifies that the video should play in a loop.
- muted: Specifies that the video should be muted by default.
- preload: Specifies how the video should be loaded. In this case, "auto" indicates the browser should load the video when it deems appropriate, and other options include “metadata” which means only metadata should be preloaded, and “none” which means nothing should be preloaded making this the option for maximum bandwidth economy.
- width: Specifies the width of the video player in pixels (640 pixels in this example).
- height: Specifies the height of the video player in pixels (360 pixels in this example).
- playsinline: This attribute specifies that the video should play inline on mobile devices instead of going full-screen.
Finally, if the browser does not support the <video> tag or any of the specified attributes, the text "Your browser does not support the video tag" will be displayed as a fallback message.
But what happens when the browser/platform does not support playback of the only video file you’re using as the source? That’s where the <source> tag can help. Let’s look at the same example, expanded.
<video
    controls
    autoplay
    loop
    muted
    preload="auto"
    width="640" height="360"
    playsinline
>
  <source src="video.mp4" type="video/mp4">
  <source src="video.webm" type="video/webm">
  <source src="video.ogg" type="video/ogg">
  Your browser does not support the video tag.
</video>
The HTML5 spec defines <source> tags, as a way to specify different video sources within the <video> tag. Each <source> tag represents an alternative video format or version that the browser can choose from based on compatibility, using the src attribute and the corresponding MIME type using the type attribute.
When the webpage is loaded, the browser will automatically select the first compatible video format from the <source> tags.
- If the browser supports MP4, it will play the "video.mp4" file.
- If it doesn't support MP4 but supports WebM, it will try to play the "video.webm" file.
- And if neither MP4 nor WebM are supported but Ogg is supported, it will attempt to play the "video.ogg" file.
- Then you can have the “Your browser does not support the video tag” text, as usual.
These attributes can be used in conjunction to embed a video directly in a webpage, or used in an advanced JavaScript-based video player that suits your needs. Let's look at how.
What are HTML5 Video Embeds?
This is the quickest, easiest, and most lightweight option for adding a video (typically MP4 or WEBM) to a webpage, with no external libraries or dependencies needed, and with peace of mind that it’ll still work natively on everyone’s browser, even if they don’t have JavaScript enabled.
It involves using the native HTML5 <video> element to directly render a video on a webpage, with fallback options using the <source> tag (with its type attribute) in case the browser doesn’t support the first format.
<video width="720" height="480" controls poster="thumbnail.jpg">
    <source src="video.mp4" type="video/mp4">
    <source src="video.webm" type="video/webm">
    <source src="video.ogv" type="video/ogg">
    Your browser does not support the video tag.
</video>
These simple HTML5 video embeds are commonly just used for short-form video clips that are 30 seconds or less, such as product previews, quick how-to’s, and promotional videos.
But what if you want additional features, like backward compatibility on browsers that don’t support the HTML5 <video> tag natively? Or support for captions/subtitles and advanced controls (such as playback speed)? What about adaptive bitrate (ABR) streaming?
That’s when you reach for an advanced JavaScript-based video player.
What are HTML5 Video Players?
An HTML5 Video Player (like Video.js, JW Player, etc.) is a standalone JavaScript library that can be included (self-hosted, or via a CDN) in your web pages, thus providing a customizable and feature-rich video player experience for all your <video> tags.
Their support for:
- Adaptive Bitrate Streaming (using HLS and DASH protocols),
- Multiple audio tracks
- Captions/subtitles
- Playback speed control
- Security (encryption or DRM)
- Video traffic monitoring/analytics (on the dev side)
It makes them uniquely suited for offering immersive, large-scale video experiences – think streaming full-length movies or TV shows for subscribers.
They are purpose-built for as wide compatibility as possible, often handling browser-specific quirks and providing fallback options for older browsers. They often come with themes/skins out of the box but are also fully customizable with additional CSS/JS in terms of appearance, playback controls, and even accessibility to align with your website’s design principles, branding, and requirements.
Here’s an example of using such a video player (Video.js):
Step 1: Include the Video.js CSS inside your tag
<head>
  <link href="https://vjs.zencdn.net/8.3.0/video-js.css" rel="stylesheet" />
</head>
Step 2 : Include the Video.js SDK inside your tag
<body>
  ...
 <script src="https://vjs.zencdn.net/8.3.0/video.min.js"></script>
</body>
Step 3 : Use tags as normal, with the video-js class for out-of-the-box styling
Use the <video> element as usual, linking to your video(s). They will now use the imported Video.js library automatically:
<video
    id="my-video"
    class="video-js"
    controls
    width="720"
    height="480"
    poster="thumbnail.jpg"
  >
    <source src="video.mp4" type="video/mp4" />
    <source src="video.webm" type="video/webm" />
    <p class="vjs-no-js">
      To view this video please enable JavaScript, and consider upgrading to a
      web browser that
      <a href="https://videojs.com/html5-video-support/" target="_blank"
        >supports HTML5 video</a
      >
    </p>
  </video>
Encoding video for HTML5
By now, you know the most common video formats and the two ways of using HTML to render video content on web pages. All that remains is how you’d go about encoding videos to ensure they can be used in web pages using HTML5 without hassle.
The TL;DR of producing video content for HTML5 is this:
- Ultimately, you need your video in these format + codec combinations: MP4 (using H.264), WebM (using VP9), or OGG (using Theora), in that order so that they can be used with the HTML5
<video>tag right away. - For high-quality video content longer than 30 seconds, you should use Adaptive Bitrate Streaming (using either the HLS or DASH protocol) with Video.js/JWPlayer etc., for optimal video delivery, adjusting quality based on network conditions.
Why do you need fallback options? A good example is the Firefox browser on Android, which can only do MP4 without hardware acceleration, unexpectedly leading to much lower performance. But it supports the Ogg/Theora combination natively, making it a fallback option that saves the day.
To accomplish this, you’ll have to encode your source videos (or transcode them, if you already have them in another format like MKV) into these HTML5 native formats somehow, and for ABR, generate variant streams with a master playlist (in the M3U8 format) that references the variants.
Here are your options for achieving this:
1. Encode using self-hosted ffmpeg
The go-to option for encoding/transcoding videos on local/on-prem dev platforms is FFmpeg, and you can use it on your remote server via SSH.
FFmpeg is a powerful open-source multimedia framework with a command-line video encoding tool. Using it, you can encode/transcode your source videos into the three HTML5 format/codec combinations, fine-tuning each quality setting yourself.
Here's an example command for encoding with FFmpeg:
ffmpeg -i input.mp4 -c:v libx264 -preset medium -c:a aac -b:v 1M -b:a 128k output.mp4This command takes an input video file (input.mp4) and converts it to an MP4 file (output.mp4) using the H.264 video codec and AAC audio codec. The -b:v and -b:a parameters specify the desired bitrates for video and audio, respectively.
For adding adaptive bitrate streaming (using HLS) with 3 variants (1080p, 720p, and 480p) into a master playlist (output.m3u8), the command gets far more complex:
ffmpeg -i input.mp4 -c:v libx264 -preset medium
	-b:v:0 5000k -maxrate:0 5000k -bufsize:0 10000k -vf "scale=1920x1080" -c:a:0 aac -b:a:0 128k -c:v:1 libx264 -preset medium
	-b:v:1 2500k -maxrate:1 2500k -bufsize:1 5000k -vf "scale=1280x720" -c:a:1 aac -b:a:1 128k -c:v:2 libx264 -preset medium
	-b:v:2 1000k -maxrate:2 1000k -bufsize:2 2000k -vf "scale=854x480" -c:a:2 aac -b:a:2 128k
	-hls_time 10 -hls_list_size 0
	-master_pl_name playlist.m3u8
	-var_stream_map "v:0,a:0 v:1,a:1 v:2,a:2"
	-f hls output.m3u8
2. Encode in the cloud
The second option for HTML5 video encoding involves utilizing third-party encoding/transcoding services in the cloud, and you have two options here:
- Pipeline-based, non-realtime encoding in the cloud – using Amazon’s AWS MediaConvert, or
- URL-based, real-time encoding in the cloud – using ImageKit.
Whichever you use, the cloud approach offloads the video encoding process to these specialized service providers, and they offer dedicated infrastructure and expertise for efficient and scalable video processing and addition of Adaptive Bitrate Streaming. Elastic resources in the cloud mean your encoding operations can scale up or down as needed, and no hardware or software of your own is ever required for any encoding.
The Pipeline-based approach – AWS MediaConvert
AWS MediaConvert is a cloud-based transcoding service that Amazon Web Services (AWS) offers. It provides a pipeline-based workflow – the encoding process is performed asynchronously, allowing users to submit video encoding jobs and retrieve the results later – for encoding videos in various formats.
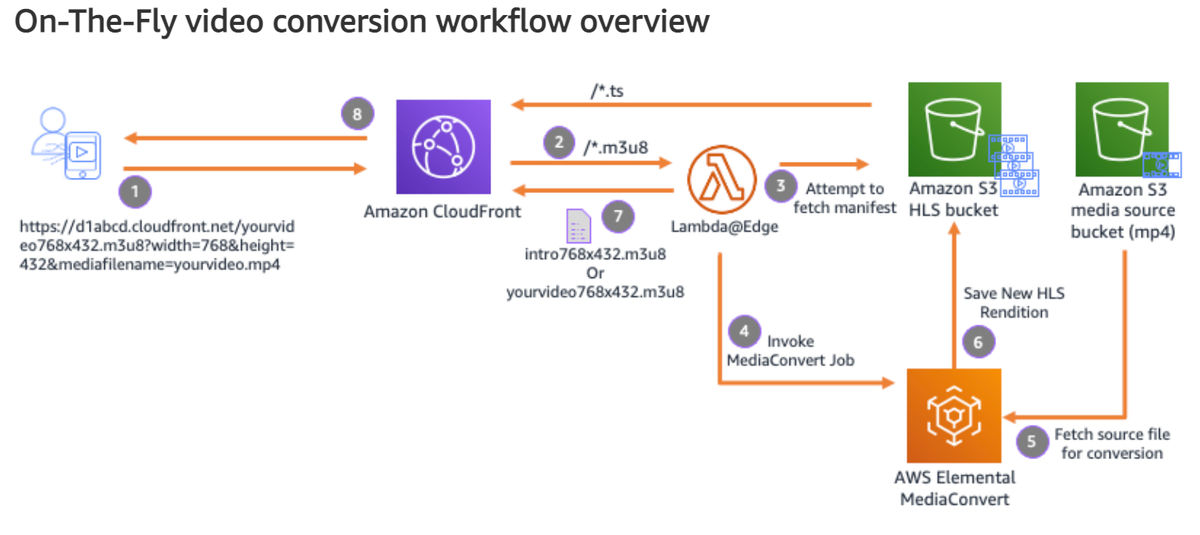
Here's an overview of how the pipeline-based approach works in AWS MediaConvert:
- Create an AWS MediaConvert job: Use the AWS Management Console or the MediaConvert API to create an encoding job. Specify the input video file and the desired output format and settings.
- Configure the job settings: Customize the encoding job settings to match your preferred output format and quality. Set parameters such as video and audio codecs, bitrates, resolutions, adaptive bitrate streaming (HLS or DASH ISO containers) and other relevant options for generating output renditions.
- Start the encoding job: Initiate the encoding job in AWS MediaConvert. The service will process the input video file and generate the specified output format.
- Track Status and Notifications: While the encoding is in progress, monitor the status of the transcoding job through the AWS Management Console, webhooks, or event notifications.
- Retrieve the encoded video file: Once the encoding job finishes, access the encoded video file(s) from the designated output location (typically another S3 bucket). You can then utilize it in your HTML5 video player.
The Real-time, API-based approach – ImageKit
AWS MediaConvert is a powerful tool, but it does not offer real time encoding, and moreover, has a very high learning curve, needing you to have a good understanding of webhooks, asynchronous programming (for tracking jobs, progress, and retrieving output renditions), a lot of video encoding-related options (such as codecs, bitrates, resolutions), and other AWS services/APIs beyond the MediaConvert service itself.
What’s a viable alternative, then? Consider ImageKit. It’s a cloud-based image and video optimization, transformation, and digital asset management platform that aims to simplify the cloud-based encoding operation for you. It takes care of the best-possible defaults for you, giving you a simple, unified API for video encoding and streaming.
ImageKit's video API provides the following capabilities:
- Encode and Transcode Videos: Upload a video file to ImageKit’s Media Library (or, connect your existing cloud storage to ImageKit, with proper permissions) in any format, and ImageKit will automatically convert it to an optimal format and optimal bitrate for playback based on different devices and network conditions, with no work involved on your part beyond a simple Dashboard setting.
- Adaptive Bitrate Streaming with only URLs: No need to memorize difficult ffmpeg commands or master pipelines, asynchronous jobs, and webhooks. With ImageKit’s URL-based approach for Adaptive Bitrate Streaming (ABR), you only have to append /ik-master.m3u8?tr=sr-480_720_1080**[1]** to the end of a video URL (to create 3 variants – 480p, 720p, and 1080p) to generate an ABR manifest in near real-time.
Deliver videos at scale: All videos you store on ImageKit can leverage Global CDN caches (AWS CloudFront, by default) to deliver them to your end-users from a location nearest to where they are geographically, giving you reduced latency and improved performance with no extra work on your part.
[1] /ik-master.mpd?tr=sr-480_720_1080 for an MPEG-DASH manifest.
This is a one-stop solution for managing your video pipeline at scale – from storage to on-the-fly transcoding and transformations to secure delivery.
Now, you can just add the ImageKit link for your video as the src to your <video> tag, like so:
<video width="720" height="480" controls src="https://ik.imagekit.io/your-username/your-video.mp4">
    Your browser does not support the video tag.
</video>
And ImageKit will automatically serve the correct HTML5 video format, every time, automatically, based on the browser/device of the device that is requesting the video. You will never have to worry about the following:
- Encoding multiple variants of the same video, in MP4, WEBM, and OGG, and storing them separately.
- Add WebM and OGG variants as fallback options within your
<video>tags to ensure all user devices can play them. ImageKit will serve the right format, even if the only link you’re including is supposedly an MP4 file. This process is completely opaque to the end user.
HTML5 Video Encoding Options Compared: Self-Hosted FFMPEG vs. AWS MediaConvert vs. ImageKit
| Parameter | ffmpeg | AWS MediaConvert | ImageKit |
|---|---|---|---|
| Scope of services | Open-source multimedia framework that includes a command-line tool with fine-grained options for video encoding, transcoding, and adding filters. | Dedicated video encoding service provided by Amazon Web Services | All-in-one media storage, optimization, transformation, and delivery platform that includes both video and images, can serve as an end-to-end static resource pipeline for websites/apps. |
| Pricing Model | Free. | You pay for the duration of the video transcoding, the output formats, and other factors such as the number of minutes processed, data transfer, and any additional features used. Pricing details can be found on the AWS website. | Offers generous limits for each tier, then charges based on usage (per second of video output produced via any conversion or transformation operation). Pricing details found on the ImageKit website. |
| Supported Input Codecs and Container formats | Pretty much everything. | Container Formats: AVI, MP4, MXF, MOV, WEBM, 3GP, OGG, MTS, MPEG, Matroska, QuickTime, and more. Video Codecs: H263, H264, H265,DivX/XVid, ProRes, MPEG-2, VC-1, and more Audio Codecs: AAC, Opus, Vorbis, FLAC, MP2, MP3, WMA, PCM | Container Formats: MP4, MOV, WEBM, MPEG, 3GP, OGG, OGV, MTS, and more Video Codecs: H264, H265, AV1, VP8, VP9, Theora, and more Audio Codecs: AAC, Opus, Vorbis, MP2 |
| Video processing features | By far the most feature-rich option – video filtering, resizing, cropping, rotating, and aspect ratio adjustment. It also provides features for codec manipulation, bitrate control, frame rate conversion, color space conversion, and video effects via filters. | Video codec conversion, bitrate control, frame rate adjustment, video scaling and cropping, deinterlacing, color space conversion, and more. It also offers features like caption insertion, DRM (Digital Rights Management) integration, and audio processing capabilities. | Video resizing, scaling, cropping (with focus adjustment), aspect ratio adjustment, quality factor adjustment, format conversion, trimming, programmatically generating thumbnails from video, and converting video to GIF. |
| Integration with other services | None; though additional functionality can be added via community modifications. | Integrates well with all other AWS services, such as S3, Elastic Transcoder, and the AWS Elemental MediaPackage, making it easy to store and deliver encoded video content – as long as you only use AWS services for your pipeline. | Provides integration with various services and platforms, such as Amazon CloudFront, a number of cloud storage platforms including Amazon S3 and Azure Blob Storage, and Magento, Shopify, and WordPress. |
Overall, the choice here depends on the specific needs of your project, budget, expertise, and the level of customization and control you require over your video encoding workflows.
Things to keep in mind while implementing HTML5 video encoding
Here are some important things to keep in mind while implementing HTML5 video encoding:
- Use the right video format and codec combination: HTML5 supports MP4 (H.264), WebM (VP8/VP9), and Ogg (Theora) natively. Encode in these format + codec combinations to make sure your video is widely supported by browsers and devices, while also encoding your videos in the other formats and including them as fallback options to ensure broader compatibility. It's also important to consider the trade-off between video quality and file size, as larger files may take longer to load and buffer.
- Provide fallback options: Not all browsers or devices support HTML5 video. To ensure compatibility, provide fallback options, such as a static image with a link to download the video. Use the
<video>element's nested<source>tags to specify alternative formats for different browsers. If using a third-party player like Video.js, read up on its backward compatibility options. - Consider adaptive bitrate streaming: Adaptive streaming allows the video player to adjust the quality and bitrate of the video based on the viewer's internet connection. This ensures that the video plays smoothly without buffering. Use technologies like HTTP Live Streaming (HLS) or Dynamic Adaptive Streaming over HTTP (DASH) to create manifest files (M3U8 and MPD formats, respectively) that can be us ed to implement adaptive streaming. ImageKit can do this for you easily via its URL-based API. Learn more here.
- Video resolution: Choosing the right video resolution is important to ensure an optimal viewing experience for your viewers. Here are some tips to help you choose the right video resolution:
a. Consider the screen size of your viewers
b. Choose a resolution that balances quality and file size
c. Stick to standard resolutions.
d. Use the Media attribute in your <video> tags to ensure the right resolution variant gets used
<video controls>
   <source src="video-small.mp4" type="video/mp4" media="all and (max-width: 480px)">
   <source src="video-small.webm" type="video/webm" media="all and (max-width: 480px)">
   <source src="video.mp4" type="video/mp4">
   <source src="video.webm" type="video/webm">
</video>
5. Test across browsers and devices: HTML5 video may behave differently across various browsers and devices. Test your video implementation on popular browsers (Chrome, Firefox, Safari, Edge) and different devices (desktops, laptops, smartphones, tablets) to ensure consistent playback and compatibility.
Use your browser’s dev tools to analyze network requests, monitor video loading times, and identify any errors or warnings related to video playback. For cross-browser compatibility and large-scale testing, tools like LambdaTest and BrowserStack will help.
Conclusion: ImageKit is the prime choice for HTML5 Video
As you’ve seen, the HTML5 standard has been a game changer for delivering video content online. But encoding and optimizing source videos for HTML5 yourself can be quite the task, with tools like ffmpeg being complex and daunting to get into and AWS MediaConvert having a steep learning curve with new concepts to learn (webhooks, complex cloud pipelines, a myriad of other AWS APIs and services) and less-than-ideal documentation for it.
ImageKit streamlines the entire video encoding, optimization, and delivery pipeline so you can get up and running with your video content in days, not weeks, with a flexible real-time URL-based video API that can do everything from customizable encoding to dynamic resizing to format conversion and optimization, and Adaptive Bitrate Streaming.
With ImageKit, you can access an all-in-one solution that combines a Media Library and AWS CloudFront. It seamlessly integrates with existing cloud storage and CMS solutions, allowing you to deliver the video experience you want at scale effortlessly.


