Images are everywhere on the web. For product displays, brand promotions, testimonials to banners and logos, images take up a lot of space on your website. They aren’t just accessories to your brand, they make up most of it online.
With the many use cases of images on a website, it’s all the more important to optimize them according to their various applications on your webpages. Images make up for most of the page weight, a raging factor determining the bandwidth consumed.
Heavier websites and high bandwidth consumption lead to inflated page load times. Factors that affect your SEO ranking greatly.
What is ImageKit?
ImageKit is a complete image optimization solution. It helps deliver the best fit for all your image optimizations and transformations and includes features like image security, automatic image format selection, smart crop, object-aware cropping, and image plus text overlays.
What is Cloudflare?
Cloudflare is one of the largest CDNs and edge server providers on the planet. With edge locations around the world, it’s one of the more popular CDNs available.
Do you need image optimization and transformation with Cloudflare?
Using Cloudflare surely speeds up the asset delivery, but it doesn’t always ensure your images are optimized, and according to your requirements.
Even with basic resizing, WebP conversions and quality control available in Cloudflare, it doesn’t offer as many important features — smart cropping, object-aware cropping, automatic best format selection, image overlays, and image security to name a few — as ImageKit.
Irrespective of the CDN in use, if you are not optimizing your images, you’re doing things wrong.
Unoptimized images lead to a slower page load speed, a factor influencing the user experience, ultimately affecting your conversion and retention rates.
Not only your users, but even search engines like Google penalize your website for a slow page load time, affecting your website ranking. Led by the fact that images play an important role in improving the overall page load performance, tools like Google Lighthouse have dedicated pointers relating to image optimization and image loading.
Also, not optimizing your images can actually end up costing you more, much more. CDNs charge you based on the bandwidth used by you. Unoptimized images consume more bandwidth. The more the bandwidth consumed, the higher the costs incurred by you.
How does ImageKit integrate with Cloudflare?
Typically, you would have your own image storage or image server directly attached as an origin to Cloudflare CDN. To optimize images in real-time, ImageKit comes as a layer between your CDN and your existing image storage or server.

Instead of directly attaching your storage or server to Cloudflare, you configure them in ImageKit’s dashboard as shown in the screenshot below, and then add ImageKit as an origin to your Cloudflare CDN. Our team works with you to set up the right configuration on CloudFlare to ensure correct caching of images on the CDN and to whitelist the domain names that you use for your images on the CDN.
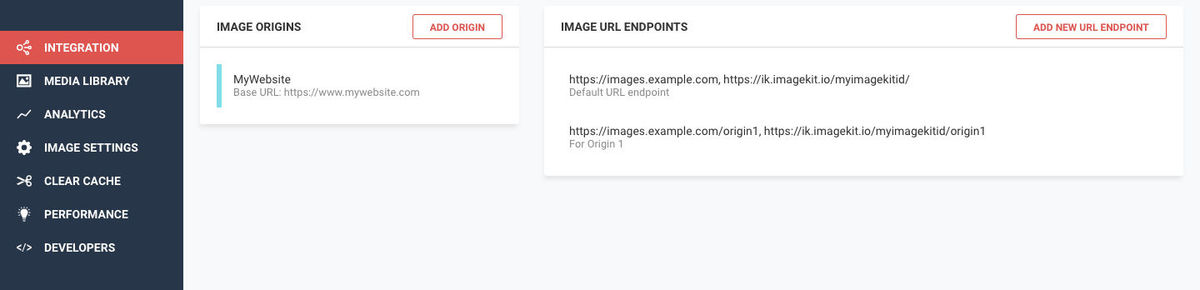
Please note, such changes are only possible on the Cloudflare enterprise plan. Other plans do not allow for enough customization in the CDN configurations to enable different cache key logics.
With these origins, you can create URL endpoints to access these images.
What does ImageKit do?
Now that ImageKit is layered between the CDN and your images, it can now optimize and transform the images upon request in real-time before they are delivered through CloudFlare.
Most optimizations in ImageKit are done automatically.
For instance, without even changing the image URL, ImageKit considers various factors like device type, image format support in browsers, content, and original image format to convert the image to the best possible format. It also compresses the image to an optimal level balancing visual appeal and size. This ensures that the images are automatically delivered at the lowest possible size without impacting the perceived quality.
These automatic optimizations alone have helped companies lower the image size by 25-40%, or in some cases, even more.
For example:
Original Image is 195KB in size, whereas the same when delivered via ImageKit here is 54KB in size and is automatically delivered in WebP format. A reduction of almost 72%.
This setup also allows you to transform your images — resize, crop, add watermarks, overlay texts, smart crop an image, and so on — in real-time.
For example:
You can resize the above image by specifying the resizing parameter directly in the URL

https://ik.imagekit.io/demo/img/test-compression_7vsHJwgIT.jpg?tr=w-300,h-300
Add to this, ImageKit’s smart crop functionality and the thumbnail automatically adjusts to bring the most important part of the image, the laptop in this case, closer to the centre.

https://ik.imagekit.io/demo/img/test-compression_7vsHJwgIT.jpg?tr=w-300,h-300,fo-auto
You can even watermark your images or overlay text on them, directly from the URL

If you need to isolate a single object from an image containing multiple objects, object-aware cropping is the perfect solution. By using fo-<object name> in the URL, you can precisely crop out the desired object.
Consider this living room example, where you want to crop out individual furniture pieces:
https://ik.imagekit.io/ikmedia/Graphics/Furniture.jpg?tr=fo-couchcrops out the couch.https://ik.imagekit.io/ikmedia/Graphics/Furniture.jpg?tr=fo-chaircrops out the chair.
This is achieved effortlessly with a simple URL transformation.
Using these real-time transformations and many more, you can also implement a great cross-device image experience with responsive images and lazy loading to improve your website performance and reduce the bandwidth consumed.
Can ImageKit do network-based image optimizations?
For network-based optimizations, it is essential to determine the user’s network conditions, whether they are on 2G/3G/4G, and then modifying and optimizing the images to be delivered accordingly.
For instance, here is an image at quality level 90 weighing 53.5KB that can be used for good network speeds on 4G. The same image is optimized here at quality level 50 which brings down its size to 42.6KB (~20% reduction in size). This can be used on slightly slower network speeds, on 3G.
Determining the user’s network speed can be best handled on their device by actively monitoring the download speeds they are observing. You can refer to this SDK by Facebook to do so in an Android device. Also, you can do it using service workers for web and mobile apps.
With ImageKit, you don’t have to rely on CDN’s estimate of a user’s connectivity conditions (which are not real-time). You can quite accurately measure the actual speed on the user’s device using Service Workers, and use ImageKit to deliver the correctly optimized image for that network.
Why ImageKit over what CloudFlare offers for images?
Cost
Imagekit is more economically priced as compared to the basic features for image optimization available in Cloudflare. Also, ImageKit only charges based on the bandwidth of the missed traffic from CloudFlare CDN (the one that actually comes to ImageKit), which makes it really cost-effective.
The more you optimize your images, the lower the bandwidth consumed and lower your costs. And there is no cap on requests or the number of transformations. Basically, you can optimize the image experience across devices to provide an efficient responsive design to your visitors.
Features
We do more than just WebP conversions, compressions or simple resizing.
ImageKit looks at multiple variations, like browser support, image content, transparency (if any) in the image, the original image format, and so on, internally to deliver the best possible image format, to all devices. We support more complex resizing and cropping logics allowing you to transform images exactly as per your requirements for different devices and screen sizes.
Features like watermarking, text overlays and smart crop, object-aware crop, which come bundled in with ImageKit, have been very useful for all of our customers.
In addition to these transformations, ImageKit also comes with image security features where you can generate signed non-modifiable URLs, or time-based expiration URLs to keep your images safe from third-party access.
Performance Centre
ImageKit lets you monitor the image optimization performance on your webpages. You can get a detailed analysis report on all your image optimizations, making comparative analysis easier for you and your team. Add to that, you will have access to all past performance data pertaining to your pages, in your dashboard.
You will also receive email alerts for critical issues pertaining to your website image performances. This performance centre dedicated to image optimizations, is one of the first in the industry.
Media Library
A valuable asset, our media library, is an unlimited storage provided by ImageKit, for your images, files and folders, wherein you can upload, search and manage them with ease. Just drag and drop, and you’re done. ImageKit’s Media Library also supports non-image assets like CSS, JS, PDF, MP4 for upload etc.
Built on top of AWS S3, it not just offers an unlimited storage, but also has automatic backup bundled in. Even your non-tech-savvy team members can also quickly and easily access the image assets of your website and apps.
How do I get started?
You create an account on ImageKit and then get in touch with our team through a support ticket or by emailing us at customer-support@imagekit.io to get started with the setup with CloudFlare.
Our team will then schedule a screen-share session at a convenient time with you, to guide you through the changes to be done in your CloudFlare configuration to integrate ImageKit.
FINAL THOUGHTS
If you value your user experience, page load performance, and SEO rankings, then you must give ImageKit a try with your Cloudflare CDN. Especially if you’re not currently using any image management and optimization tool, or paying a hefty sum for using one, ImageKit is the go-to solution for you.
If you do not want to integrate ImageKit with Cloudflare, ImageKit comes with a CDN bundled with its product as well (AWS CloudFront). You can sign up and get started using this bundled CDN for all your images.
The effort invested is much less in this case, and you can get started immediately.


