Video encoding is the foundation of a great streaming experience where the video file contents are optimized in terms of size, quality, and format to meet the requirements of the end users. It is an umbrella term, referring to miscellaneous processes to alter the RAW video contents depending upon a set of well-defined recipes.
Why is video encoding important?
Practically speaking, whether it's watching a three-hour long movie on a high-end HDR TV with the fastest broadband connection, or a short clip on a mobile phone with a choppy cellular network, you need to ensure uninterrupted playback, at the optimal quality for the user’s device.
To ensure this, a reliable solution is required.
Enter video encoding.
Video encoding techniques help compress large video files by eliminating redundant data, making storing, transmitting, and streaming video content more efficient. By utilizing these techniques, you can easily address critical factors such as smooth streaming over any network and issues related to quality, compatibility, and storage.
Video encoding: How does it empower your video production?
Let's find out the several that incorporating video encoding techniques in our video production can provide.
Reducing file size
Video compression is the primary technique used in video encoding, which involves the removal of redundant frames from the video stream to reduce the size of the file. By reducing the size of the file, video content can be transmitted more quickly over the internet, making it possible to stream high-quality videos with low bandwidth requirements.
Optimizing video quality
Video encoding allows us to choose between the tradeoffs of video quality and file size, depending on the specific needs of our audience and the resources available to us.
In some cases, we may prioritize video quality over file size to provide high-quality video content to viewers with strong internet connections. In other cases, we may limit the video quality to optimize our storage and throughput, especially when we have limited storage space and bandwidth resources.
Ensuring video compatibility
Not all platforms and devices support the same containers, codecs, or compression formats. This is where multi-format encoding comes in handy, allowing us to produce video content that is compatible with a wide range of platforms and devices – smartphones, tablets, desktops, and smart TVs – making it easier to reach a broader audience.
What are Video Codecs?
Video codecs are compression technologies (devices or software) that compress and decompress digital video data for storage, transmission, and playback purposes. A “codec” is an abbreviation of "encoder/decoder," meaning it converts raw video data into a compressed format during encoding and decodes it back to its original form during playback.
These codecs use various algorithms to compress digital video data, reducing the size of the file while preserving as much of the video quality as possible. Some common video codecs include H.264, H.265 (HEVC), VP9, AV1, MPEG-2, and MPEG-4. These differ in terms of their compression efficiency, encoding speed, and compatibility with different devices and platforms, but all let users choose various recipes or “presets” to determine quality, final file size, bandwidth, etc.
Once the encoding process is complete, the compressed video data is packaged into a video container, better known as a video file format. Popular video container formats include MP4, AVI, MOV, and MKV. Each differs in its ability to store different types of video and audio data, subtitles, and metadata, but choosing a container usually just comes down to compatibility with most devices (and that usually means MP4).
There are two types of codecs :
- Lossless compression codecs
- Lossy compression codecs
Lossless Compression Codecs
Codecs utilizing this technique reduce the size of a video file without losing any information or quality. Unlike lossy compression, which discards some data to achieve a higher compression ratio, lossless compression algorithms preserve all the original data in the video stream. This means that when the video is decompressed, it will be identical to the original, with no loss of quality.
Examples of Lossless Codecs include Apple ProRes (which is widely used in professional video production) and the open-source FFV1 codec (widely used for archive footage and in video preservation projects) developed by the FFmpeg project.
Algorithms used in Lossless compression are Run Length Encoding, Lempel-Ziv-Welch, Huffman Coding, Arithmetic encoding, etc.
Lossy Compression Codecs
These codecs utilize compression techniques that reduce the size of a video file by discarding some of the redundant data from the original video stream. Unlike lossless compression, lossy compression cannot be reversed to retrieve the original video data, as some of the data has been discarded during the compression process.
With more aggressive compression presets, will lead to more noticeable artifacts and degradation in the video. But despite this, lossy compression remains extremely popular, as the ability to reduce file size while maintaining an acceptable level of video quality is crucial for delivering video content efficiently and cost-effectively over the internet.
Examples of Lossy Codecs include: H.264, also known as Advanced Video Coding (AVC). This codec is universally popular and ubiquitous, designed to deliver high-quality video at low bitrates, making it ideal for streaming video over the internet.
Algorithms used in Lossy compression are Transform coding, Discrete Cosine Transform, Discrete Wavelet Transform, fractal compression, etc.
Comparing Lossless vs. Lossy Codecs
| Lossless video codecs | Lossy video codecs | |
|---|---|---|
| Algorithm | Reduces file size without losing quality | Reduces file size by discarding some data |
| Reversibility | It can be reversed to retrieve original video data | It cannot be reversed to retrieve original video data |
| Compression ratio | Lower compression ratio compared to lossy codecs | Higher compression ratio compared to lossless codecs |
| Quality | Maintains original video quality | Reduces video quality to some extent, adjustable via presets/configuration. |
| Use cases | Archival, preservation, and professional applications where quality is paramount | Applications where file size is a primary concern, such as online video streaming |
| Examples | Apple ProRes, FFV1 | H.264, MPEG-4 |
Popular codecs used in video encoding
Common Video codecs used today include H.264, HEVC, VP9, and AV1. There are pros and cons to each video codec and file format. There is no silver bullet when it comes to streaming content on the web.
Let us explore these.
H.264 (AVC)
H.264 codec, also known as Advanced Video Coding (AVC), is one of the most widely used video codecs in the world of digital video. It is designed to deliver high-quality video at a low bit rate, making it ideal for streaming video over the internet.
It achieves high compression efficiency using advanced techniques such as motion estimation and inter-frame prediction. It divides video frames into small blocks (macroblocking) and analyzes the motion between blocks to create a motion vector, which is then used to predict the appearance of the next frame. This allows the codec to encode video with high compression efficiency while maintaining high quality.
H.264 has been widely adopted in a variety of applications, including live streaming, video conferencing, cable TV broadcasts, Blu-ray disks, and more. It has become the de facto standard for video compression in many industries and continues to play a crucial role in the world of digital video.
H.265 (HEVC)
H.265, also known as High Efficiency Video Coding (HEVC), is a newer video codec that was developed to replace the widely used H.264 codec. Although H.265 has not yet replaced H.264 as the industry standard, it offers significant improvements over its predecessor.
One of the main advantages of H.265 is its improved compression efficiency. The codec uses advanced compression algorithms – Coding Tree Units (CTUs) instead of macroblocking, more advanced spatial and temporal prediction (Merge Mode, and Advanced Motion Vector Prediction), improved deblocking filters, and sample adaptive offset filtering – that allows it to achieve better image quality and up to 50% better compression than H.264, resulting in smaller file sizes without sacrificing video quality. This is particularly useful for storing high-resolution video files.
Another advantage of H.265 is its support for much higher resolutions. It was the first codec to support 8K resolution – four times the resolution of 4K, and sixteen times that of Full HD. This makes H.265 ideal for applications requiring high-resolution videos, such as video surveillance and medical imaging.
Despite its advantages, H.265 has not yet gained widespread adoption due to its compression algorithm's higher computational demands, lower hardware decoding support availability and some patent/licensing issues.
AV1
AV1 (AOMedia Video 1) was released in 2018 as an open-source and royalty-free alternative to H.264 and H.265. It was developed by the Alliance for Open Media, a consortium of top tech companies including Google, Mozilla, Amazon, and Netflix, who regularly update it with new features and improvements to keep up with the evolving needs of the industry.
The AV1 codec uses a new compression algorithm called the AV1 Bitstream, which is designed to deliver high-quality video at lower bitrates. It achieves this by using a combination of advanced techniques(1) such as intra-frame prediction, inter-frame prediction, and variable block size.
One of the biggest advantages of AV1 is its efficiency. According to tests by the Graphics & Media Lab Video Group, MSU, it is about 30% more efficient than x265 (the H.265 codec), which means that it can deliver the same quality of video at lower bitrates.
![[Source: [1] A. Zvezdakova, D. Kulikov, S. Zvezdakov, D. Vatolin, "BSQ-rate: a new approach for video-codec performance comparison and drawbacks of current solutions," 2020.]](https://ik.imagekit.io/ikmedia/blog/ghost/content/images/2023/03/Average-bitrate-for-same-quality-rate.png?tr=w-1200%2Cc-at_max)
Also, it is flexible, supporting a wide range of resolutions from standard definition to 8K and beyond. More importantly, it supports higher color spaces and high dynamic range (HDR) formats, which makes it ideal for gaming, and virtual reality experiences. However, it is not widely integrated across all media platforms yet.
VP9
VP9 is an open-source video codec developed by Google, which was released in 2013. It is also a royalty-free codec, making it an attractive option for companies looking to reduce licensing costs.
VP9 offers better compression efficiency than H.264, which means that it can deliver the same quality at a lower bitrate. It uses spatial and temporal prediction, intra-frame prediction, and transform coding to achieve higher compression efficiency.
It is supported by many platforms and browsers, supports resolutions up to 8K, and is optimized for streaming video over the internet. However, VP9 is not supported on Apple devices, which limits its use for cross-platform applications.
Video Compression Methods

These are some techniques used to reduce the amount of data needed to store or transmit video, while still maintaining acceptable levels of visual quality. There are two main types of video compression methods: intra-frame, and inter-frame.
Intraframe Compression
This is spatial compression. Each individual frame of the video is compressed, without considering other frames. This is the method used in MJPEG, or H.264 Intra. Intraframe compression can achieve high quality, but requires a lot of data to be stored or transmitted, which can result in large file sizes.
Intraframe compression makes use of I-Frames, or Keyframes. These frames can be decoded independently of other frames, contain all the information needed to display a complete image, and are typically placed at regular intervals in the video stream, such as every few seconds or every few frames.
Encoders allow selecting this keyframe interval. The more I-frames that are created, the more space the final video requires. However, there are benefits to doing periodic I-frames every 2 seconds, the largest of which is adaptive streaming (which can only change quality settings on an I-frame).
Interframe Compression
This is temporal compression. The video is compressed by analyzing and encoding differences between frames rather than encoding each frame independently. This method is used in video codecs such as MPEG-2, MPEG-4, and H.264. Interframe compression can achieve higher levels of compression and smaller file sizes, but may sacrifice some visual quality due to the fact that each frame is not encoded independently.
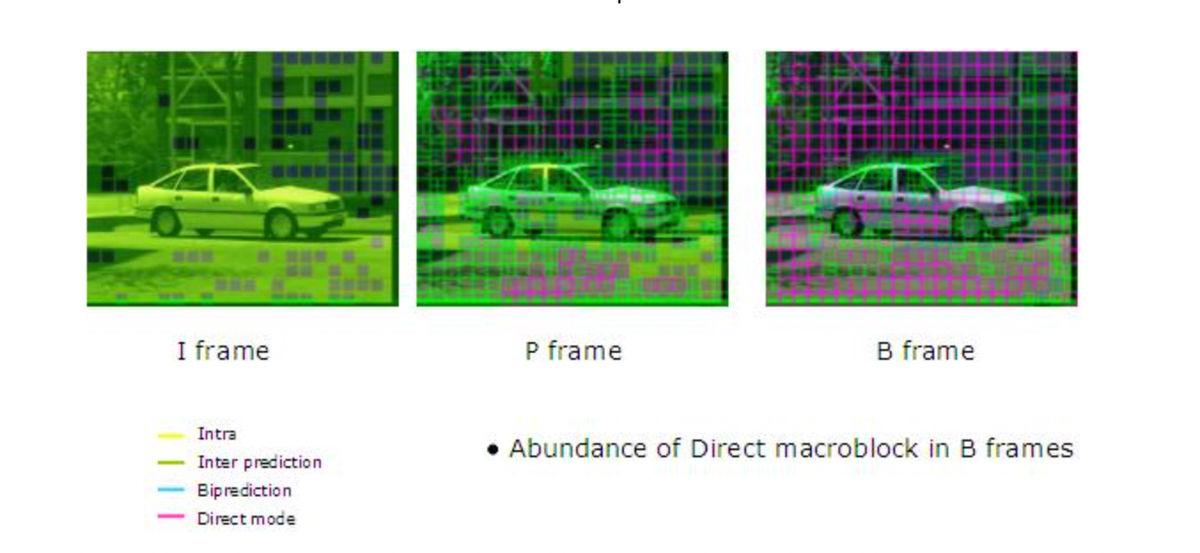
To execute the technique, the process utilizes three different types of frames: I-frames (same as those used in Intraframe Compression), P-frames and B-frames.
P-Frames (Predictive-frames):
These are frames that are encoded using interframe compression, based on a previous I-frame or P-frame. These frames only contain the difference between the previous frame and the current frame. P-frames rely on the information in the previous I-frame or P-frame to be decoded and are typically used to encode changes in the video stream that occur between I-frames.
B-Frames (Bidirectional-predictive-frames):
B-frames are encoded using interframe compression based on both previous and future frames (P-frames or I-frames).
This is a delta frame that also only contains some of the image. The difference between this and a P-Frame, though, is that it can look backward or forward for other delta frames or I-Frames when choosing what details to leave out. As a result, B-frames can achieve higher levels of compression than P-frames, but require more processing power to decode.
How to achieve the best balance between video quality and file size when using video compression
When using video compression, achieving the best balance between video quality and file size is a key consideration. Here are some tips to help you out:
1. Choose the right codec: Different codecs have different compression algorithms and produce different levels of visual quality and file sizes. Choose a codec that is appropriate for your specific needs and requirements. H.264 is ideal for live streaming on Twitch, but not when uploading your portfolio on Vimeo where H.265 might be more suitable. H.264 is a “good enough” option for a majority of use cases, though.
2. Use appropriate encoder presets: Many video compression tools offer a range of settings that can be adjusted to optimize the balance between quality and file size. Experiment with different settings such as bitrate, resolution, frame rate, and keyframe interval to find the best balance for your specific video.
For example, the recommended YouTube bitrate values are sorted by decreasing order of video resolution.
| Resolution | Bitrate (24, 25, 30 FPS) | Bitrate (48, 50, 60 FPS) |
|---|---|---|
| 2160p (4K) | 35-45 Mbps | 53-68 Mbps |
| 1440 (2K) | 16 Mbps | 24 Mbps |
| 1080p | 8 Mbps | 12 Mbps |
| 720p | 5 Mbps | 7.5 Mbps |
| 480p | 2.5 Mbps | 4 Mbps |
| 360p | 1 Mbps | 1.5 Mbps |
3. Use variable bitrate (VBR) encoding
A variable bitrate encoding adjusts the bitrate according to the complexity of the video content, resulting in better quality for complex scenes and lower bitrates for less complex scenes. This can help achieve a better balance between quality and file size compared to a constant bitrate (CBR) encoding.
4. Use interframe compression
As opposed to Intra-frame, Inter-frame compression techniques such as prediction coding and motion estimation can achieve higher levels of compression while maintaining good visual quality compared to intraframe compression. Use the appropriate interframe compression techniques for your specific needs and requirements.
5. Avoid over-compression
Over-compression can significantly lose visual quality, even if the resulting file size is small. Be mindful of how much compression is applied and strive to balance quality and file size well. Again, remember that video compression is not always a race to the smallest file sizes!
6. Consider using Adaptive Bitrate Streaming
If you are streaming video over the internet, consider using Adaptive Bitrate Streaming (ABS) which offers multiple bitrates or resolution variants for a given video, to ensure the best possible viewing experience for different devices and network conditions.
Video Quality
The factors that decide a compressed video quality include: Video resolution, frame rate, bitrate, etc. Let us understand them as below:
What is video resolution?
Video resolution refers to the number of pixels that make up each frame of the video. Resolution is measured by the pixel count. A higher resolution means more pixels, and a greater level of detail, resulting in better-perceived video quality.
For example, a video with a resolution of 2160p has more detail than a video with a resolution of 1080p simply because it has 4 times as many pixels (4K is 3840 x 2160 pixels, which is a total of 8,294,400 pixels per frame, as compared to 1080p’s 1920 x 1080 pixels, a total of 2,073,600 pixels per frame) This higher pixel count of 2160p video allows for finer details to be captured and displayed, resulting in a sharper and more vivid image.
What is frame rate?
Frame rate refers to the speed at which consecutive images are displayed in a video. Moving images create videos, which are simply a series of consecutive images moving at a certain speed (frame rate or frame frequency) expressed in frames per second (FPS).
There is no ideal frame rate for all videos, rather it needs to be decided per subject. Different videos may require different frame rates to achieve the desired level of quality and realism.
For example, movies are typically shot and displayed at a frame rate of 24 fps, while news broadcasts often use a frame rate of 30 fps. On the other hand, videos that contain a lot of motion, such as live sports streaming or video games, may benefit from a higher frame rate of 60 fps or more. This can help ensure that the motion in the video appears smooth and realistic, without any blurring or distortion.
What is bitrate?
The video bitrate refers to the number of bits needed to encode a single second of video and is typically measured in bits per second (bps), kilobits per second (kbps), megabits per second (Mbps), or gigabits per second (Gbps). Naturally, the higher the bitrate, the larger the amount of data processed per second, resulting in higher video quality.
- 1 kbps = 1000 bps
- 1Mbps = 1000 kbps
- 1Gbps = 1000 Mbps
Bit rate is the main factor that decides video file size (video size = bitrate x duration). A higher bit rate normally brings better video quality. However, as the bitrate increases, there is a diminishing marginal utility effect, meaning that the increase in video quality becomes less noticeable, and the increase in file size becomes more significant.
Therefore, when compressing a video, it is important to choose a bitrate that balances video quality with file size, taking into account the duration of the video and the requirements of the application or use case. Most video codecs offer optimal presets that take care of bitrate settings in a best-practices way, meaning you probably won’t have to worry about this in most cases.
How video quality affects the viewer's experience, and how to optimize it
Video quality significantly impacts the viewer's experience, as it directly affects the visual clarity, sharpness, and detail of the video.
Even for someone who knows nothing about the concept of the video, high-quality videos will be immediately perceived as a more immersive and engaging experience, while low-quality videos will make for a frustrating, disappointing experience.
Optimizing video quality for different scenarios requires a careful choice of the right combination of video resolution, frame rate, bitrate, and encoding format. Here are a few tips:
Online Video
- Use a video codec that supports efficient video compression, such as H.265 or VP9.
- Implement adaptive bitrate streaming to adjust the video quality based on the viewer's internet connection.
- Consider using Adaptive Bitrate Streaming (ABS)
- Use a reliable content delivery network (CDN) to minimize latency and buffering, by making sure when viewers request playback of the video, it can be pulled from the edge server geographically closest to them.
Offline Video
- Use high-quality video formats, such as 4K or 8K, for maximum resolution and detail.
- Use a high-quality encoding format, such as ProRes or DNxHD, to maintain the original video quality while reducing the file size.
- Consider the storage medium, such as Blu-ray or hard drive, and choose a video format that is compatible with the device.
Mobile Devices
- For this use-case, you need to optimize your videos for both limited bandwidth (these devices mostly work on cellular data) and limited processing power. So, stick to Full-HD (1080p) at most, and use H.264 codecs to provide the best balance for these constraints.
- Also consider using the Baseline profile with H.264, as it targets older mobile devices by design.
- Use Adaptive Bitrate Streaming (ABS) to adjust the video quality based on the viewer's internet connection and device.
Live Streaming
- Latency is your primary concern, so use a video codec that supports low latency without sacrificing quality or requiring high-end computing resources. H.264 would be ideal.
- Compatibility is your secondary concern. Again, H.264 is ideal as it works on pretty much any device and any browser, while H.265 is limited and only supported natively on Safari – everything else requires device hardware support[1].
- Use an appropriate video bitrate. Your bitrate should be optimized based on your content's stream resolution, framerate, and complexity.
Video File Formats
Video file formats dictate how video content is stored, distributed, and played back on different platforms, programs, and devices. There are a variety of video file formats available, each with its unique features and characteristics.
The important distinction here is that while a codec works on encoding/decoding video, a container stores and organizes the encoded video data. A container is a file format that holds video, audio, and other data streams, along with metadata and other information that describes the contents of the file.
What are the most popular and widely-used video formats?
Here’s a list of the most popular video formats today, compared based on their maximum capabilities and common codecs used.
| Format Name | File Extension | Max Resolution | Max Bitrate | Max Framerate | Supported Codecs |
|---|---|---|---|---|---|
| MP4 | .mp4, .m4v | 4K | 100 Mbps | 60 fps | H.264, H.265, MPEG-4 |
| AVI | .avi | 1080p | Uncompressed | 30 fps | Various |
| MOV | .mov | 4K | 500 Mbps | 60 fps | H.264, H.265, ProRes |
| WMV | .wmv | 1080p | 40 Mbps | 30 fps | VC-1, WMV3, WMV2 |
| FLV | .flv | 1080p | 10 Mbps | 60 fps | VP6, H.264 |
| WEBM | .webm | 4K | 100 Mbps | 60 fps | VP8, VP9, AV1 |
| VOB | .vob | 720p | Uncompressed | 30 fps | MPEG-2 |
| OGG | .ogg | 1080p | 40 Mbps | 60 fps | Theora, Vorbis |
| AVCHD | .mts, .m2ts | 1080p | 28 Mbps | 60 fps | MPEG-4, H.264 |
So far, we talked about the formats, let’s now work on choosing the right format for your project.
Choosing the right video file format depends on a variety of factors such as the intended audience, distribution platform, and playback device. Some formats are better suited for web-based streaming, while others are better for high-quality playback on local devices.
- If you are creating videos for social media or personal use, you may just stick to the universal MP4, with the default settings from your phone/other recording devices. For you, the file size will probably take priority over image quality.
- If you plan to upload your video to streaming services such as YouTube or Vimeo, you can use a common source format like MP4 or MOV – just make sure you record at a resolution one notch higher than you want it to be seen on these platforms, as they will transcode it using VP9 or other proprietary codecs for internal storage, so you need to ensure the highest source quality possible.
- If you are a filmmaker or videographer, you may want to use higher-quality formats such as ProRes or DNxHD. These formats are designed for professional video editing and can provide high-quality video with minimal loss of detail during editing.
- If you want to archive your videos for long-term storage, you may want to consider using a format such as FFV1. These formats are open, royalty-free standards and can provide the high quality your content deserves.
- If you’re building responsive, content-rich websites and apps, instead of choosing a specific format for your embeds, the best option would be to use ImageKit to automatically convert your videos to an optimal format and quality, based on the viewer’s device requirements and network bandwidth, and then serve it from global CDN caches. All with no extra work on your part.
How ImageKit Helps in Video Encoding
Getting the file size-to-image quality ratio right is a delicate balance; this is where ImageKit can help. With it, you get multiple video optimization features right out of the box.
These include automatic video format conversion, and quality optimization, which work together to significantly reduce the final size of the output video without compromising on image quality – all with zero infrastructure or additional dependencies on your part.
Let's dive in and see how these features can benefit your video encoding process.
Using ImageKit for automatic video format conversion
Getting started with automatic video format conversion with ImageKit is a cakewalk:
- Log in to ImageKit, and go to your Dashboard.
- Under the Video Settings tab, set "Use best format for video delivery" to on.
That’s all! Now, ImageKit will automatically deliver your videos in WebM or MP4 based on the viewer’s device, with no additional input required on your part.

Using ImageKit for video optimization
For automatic quality optimization, follow these steps:
- In your ImageKit dashboard, inside Videos, and under optimization, set "optimize video quality" control to on.
- By default, ImageKit sets the video quality to 50. This will give you a balanced, “good enough for all use cases” visual quality, but can be changed to whatever suits your use case.
- The default quality can be overridden from 1-100 as: https://ik.imagekit.io/demo/sample-video.mp4?tr=f-mp4,q-20

The higher the quality value you use, the better the perceived image quality and the higher the file size. As an estimate, using q-20 maps to a final video size of 397 KB can be set to other factors like q-90, which would get you a video file that’s ~7.6MB. A very high value here (90-100) will not improve your image quality beyond what you provide as the source, so the default q-50 is enough nine out of ten times.
Using ImageKit for video transformation
Using either an SDK, or a developer-friendly URL-based API, you can create on-the-fly transformations/manipulations of your video.

URL Based transformations
Let’s say you want to generate a variant of your original video that’s cropped to 300 by 300 pixels. These transformation parameters w-300,h-300 can be added in the URL as path params or as query parameters, and ImageKit will generate this variant for you dynamically, storing it in the media library.
As path parameter - https://ik.imagekit.io/demo/tr:w-300,h-300/sample-video.mp4
As query parameter - https://ik.imagekit.io/demo/sample-video.mp4?tr=w-200,h-200
On subsequent fetches, using the same transforms will fetch the already stored and cached video file instead of redoing it.
Few points to be noted :
- Transformations have a limit on the size of the input video, but this limit can be adjusted based on your pricing plan.
- Video transformation happens asynchronously. The video polling duration can be set as below.

Using ImageKit for Adaptive Bitrate Streaming (ABS)
Using ImageKit, you can easily implement Adaptive bitrate streaming (ABS) to dynamically adjust the quality of the video stream based on the viewer's internet speed, network quality, and device capabilities.
Normally, you’d need a manifest file and an adaptive playlist that can store and keep track of multiple versions of the video, in chunks, encoded at different bitrates and resolutions…but with ImageKit, all you’d have to do is use URL parameters to specify how many versions of the original video you want, and ImageKit will generate everything needed for you.
This example will request a manifest with 3 variants (at 480p, 720, and the source 1080p) of the source video to be generated:
For a HLS manifest:
https://ik.imagekit.io/demo/sample-video.mp4/ik-master.m3u8?tr=sr-480_720_1080
For a DASH manifest:
https://ik.imagekit.io/demo/sample-video.mp4/ik-master.mpd?tr=sr-480_720_1080
You can then embed this URL where needed in your website or app. You can learn more about ImageKit’s ABS capabilities here.
Conclusion
With modern-day improvements to video encoding techniques, users can effectively focus on building the experience they want without worrying too much about tradeoffs. However, choosing the right video codecs, encoding settings, and file formats for a given project is still critically important to balance visual quality, file size, and compatibility with different devices and platforms.
For those looking for the right platform to encode their videos, ImageKit offers a wide range of video encoding options with customizations for bitrate, resolution, and file formats. The platform also provides features like optimization, delivery, and security to ensure the best experience for end users.
To find the best results for their projects, users are encouraged to experiment with different video encoding settings while maintaining the true essence of the original content. With the help of platforms like ImageKit, achieving highly optimized videos has never been easier.
Want to get the full experience of ImageKit's video capabilities?
Sign up for the forever-free trial. Upgrade whenever you are ready.


