Let's begin with the bascis.
What is Video transcoding?
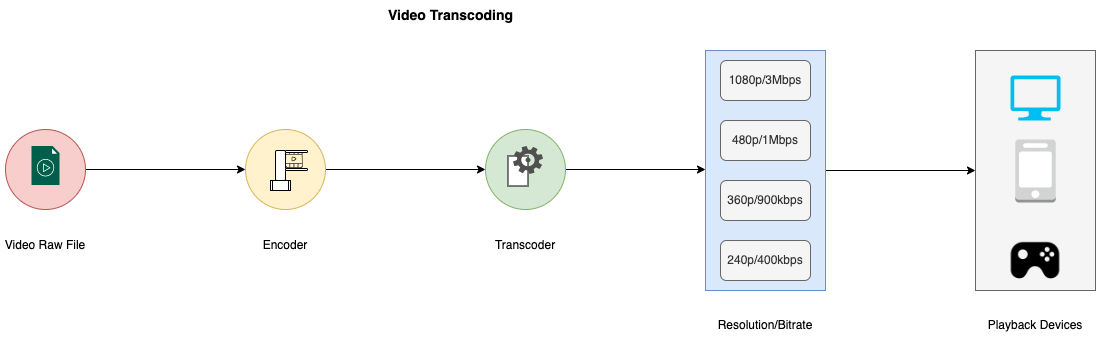
Video transcoding is the process of converting a video file from one format to another. It involves changing a video file's encoding format, resolution, bit rate, or other parameters to ensure compatibility with different devices, platforms, or internet connection speeds.
Transcoding is key in video production and distribution on any scale whatsoever, and in this blog post, we'll delve deep into video transcoding, providing you with comprehensive knowledge about its benefits, limitations, and best practices.
We'll cover the transcoding process, types of transcoding, use cases, and the tools and technologies available. By the end, you'll clearly understand the importance of transcoding for video production and streaming and be equipped to make informed decisions about optimizing your video content for different devices and platforms.
Let’s get started!
The Importance Of Video Transcoding In Today's Digital Landscape
In a world where digital content is consumed on an ever-expanding array of devices and platforms, video transcoding has become an essential tool to ensure seamless playback of video content. Here are some of the key reasons why video transcoding is so important:
Compatibility: Different devices and platforms have support for different resolutions, bitrates, codecs, and container formats. Transcoding enables seamless conversion into desired formats that are compatible with a wider range of devices and platforms.
Optimization: Transcoding allows videos to be optimized for different devices (desktops, smartphones, tablets, or smart TVs) which all have different definitions for ‘optimal’ settings. By transcoding videos into resolutions and bitrates that ensure the smoothest playback for each at the best possible image quality, you ensure a better viewing experience for users.
Streaming: Transcoding is business critical for OTT video streaming services like YouTube, Netflix, Amazon Prime Video, etc. These services have to support a wide range of devices, operating systems, browsers… and even different brackets of internet bandwidths! They use transcoding as a solution – optimizing their videos into multiple formats and resolutions to ensure smooth playback on a wide range of user platforms and bandwidths.
File size reduction: Transcoding videos can also reduce the file size of the video, making it easier and quicker to upload, share, or stream. This is especially important when dealing with large videos.
Accessibility: Closed captions and subtitles can be added during the transcoding process, enabling users with hearing impairments to understand the content of the video. Videos can also be transcoded with audio streams in different languages, to cater to non-native speakers.
Video transcoding is essential in today's digital landscape for compatibility, optimization, accessibility, and efficient streaming of video content across devices and platforms.
Overview the video transcoding process
“Transcoding” is an umbrella term – the actual processes involved vary from case to case. However, let’s look at an accepted standard for this process.
The Input Stage
The first stage in video transcoding typically involves analyzing the original video file to extract information such as the video and audio codecs, resolution, bitrate, and frame rate. This information is compared to those of the playback platform to be used, to determine the optimal settings for the transcoded output file, and determine if a conversion is necessary.
If it is, we move on to the transcoding pipeline.
The Transcoding Pipeline
A transcoding pipeline is a series of steps involved in transcoding a video file from one format to another or optimizing it for different devices and platforms.
Here are the steps involved:
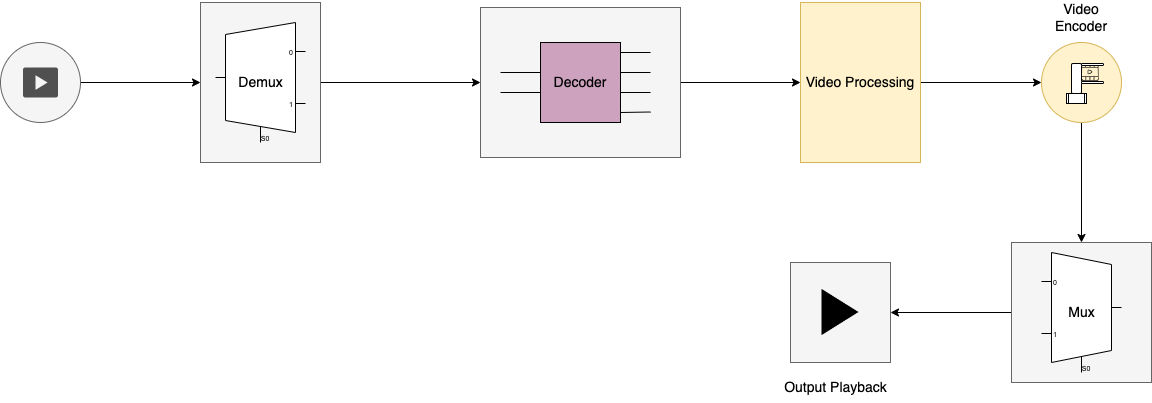
Step 1: Demuxing the input
Demuxing (De-Multiplexing) is the process of analyzing a source video file to identify its streams (video, audio, and subtitles) within it and separating them into separate components. Each component can be individually processed and optimized for the desired output format.
This separation is crucial, as different streams require different processing and optimization strategies to achieve the desired output quality. For example, the video stream may need to be resized or re-encoded at a different bitrate, while the audio stream may require a different sampling rate or compression format.
For our example, we’re only covering optimization of the isolated video stream.
Step 2: Decoding the video stream
Once isolated, the compressed video stream is first converted (decoded) into an uncompressed intermediate format, such as YUV or RGB, to ensure that the source quality is preserved.
Then, the video decoding process involves inverse quantization and inverse discrete cosine transform (DCT) to recover the original pixel values for each frame, and finally, motion compensation and deblocking to reconstruct and smooth out the frame.
Decoding can be performed in software or hardware, with hardware decoding being faster and more power-efficient, but less flexible than software decoding.
Step 3: Post-processing the uncompressed video
This is the optimization of the decoded (intermediate) video data obtained in the previous step. It involves color correction, scaling, noise reduction, or frame-rate conversion, to adapt the content to the target device or software.
Step 4: Re-encoding the uncompressed video
This is the conversion of the uncompressed + post-processed video frames into a new (once again) compressed video stream, using the codec that was deemed most suitable for the target device or software back in the Input Stage, before entering the Transcoding Pipeline.
Several factors, including the choice of codec, the encoding settings, and the complexity of the source video content influence the quality of this encoded video stream. By carefully selecting the right codec and encoding settings, the transcoding software can create a high-quality output video that is optimized for the target device or platform.
Step 5: Muxing the encoded video, audio, and subtitle streams into a new file
Muxing (multiplexing) is the final step in the video transcoding pipeline. It involves combining the different components of the multimedia file – the processed and re-encoded video, audio, and subtitle streams – into a single output file.
This process also adds any necessary metadata or other information, such as a container format or streaming protocol. This may also involve adding a file header/trailer, checksums, – basically, any other data that is required for compatibility with the target device or software.
How does transcoding differ from Transrating and Transsizing?
Transcoding, Transrating, and Transsizing are all techniques used in video processing, but they differ in their goals and the specific aspects of the video stream that they modify.
Transcoding is the most general term, referring to the modification of various aspects of the video stream to create a new, optimized output file; while Transrating and Transsizing are more specific techniques that focus on optimizing either the bit rate or the resolution, respectively, leaving everything else unchanged.
Summarizing this as a table should clear things up.
| Process | Goal | Method |
|---|---|---|
| Transcoding | Convert video from one format/codec to another to make it compatible with a particular device or platform, while also reducing the file size as much as possible. | Change format, codec, resolution, bitrate, etc. |
| Transrating | Reduce the size of the video stream to accommodate lower bandwidth connections while maintaining the quality of the video. | Change the bitrate of a video stream without changing the format or resolution of the video. |
| Transsizing | Optimize the video for different device/screen sizes while maintaining the quality of the video. | Changing the resolution of a video stream without changing the bitrate or format of the video. |
Types of Video Transcoding
Several types of video transcoding can be used. Let’s quickly compare these.
1. Lossless vs. Lossy Transcoding
Lossless transcoding preserves the original video quality but can result in larger file sizes, while Lossy transcoding sacrifices some quality to achieve smaller file sizes, but may not be suitable for use-cases that prioritize image quality.
| Factor | Lossless Transcoding | Lossy Transcoding |
|---|---|---|
| Quality | Maintains original quality, whether the conversion was lossless-to-lossless, or lossy-to-lossless. | Discards data that won’t be perceived by most human beings, sacrificing some quality for a “close enough” result. |
| File size | Typically results in larger file sizes. | Typically results in smaller file sizes. |
| Bitrate | Can maintain the same bitrate or increase it for better quality. | Reduces bitrate to reduce file size, so inherently sacrifices some quality. |
| Codecs Typically Used | FFV1, Lagarith, H.264 Lossless, OpenEXR | H.264, H.265, VP9, AV1 |
| Use case | Best for archiving, and preserving original quality. | Best for streaming and delivery, where smaller file sizes are more important than quality. |
The choice of using lossless transcoding simply depends on whether you need to convert to new formats without losing quality. If the answer is no, lossy transcoding is the way to go.
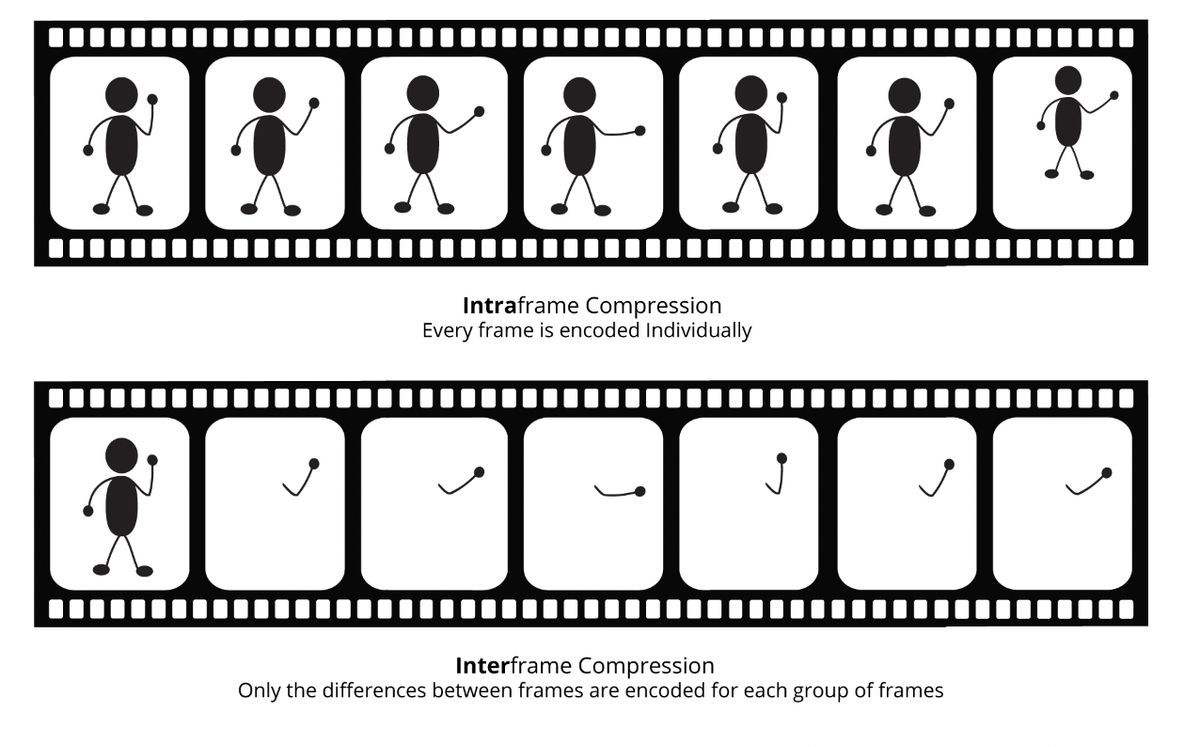
2. Interframe Vs. Intraframe transcoding
Inter-frame transcoding analyzes the differences between frames and only encodes the changes, resulting in smaller file sizes but higher processing demands, while intra-frame transcoding encodes every frame as a standalone image resulting in larger file sizes but lower processing demands.
| Factor | Interframe Transcoding | Intraframe Transcoding |
|---|---|---|
| Compression | Achieves higher compression by referencing neighboring frames, and then compensating for temporal differences. | Achieves less compression since each frame is encoded independently. |
| Quality | A greater risk of quality degradation, and artifacting. | Maintains quality, since each frame is encoded independently |
| Bitrate | Can achieve the same quality at lower bitrates thanks to temporal compensation. | Typically needs higher bitrates for the same quality, since each frame is encoded independently. |
| Decoding | Requires more processing power to decode. | Requires less processing power to decode. |
| Codecs Typically Used | H.264, MPEG-2, MPEG-4 | Apple ProRes |
| Use case | Best for streaming and delivery, where smaller file sizes are more important than quality. | Best for editing and post-production workflows, where preservation of quality is mission-critical. |
The choice between intraframe and interframe transcoding will depend on the specific use case, the video's motion, and the desired balance between quality and file size.
3. Format-specific transcoding (e.g., transcoding from H.264 to H.265)
Format-specific transcoding refers to the process of converting a video from one specific combination of codec and container (H.264 and mp4, for example) to another, a popular example being transcoding an H.264 stream to an H.265 stream. It is the classical use case for video transcoding, and is based entirely on the requirements of the target platform or device.
H.265, also known as High Efficiency Video Coding (HEVC), is a newer compression standard than H.264 and offers better compression efficiency, which means that it can achieve higher quality video at lower bitrates or smaller file sizes.
Transcoding from H.264 to H.265 involves decoding the H.264 video stream into uncompressed video frames and then re-encoding those frames into the H.265 format using an H.265 encoder. The process involves analyzing the original video stream to determine the best way to compress the video using H.265 encoding techniques, and then encoding the video with the chosen parameters.

Video Transcoding – Tools And Technologies
Video transcoding requires powerful and reliable tools, and there are several technologies available that can help. Whether open-source, cloud-based, or prosumer-grade tools, there's one for every need and skill level. Here are a few popular choices:
FFmpeg: FFmpeg is a free and open-source command-line tool for video transcoding, encoding, and streaming. It supports a wide range of video formats and codecs and can be used on various platforms, including Windows, Mac, and Linux.
Handbrake: Handbrake is a free, open-source video transcoder that is easy to use and available for Windows, Mac, and Linux. It supports a wide range of video formats, codecs, and readymade presets for various devices/use-cases, as well as several advanced features like batch processing, video filters, and chapter markers.
Adobe Media Encoder: Adobe Media Encoder is a professional-grade video transcoding tool that is part of Adobe's Creative Cloud suite. It supports batch processing and can be used to automate complex transcoding workflows. It also includes presets for specific devices and platforms, video filters, and the ability to add watermarks and captions to videos.
Open source transcoding libraries: These popular open source transcoding libraries provide developers with powerful tools for transcoding video content, as well as for editing, processing, and streaming multimedia content. They are constantly being updated and improved, and are widely used by developers around the world.
x265: x265, similarly, is another free and open-source video encoder library that is used for encoding HEVC/H.265 video streams instead. Implementing advanced H.265 compression techniques, it requires less bitrate than x264 to achieve the same image quality.
AOMedia Video Codec (AV1): AV1 is a free and open-source video codec developed by the Alliance for Open Media (a consortium, including Google, Amazon, Microsoft, Mozilla, and Netflix, among others.) The main goal of AV1 is to provide a royalty-free alternative to existing video codecs such as H.264 and H.265/HEVC, which require licensing fees to be paid to patent holders.
Firefox and Chrome have native support for AV1, and many popular video transcoding and editing software applications, such as HandBrake and OBS Studio, also support AV1 encoding and decoding.
libvpx: libvpx is a free and open-source video codec library that is written in C, first introduced by Google in 2010 (improved with VP9 in 2013), and designed to provide a free and open alternative to existing video codecs such as H.264. VP8/VP9 both provide efficient compression of video data while also maintaining high visual quality, making libvpx well-suited for use in a wide range of applications.
5. Cloud-based transcoding services: Cloud-based transcoding services are online platforms that provide video transcoding capabilities on the cloud, enabling users to easily transcode, store, and manage their video content. These services are highly scalable, cost-effective, flexible, and easy to use. Some examples of cloud-based transcoding services are:
Amazon Elastic Transcoder: Amazon Elastic Transcoder is a fully managed service that enables users to convert media files from their source format to versions that will play back on devices like smartphones, tablets, and PCs.
Azure Media Services: Azure Media Services is a cloud-based media processing platform that allows users to encode, package, protect, and stream video and audio at scale.
ImageKit: ImageKit is a cloud-based image and video optimization, transformation, and digital asset management platform that takes care of your entire content pipeline, from optimization to delivery.
A key feature of ImageKit is its automatic video optimization – which transcodes any uploaded source video on the fly to an optimal format and optimal bitrate for playback on a user’s device, with no work involved on your part beyond a simple Dashboard setting.
With ImageKit, you can also Transrate or Transsize videos (and images, too, making it a great fit for managing all of your static content!) in real-time, or add Adaptive Bitrate Streaming (ABR) to any stored video with a developer-friendly API, and finally, leverage Global CDN caches (AWS CloudFront, by default) to deliver this video content to your end-users with reduced latency and improved performance.
Best Practices For Video Transcoding
In the video industry, there are some battle-tested, recommended techniques and methods for transcoding video content. These practices are designed to ensure that video content providers can deliver high-quality video to their viewers with improved performance and a better user experience. Here are some of them:
Use Two-Pass Variable Bitrate (VBR) Encoding: Variable Bitrate (VBR) encoding is a technique that allows the bitrate of a video to vary dynamically based on the complexity of the video content from second to second, resulting in a higher quality video at a smaller file size. Two-pass VBR encoding involves analyzing the video in the first pass to determine the appropriate bitrate and then encoding the video in the second pass using the gathered information, for even better results.[1]
Know which bitrate to use, and when
Choosing the right bitrate and resolution for video encoding is crucial to ensure a balance between video quality and file size. Two important factors when choosing the appropriate bitrate and resolution are the type of content being encoded, and the target audience.High-motion content requires a higher bitrate and resolution to capture the details, while static scenes can use a lower bitrate and resolution without affecting the overall quality. The target audience's viewing habits should also be considered, with social media uploads and live streams requiring lower resolutions and bitrates to ensure smooth playback and little-to-no buffering. A bitrate between 1,500 and 4,000 Kbps is suitable for 720p video, while 8,000 and 14,000 Kbps is suitable for 4K video[1].
Know your target devices and platforms
When producing video content, research the technical specifications and recommended settings for the platforms and devices your video will be viewed on, taking into account factors such as supported video codecs, screen size, and available bandwidth. Are you going to be making VOD content for YouTube? Here are the recommended settings Google prescribes for it. Are you a Twitch streamer instead? You need to be on top of these guidelines, then.This information can be constantly changing, so it is important to stay up to date. Also, video hosting platforms may offer analytics data on video performance and playback quality that can help you optimize content for specific devices and platforms.
Use hardware acceleration for faster transcoding
Hardware acceleration involves using specialized hardware components such as GPUs and DSPs to speed up video transcoding, which can be computationally intensive.It provides a significant boost to encoding speed and efficiency by offloading certain tasks to these hardware components that can perform certain calculations more efficiently than the CPU, leading to improved performance across the board. However, hardware compatibility with software needs to be considered before use.
Use adaptive bitrate streaming: Adaptive bitrate streaming (ABR) adjusts the video quality in real-time to optimize the viewing experience based on the user's network conditions. This technique works by breaking the video into small segments, encoding each segment at multiple quality levels, and selecting the appropriate quality level for each segment based on the user's network conditions.
To use adaptive bitrate streaming, we need to encode our video into multiple versions at different bitrates, generate a manifest, an adaptive playlist, and use a video player that supports this feature.
If you’re using ImageKit, these steps are handled for you automatically. All you have to do is request ABR for a given video via URL parameters, specifying how many variants you want to be generated [1], and you’ll get back an embeddable URL that you include in your site/app.
6. Use a cloud transcoding service:
No matter your use-case, a cloud transcoding service like ImageKit can help you streamline your content pipeline by offloading the resource-intensive task of transcoding (including automatic format conversion), optimizing (dynamic transrating and transsizing), and delivering video, to a fully managed SaaS. Additionally, you get the benefits of requesting Adaptive Bitrate Streaming (ABR)[1] for any of your videos with one line of code, and any transform you can think of, in real-time[2].
This way, you save on investing in expensive dedicated hardware and software (and maintaining them), by leveraging the infrastructure and processing power of the cloud provider to transcode videos at scale, only paying for what you use. This gives you faster turnaround times on your content, and greater scalability.
Common use cases for video transcoding
Compressing large video files for easier storage and sharing
Video transcoding can help compress large video files to a smaller size without compromising the video quality, making it easier to store and share (a good rule of thumb is to lower the bitrate by no more than 20% of the original bitrate). This is especially useful when dealing with high-resolution video files (or HDR video) that can take up a significant amount of storage space. A good example of this is video archiving.
By transcoding old family videos, historical footage, or other important videos that were recorded in old video formats like VHS (a notoriously fragile physical media) with codecs like FFV1, we can compress this old, raw video footage, and convert it to a size and format that is more suitable for long-term storage. Here, transcoding ensures that video content remains accessible and playable even as technology and formats evolve over time.
Optimizing videos for streaming services (e.g., YouTube, Vimeo)
Transcoding the original video into multiple versions at different bitrates,
resolutions, and codecs ensures that viewers with different internet speeds and device capabilities can stream the video seamlessly without buffering or stuttering, resulting in a better viewing experience.Also, the transcoding process can add Metadata, (such as title, description, and tags) to increase visibility.
Transcoding videos for editing or post-production workflows
Transcoding videos for editing or post-production workflows involve converting raw footage from cameras or other sources (that can be huge – A 60-minute standard definition video is ~70 GB, while a two-hour-long 4k UHD movie would be ~3400 GB or 3.4 TB[1]) into a format that is more easily editable, without dropping frames trying to decode massive videos in real time, losing quality from the source, or losing compatibility with the workstation platform.
For example, the ProRes codec is a popular choice for video editing on Macs, while the DNxHD codec is often used for Windows-based systems. By transcoding the footage, editors and post-production teams can work more efficiently and effectively, reducing the amount of time and resources needed to complete projects and ensuring that the final product is of high quality.
Transferring videos over a network
You can use video transcoding on the fly to stream a movie (in 4K, encoded using HEVC/H.265, in the MKV format) from your Media Server, over the internet, to your friend’s Smart TV (on a connection that only has enough bandwidth to support 1080p videos, with the TV itself only supporting H.264 videos in the MP4 format) for a group movie night. This is a scenario that would not be possible without live transcoding.
Adding subtitles or captions to videos using video transcoding
Via transcoding, you could convert the original video into a container like MKV that supports native subtitles or captions and then add the subtitles or captions (SRT, VTT, or SSA formats) to the video.This ensures that viewers can watch the video with subtitles or captions, which is especially useful for accessibility purposes or for viewers who speak a different language.
Conclusion
Video transcoding is a vital technology transforming how we deliver and consume video content. By optimizing video content for different devices and networks, transcoding improves video delivery efficiency, enhances the viewer experience, and enables content creators and distributors alike to reach a wider audience.
Whether software or hardware-based, transcoding has also been vital for enhancing accessibility as video consumption continues to grow. Used right, it can add subtitles, captions, and other accessibility features, expanding the video’s reach to a wider range of viewers.
So, it’s fair to say that the future outlook for video transcoding is promising, with it playing an increasingly important role in delivering high-quality video content to a wider audience while also enhancing the viewer experience across the board.
Looking for an easy-to-use video transcoding tool for scaling your video streaming?
Look no further than ImageKit. Sign up for our forever free trial to know what it can do for your video streaming.


