


Sight, Sound, and Text.
These are the three pillars of creating an immersive experience that’s memorable yet easy to understand.
Unsurprisingly, video has become the preferred method of consuming digital content as online content consumption habits continue to veer away from the text.
If you want numbers, videos must be part of your content strategy. However, using them properly for content is not as intuitive as you may think without some additional help.
Let’s discuss this ‘additional help’ – video storage APIs – including what they are, why you’ll need them, how they work, and how to implement one for your own video storage needs.
Uploading Your Video Is Only Half The Story…
Let’s say you own and operate an online designer clothing store. If you wanted to add a showcase video for a new sweater, you might think this is how you do it:
- Upload it to the cloud (e.g., Amazon AWS S3)
- Use the HTML5 <video> tag to link to it in the relevant section of your webpage like so:
<video controls src="path/to/product-sweater-demo.mp4"></video>
If you try this out, you’ll find that it works. Great! You’re done, right? Well, sadly, no. Here are some problems with the above example that you might not have considered:
- Cloud storages let you upload and link to anything. So, your video could be in a completely proprietary format that has zero compatibility with all but your own browser and device, meaning, while the above HTML is completely valid code and you can definitely link to the video, nobody else could watch it. It defeats the purpose of having the video.
- Cloud storage only store binary files. They cannot optimize or compress video in any way. If you’ve uploaded a 4K video that is a 200 MB MP4 file, that’s just how it’ll be served and downloaded in full before being displayed, regardless of whether your customers’ network/device can handle it.
Naturally, you’ll be plagued with complaints about your non-functional website, slow download speeds, and stuttery playback, leading to lost customers.
Simply storing files in the cloud and linking to them isn’t going to cut it. This is where video storage APIs come in.
What is a Video Storage API?
A video storage API (Application Programming Interface) is a set of protocols, routines, and tools directly addressing the above issues. It provides the ability to store, manage and retrieve video content from a video content platform. Developers can use the API to perform myriad functions like uploading and retrieving video files and organizing and categorizing video content based on purpose.
Further, the API acts as a way to interact with other software systems, like CMS, video players, analytic platforms, etc., to automate tasks without directly accessing the underlying storage infrastructure.
Here's the TL;DR:
- They take a video file,
- Transcode it into formats all browsers and devices can play, and
- Optimize and store it online for easy global access, regardless of the kind of network users are on.
- Optionally, they can add real-time transforms – aspect ratio correction, watermarks, subtitles/closed captions, etc.
These APIs are just what you need if the video is part of your content strategy. They abstract away the complex process of implementing modern online video correctly (transcoding, optimization, hosting, delivery, and monitoring) into a single endpoint in the cloud.
All you do is send your video to these endpoints using standard HTTP POST and GET back a link that you can then include in your HTML, just like the original example – only this time, you can ensure highly available, highly optimized playback to every single one of your customers.
Benefits of using a Video Storage API
Video storage APIs provide a way for developers to easily integrate video functionalities into their products without the need to build and maintain their server infrastructure for encoding, hosting, and delivering videos.
By leveraging APIs, developers can cut out months of initial development time and focus on creating unique features for their products.
Some of the key benefits of using video storage APIs include:
- Unlimited scalability
- Expansive CDN network
- Improved security
- Flexibility and reduced video delivery costs
- Added functionality
👉Unlimited scalability
Serving a handful of video files might be doable by hacking together your own NodeJS script, combined with AWS S3 for storage, and your own transcoded videos…but what happens when you grow as a company and need to do this for dozens to hundreds of videos?
This approach will never scale, and you’ll hamstring your business just as it’s starting to get off the ground.
A video storage API can handle unlimited videos and users, ensuring you never have bandwidth bottlenecks. You also add elasticity and fault tolerance this way – meaning you can scale up or down as needed, allowing your application or website to handle sudden spikes in traffic without interruption.
👉Expansive CDN network
To serve your videos as quickly as possible, you need them stored close to your users.
However, there aren’t nearly enough servers worldwide to buy runtime to make this a reality. Even if you could, this is another approach that doesn’t scale.
This is why video storage APIs use a Content Delivery Network (CDN) to distribute videos to users. CDNs store parts of your video in chunks rather than the whole thing, serving them on demand. Also, they have servers worldwide, allowing users to access the videos quickly and with minimal latency.
👉Improved security
A video storage API can provide a high level of security for your videos, ensuring that only authorized users can access them by baking in measures such as encryption, authentication, and access control – in addition to assured compliance with data protection requirements, such as the GDPR for EU countries.
👉Flexibility and reduced video delivery costs
With a video storage API, developers can easily integrate video storage and management functionality into their applications without having to build it from scratch or hard-coding functionality in their application code. This allows for more flexibility and control over the video storage process, enabling developers to create custom solutions tailored to their applications' specific needs.
With flexibility comes the added benefit of reducing the costs associated with delivering videos to users by offloading the storage and distribution of videos to a third-party service.
👉Added functionality
A video storage API may offer a wide range of functionality, such as support for various video formats, creating thumbnails, and adding watermarks, captions, and subtitles, which improve the user experience – especially accessibility – of the application or website.
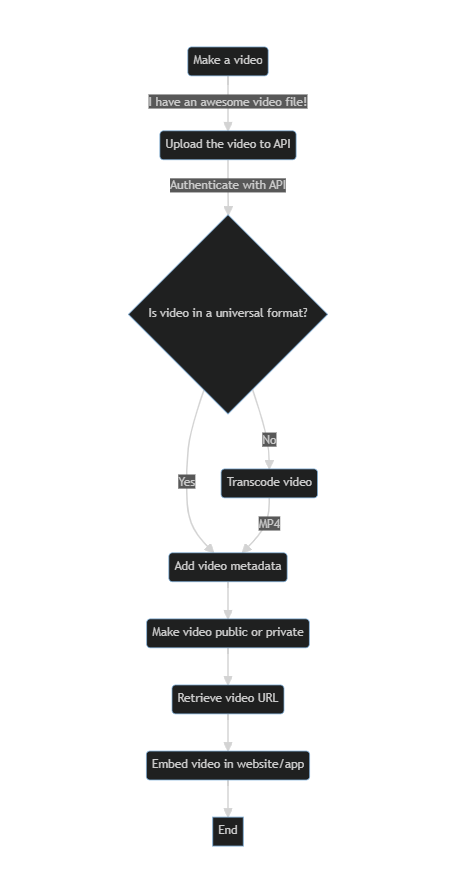
The workflow of using a video storage API typically involves the following steps:
- Authenticate: The first step is to authenticate the user or application making the request. This is usually just an API key.
- Upload: Once authenticated, the user can upload a video file to the API. The video file is typically sent as a multipart/form-data request but can also be in BASE64 encoded strings.
- Store: The API stores the video file in cloud storage service(s) for which the user has provided credentials – such as Amazon S3, Google Cloud Storage, or Azure Blob Storage.
- Transcode: Now that the provider has the video file stored, it can transcode it (if necessary) into multiple formats so the appropriate format can be served to the relevant device. For example, the API could automatically transcode a source MOV file into MP4 (desktop), OGV, and WEBM (mobile devices) formats.
- Retrieve: The user can retrieve the video file by making a GET request to the API. The API retrieves the video file from the storage service and returns it to the user, ready for embedding.
But there’s no better way to learn something than doing it yourself, right? So let’s see how we can put such an implementation to work for us, using ImageKit – a real-time image and video storage, optimization, delivery, and digital asset management solution – as our video storage API.
A. Uploading a file in local storage to ImageKit.
Step 0: Setup
- Sign up for ImageKit and get your API Keys (public and private) from the Dashboard here.
- Then, ensure you have Node.js and NPM installed on your machine, and install ImageKit’s Node.js SDK via npm.
npm install imagekit --save
Step 1: On to the coding!
const ImageKit = require('imagekit');
const fs = require('fs');

const imageKit = new ImageKit({
  publicKey: "your_public_key",
  privateKey: "your_private_key",
  urlEndpoint: "https://ik.imagekit.io/your_imagekit_id/"
});

const filePath = 'path/to/your/video.mp4';

fs.readFile(filePath, (err, data) => {
  if(err) {
    console.error(`Error reading file ${filePath}:`, err);
    return;
  }

  const fileName = filePath.split('/').pop();
  const tags = ["tag1", "tag2"]; // add your own, as required

  imagekit.upload({ file: data, fileName, tags }, (error, result) => {
    if(error) {
      console.error("Error uploadaing file:", error);
    } else {
      console.log("File uploaded successfully:", result);
    }
  });
});
We’re using a JSON-encoded response body to send a POST request to ImageKit’s file upload endpoint at https://upload.imagekit.io/api/v1/files/upload and using our API key for authentication
If all goes well, you'll get an HTTP 200 OK response, and the response body will contain your video’s publicly accessible URL as the url property. You simply take this, embed it in your site or app, and you’re good to go!
But what if you already have cloud storage set up (Amazon S3, for example) and want to use it as primary storage for your videos, with ImageKit only acting as your optimization, transformation, and delivery pipeline? In that case, here’s how the Imagekit integration would work.
B. Getting it to work with AWS S3 Storage
Step 0: Setup
This phase is the same as above, but also make sure you have Amazon’s AWS SDK installed, the proper read and write permissions for the specified S3 bucket ready in the AWS Dashboard, and your AWS credentials ready.
npm install aws-sdk --save
Step 1: Uploading your video to AWS S3
const AWS = require('aws-sdk');
const fs = require('fs');

const s3 = new AWS.s3({
  accessKeyId: 'YOUR_ACCESS_KEY',
  secretAccessKey: 'YOUR_SECRET_KEY',
});

const file = 'path/to/your/video.mp4';
const bucketName = 'your-bucket-name';
const key = 'video.mp4'; // this is your filename

const params = {
  Bucket: bucketName,
  Key: key,
  Body: fs.readFileSync(file)
};

s3.upload(params, (err, data) => {
  if(err) {
    reject (err)
  }
  resolve(data.Location)
});
The value returned by this promise (data.Location) is the S3 URI you’ll use in the next step. However, this isn’t a tutorial on working with S3, so check out their docs (file upload API ref here).
Step 2: Uploading it to ImageKit via the S3 URL
const ImageKit =  require("imagekit");

const imageKit = new ImageKit({
  publicKey: "your_public_api_key",
  privateKey: "your_private_api_key",
  urlEndpoint: "https://ik.imagekit.io/your_imagekit_id/",
});

const file = "https://S3_URI_FOR_YOUR_FILE_HERE.mp4";
const fileName  = "YOUR_FILE_NAME.mp4";

imageKit.upload({ file, fileName } , (error, result) => {
  if(error) {
	console.error("Error: ", error);
  } else {
	console.log("Success! ",  result);
  }
});
Once again, the resulting body will contain your video’s publicly accessible URL as the url property, and you can freely embed this as you need in your frontend.
C. Delivering Videos with the ImageKit API
Once you have the ImageKit hosted URL for a video asset, you can deliver a video to a user by simply linking to the video's URL. For example, the following HTML code will play a video on a webpage:
<video width="320" height="240" controls>
  <source src="https://ik.imagekit.io/your_imagekit_id/path/to/video.mp4" type="video/mp4">
  Your browser does not support the video tag.
</video>
When a user accesses the video's URL, ImageKit will automatically optimize the video for delivery to the user's device and network conditions. This includes features like Adaptive Bitrate Streaming (ABS) which automatically adapts the video quality based on the viewer's network conditions. This ensures that the viewer can watch the video without buffering or interruption.
You can also generate video thumbnails by appending ?tr=h-150,w-150 to the video URL.
You can also use the video API to transform the video on the fly. The video API provides a URL-based API for manipulating videos on the fly by passing query parameters to the URL.
Putting all of this together, you can use the following URL to resize and convert a video to WEBM on the fly:
https://ik.imagekit.io/your_imagekit_id/path/to/video.mp4?tr=h-150,w-150,fo-webm
And there you go! From a video on your filesystem to having an optimized, transformable-on-demand, edge-cached version of it in the cloud in seconds, thanks to ImageKit.
Best Practices for Working With Video Storage APIs
Ensure you follow these best practices if video delivery and management are at the core of your business.
✅Ensure your source video is at the highest resolution and quality you can create.
Starting with high-quality sources at little or no compression will ensure the best results for the final video. If you’re using ImageKit, it can do the needed optimization for you during video delivery in real time.
✅Use a cloud-based storage service such as Amazon S3, Google Cloud Storage, or Microsoft Azure
These are ideal if your use case involves multiple long videos (>30 seconds). These storage servers are reliable, battle-tested services designed to handle large amounts of data and can easily scale to accommodate growing storage needs. Plus, you get data replication and backups to ensure durability and availability.
✅Make sure your users always get the best version for their device, no matter your source.
Certain file formats play best on certain devices. Again, ImageKit’s automatic format conversion (Just add a tr=f-auto parameter to the end of your video’s public URL, like https://ik.imagekit.io/demo/sample-video.mp4?tr=f-auto) can ensure you’re always playing the video in the right format compatible with users' devices.
✅Use modern methods of video compression
This is to reduce the final file size of the video your users are served without any perceptible loss in quality. Use lossy compression to ensure the best quality at the smallest file sizes. Once again, ImageKit can do this for you automatically if you specify a quality factor (the URL parameter q) while requesting the public URL, like so: https://ik.imagekit.io/demo/sample-video.mp4?tr=f-auto,q-90, where the higher the number, the higher the perceptual quality at the expense of larger file sizes.
✅Persist on the public URL and re-use it
No matter which Video storage API you’re using, its API response should give you a public URL for the videos you upload. Make sure you persist this URL and re-use it across your app wherever needed instead of making HTTP GET calls to your API for the URL every single time. This will boost your website/app’s performance across the board.
✅Lazy load videos in your UI
Use a gleam, skeleton, or placeholder content before the image or video player loads. This good UI/UX design gives you some breathing room to have your videos load in.
✅Use Adaptive Bitrate Streaming (ABS) for videos
This way, you can adjust the quality of the video playing on-the-fly based on the user’s network quality and bandwidth available. To implement ABS, you’ll need a manifest file and an adaptive playlist… but ImageKit can take care of all that for you. All you have to do is use URL parameters to specify how many versions of the original video you want, like so:
For HLS protocol:
https://ik.imagekit.io/demo/sample-video.mp4/ik-master.m3u8?tr=sr-240_360_480_720_1080
For DASH protocol:
https://ik.imagekit.io/demo/sample-video.mp4/ik-master.mpd?tr=sr-240_360_480_720_1080
it’ll generate everything for you; all you’d have to do is embed this where you want it.
Now that you know the What, How, and Why of Video Storage APIs, let’s take a closer look at the service we used so easily to implement ImageKit.
ImageKit: A Content-first, Developer-friendly Video API
ImageKit’s video storage API makes it easier for to store video withing getting bogged down in low-level code to store, optimize, and transform your videos in real-time, at scale.
It will enable you to deliver superior experiences across your website and mobile app where users could be consuming video content. .
Technical and non-technical content creators alike can build highly scalable and highly available streaming video software (website, mobile app, whatever your use-case may be) with ImageKit – all they have to do is simply POST a video to the ImageKit API, and GET back an embeddable, public link to a video – with auto thumbnail generation, and all the metadata for their use-case.
Continuing with our eCommerce example, let’s see how ImageKit could help you.
When a customer is considering purchasing a product, they often want to see a demonstration of how it works or looks in use. Using a product demo video can give your customers a more engaging and informative experience to bump conversions and sales.
ImageKit’s goal is to eliminate the complexity of modern online video so you can worry less about…
🎯Manually handling asynchronous ingest (transcoding, thumbnailing, packaging, inspection) for product demonstration videos on your PDPs.
🎯Implementing Adaptive Bitrate Streaming (ABS) automatically adapts the video quality based on the viewer's network conditions. This ensures the viewer can watch the product video without buffering or interruption.
🎯Configuring ABS-compatible playlists (HLS and DASH) to contain video chunks (TS and fragmented MP4) at different bitrates, resolutions, and qualities, so the client-side player can auto-switch to the best-quality versions that the viewer’s network and the device can handle.
🎯Streaming ingest endpoints (RTMP) if your content strategy involves live streams such as paid influencer product reveal, announcements, unboxings, etc.
🎯Various options to optimize video delivery, such as automatic video transcoding, adaptive streaming, and lazy loading, or configuring distributed edge caches for stutter-free playback for your users (ImageKit does all of that – and comes integrated with AWS CloudFront out of the box)
And a dozen other things: text tracks (captions and subtitles), real-time transformations, instantly generating video thumbnails, and more.
…and instead, build more engaging and informative experiences enriched with video content that can serve your business needs.
| Container | Video Codecs | Audio Codecs |
|---|---|---|
| .mp4 | h264, mpeg4, hevc, av1 | aac, opus |
| .mov | mpeg4, h264 | aac |
| .webm | vp8, vp9, av1 | opus. |
| mpeg | mpeg1video, mpeg2video | mp2 |
| .3gp | h263 | aac |
| .ogg | theora | vorbis |
| .ogv | theora | vorbis |
| .hevc | hevc | - |
| .mts | mpeg2video | - |
In Summary…
Video marketing offers promising results. But executing it is hard.
Instead of spending weeks building complex infrastructure and backends before you even see any of your videos up and running, use ImageKit’s cloud-based video storage API instead.
With its developer-friendly API, global CDN network, real-time video optimization, Adaptive Bitrate Streaming, and URL-based delivery, ImageKit easily handles large volumes of video data and optimizes video file sizes. It can also easily integrate with popular web and mobile frameworks, including Vue, React/React Native, Next.js, and PHP.
It will instantly cut your time-to-market from months to days – improving your end-to-end developer experience of uploading and storing video, ensuring high video quality and delivery optimization across multiple CDNs – whether your user base is on desktops, laptops, or mobile devices.
Sign up for a forever-free plan to start using ImageKit as your video storage API. It offers 20 GB of media storage and 20GB of bandwidth every month, with unlimited requests and transforms.
Experience effortless video storage management with ImageKit.
Sign up now for our forever free trial. No credit card required. No hidden terms.