What is named transformation in ImageKit.io?
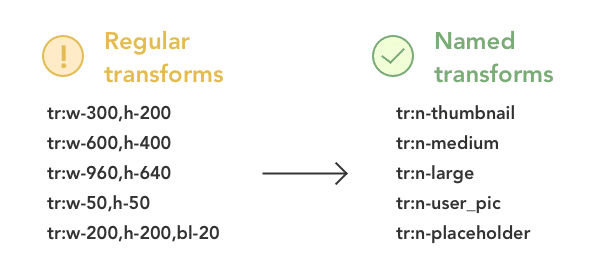
Named Transformations within ImageKit.io are aliases or names you can give for a complex URL transformation string. For example, if you are resizing an image to 300x200px and adding a blur to the image.
Original URL:https://ik.imagekit.io/demo/img/tr:w-300,h-200,bl-10/default-image.jpg.
URL with Named Transformation:https://ik.imagekit.io/demo/img/tr:n-blurred_thumbnail/default-image.jpg
Here, we replace the transformation string tr:w-300,h-200,bl-10 with an easy-to-remember alias - blurred_thumbnail.
How To Simplify Code Using Named Transformation
Let’s say you have a website with three column layout like this:

ImageKit.io provides tons of resizing and cropping image transformations using URL parameters. This means that you can use ImageKit.io width and height resizing on the master image and can get the desired image size.
Let's say we need a 400x300 image for our three-column layout for desktop.
The image URL will be https://ik.imagekit.io/demo/img/tr:w-400,h-300/image1.jpeg
Now tr=w-400,h-300 is simple enough string that you can directly use in your theme files. However, as this layout changes in the future, there is a good chance that this transformation string will change and become less readable.
Suppose one of the members of your UI development team wants to use the automatic smart cropping feature provided by ImageKit.io. So they will need to add the fo-auto parameter.
Now let’s say you want to get an exact dimension image and want ImageKit.io to automatically add padding around the image if necessary using cm-pad_resize crop parameter.
So the transformation string becomes tr:w-400,h-300,fo-auto,cm-pad_resize. Now let’s support different DPR values provided by ImageKit.io. This will require adding dpr-value.
So now the transformation string becomes:
tr:w-400,h-300,fo-auto,cm-pad_resize,dpr-2tr:w-400,h-300,fo-auto,cm-pad_resize,dpr-3
Given the different types of layouts on your page and the complexity of your website, you can imagine that the codebase will quickly become scattered with these ImageKit.io resizing parameters. And as different team members work on a piece of code, they will keep introducing new parameters. This is not good for maintaining good code quality.
We can simplify this problem using named transformations.
Creating Named Transformations
Navigate to the Named Transforms section within Image Settings on your dashboard. Click on 'Add New'.
Within the popup, give a name for the transformation string. For example, the name could be listing_page_thumbnail , and the transformation string could be tr:w-400,h-300,fo-auto,cm-pad_resize,dpr-3.
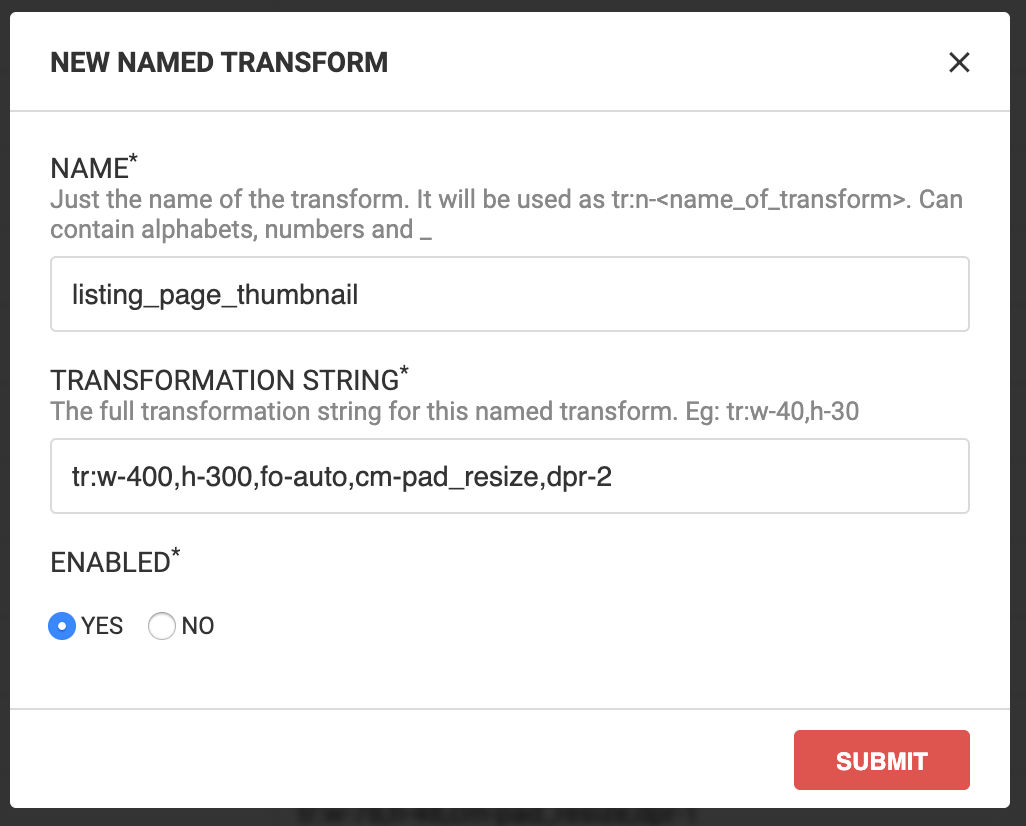
Always test your transformation before saving it as a named transformation. You can test by clicking on the message that appears at the bottom of the popup.
Save the transformation. You can now replace the string tr:w-400,h-300,fo-auto,cm-pad_resize,dpr-3 with tr:n-listing_page_thumbnail to use named transformations within your URL.
Editing Named Transformations
Navigate to the Named Transforms section within Image Settings on your dashboard.
Click on ... next to the named transformation you want to edit. A popup window appears.
Edit the named transformation name or value, and enable/disable the named transformation from the popup.
Click "Submit". The changes apply to every new image URL request. For older images, please clear the cache or contact support through your dashboard, or email us at support@imagekit.io
Benefits Of Using Named Transformations
Easy to read and remember
There are usually 4-5 different image sizes and variations on a website. In some cases, we have even seen 8+ variations of the same image on the same website. In such a scenario, it isn't very easy to remember each transform parameter.
As you saw in the above example, named transforms make it simple. Configure them once and get easy-to-remember names for all your transforms.

You can create multiple image transformations in the ImageKit.io dashboard like this:
| Named transformation | Actual transformation |
|---|---|
| tr:n-2x_announcements | tr:w-18,h-18,cm-pad_resize,dpr-2 |
| tr:n-xxxhdpi_announcements | tr:w-18,h-18,cm-pad_resize,dpr-4 |
| tr:n-xhdpi_announcements | tr:w-18,h-18,cm-pad_resize,dpr-2 |
| tr:n-mdpi_announcements | tr:w-18,h-18,cm-pad_resize,dpr-1 |
Developer Productivity, Communication, and Consistency
Because named transforms are easy to remember and communicate, they also improve the productivity of your development/technology team and the consistency in the codebase.
Instead of remembering the exact transformation parameters, your developers would know that they have to use thumbnail transformation on product search pages. This results in better communication in the team and consistency while writing the code as all the developers would always use the same name to achieve the same transformation.
Security
You have an option to restrict the direct use of ImageKit.io transformation parameters in the URL. This will prevent any third parties which are trying to use images from your website and changing the image transformation as per their requirement
![]()
From the ImageKit.io dashboard under image settings, you can prevent any other unnamed transform from being applied to the image.
![]()
Note: You can use URL signatures to counter this problem and get fool-proof non-modifiable URLs. But implementing signatures may require significant development effort for your team.
Cache Purging While Using Named Transformations
Let’s say you edit a named transformation from the dashboard. Now, ImageKit.io doesn’t automatically purge all the images using that named transformation for performance reasons. In that case, please raise a support request either from the dashboard or by writing to us at support@imagekit.io
Conclusion
So essentially, named transformations help you write more readable and maintainable code. At the same time, by restricting the usage of unnamed transformation, you can make sure that any third party doesn't misuse your image URLs. The only point to keep in mind while using named transformation is always to purge the cache when you edit a named transformation from the dashboard.


