Named Transformations in ImageKit allow you to create easy to remember aliases or names for your complex URL-based transformations.
For example, let’s say you want to resize an image to size 300x200 and then make it slightly blurred in ImageKit.

To achieve this, you would use the height, width and blur transforms in the URL like this -
Original image URL with transformation
https://ik.imagekit.io/demo/img/tr:w-300,h-200,bl-10/default-image.jpg
With named transforms, we would be able to write the same URL as
https://ik.imagekit.io/demo/img/tr:n-blur_thumbnail/default-image.jpg
Cleaner, easier to remember and more secure. Let’s discuss these advantages in detail and see how you can get started with using named transforms for your image URLs.
Advantages of using Named Transformations
1. Easy to read and remember
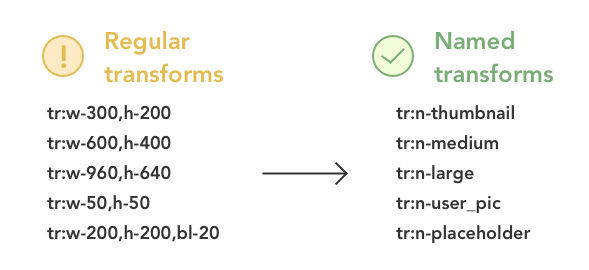
Easy to use Named Transforms
Images are usually displayed in 4-5 different sizes and variations on a website. In some cases, we have even seen 8+ variations of the same image on the same website. In such a scenario, it is very difficult to remember each transform parameter.
Was the height 656px or 665px? What was the crop mode we need to use? Does I need to blur the product thumbnail image on the search page? You would often have such doubts when trying to create a new URL.
Named transforms make it really simple. Configure them once and get easy to remember names for all your transforms. So w-300,h-200 can be aliased as thumbnail, w-300,h-200,cm-pad_resize,bl-5 can be aliased as blurred_padded_thumbnail and so on. And you can use these names in the URL making it really easy to apply the same transform on any image.
2. Developer Productivity, Communication and Consistency
Because named transforms are easy to remember and communicate, they also improve the productivity of your development / technology team and the consistency in the codebase.
Instead of remembering the exact transformation parameters, your developers would know that they have to use thumbnail transformation on product search pages. This results in better communication in the team and consistency while writing the code as all the developers would always use the same name to achieve the same transformation.
3. Security
Named Transformations Security
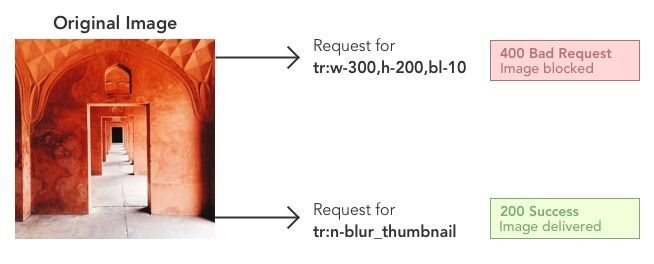
ImageKit provides a unique security feature that makes named transforms really powerful and secure your images against any unwarranted usage by third parties. This feature is available in your ImageKit dashboard.
You can use URL-based parameters like height and width to get a new transform of an image. This makes it very easy for third parties to pick images from your website and change the image transformation as per their requirement. You can use URL signatures to counter this problem and get full-proof non-modifiable URLs (we will talk about it in our next post). But, implementing signatures may require significant development effort for your team.
However, a simpler way to achieve basic security from unwarranted use is to map all the transforms that you are going to use on your website to a named transform. Then, in your ImageKit settings, you can prevent any other unnamed transform from being applied to the image.
For example, if you have a named transform thumbnail in your ImageKit account and have disabled unnamed transforms, no third party would be able to use a height or width or any other transform on this image. They would be shown an error if they try to do so. This ensures that your images can only be fetched in sizes or transforms that you create or allow and nothing else.
How to get started with Named Transforms in ImageKit?
Let’s see how you can create new named transforms or edit them in ImageKit and then secure those URLs from your dashboard.
Creating new named transformations
- Go to your ImageKit dashboard.
- Go to Image Settings > Named Transforms and click on “Add New”
- In the form that pops up, give any name that you want for your named transformation. Then specify the actual transformation string in the next field. For example, name could be
thumbnailand transformation string could betr:w-300,h-200. - You can also test a new named transform before submitting it. In the popup, if the data entered by you is valid, you would get a link to test a default image with the new transformation that you are trying to create. We recommend that you test the transformation before saving it.
- Click on “Submit”. Your named transformation is ready to use in your URL. For the above example, you will need to replace
tr:w-300,h-200in your URL withtr:n-thumbnail.
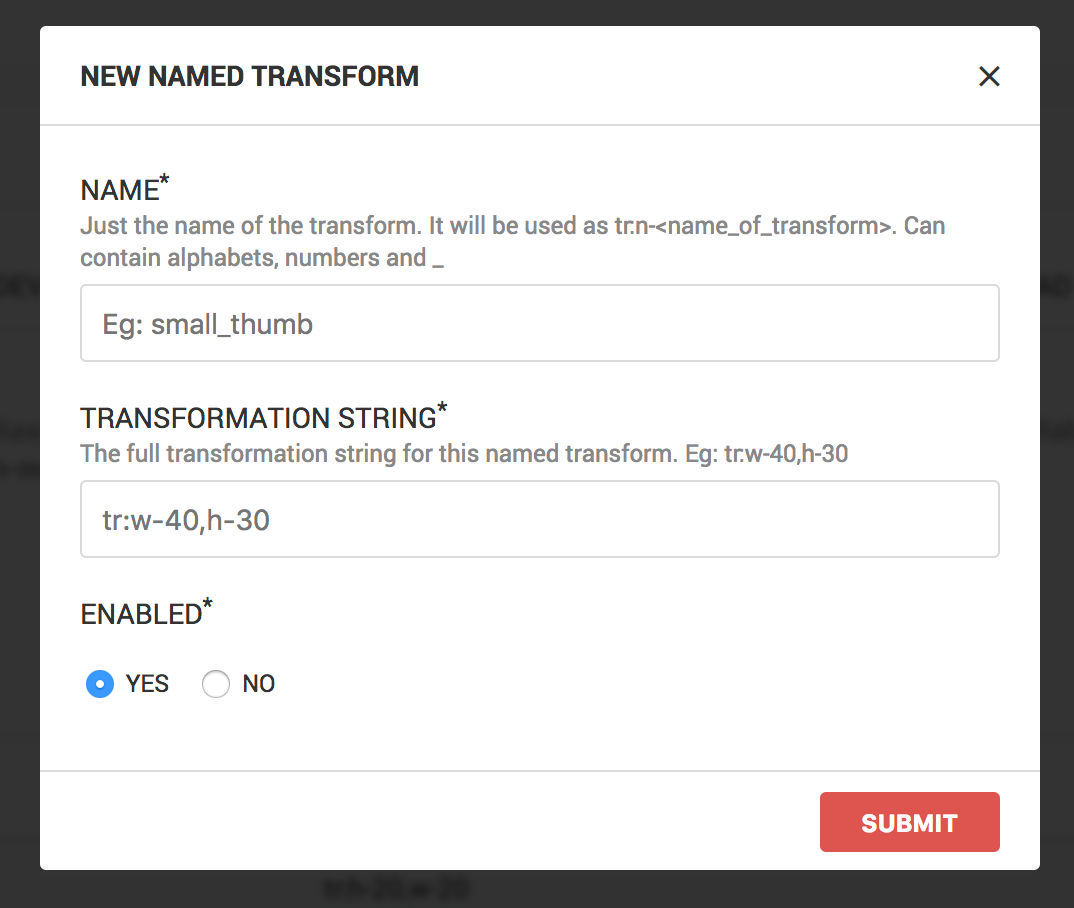
Creating a new named transformation
Editing Named Transformations
- Go to Image Settings > Named Transforms.
- When you hover on any existing named transform, you would get a link to edit it.
- Clicking on the link would open up a popup where you can edit the named transform or enable or disable it.
- Once you are done making the changes, click on "Submit". Your changes will apply immediately for any new images that are fetched. For older images, you would need to clear the cache from your dashboard or contact support for the same.
Securing your named transform URLs
- Before doing this step, ensure that you are not using any unnamed transformations on your website or app. After you complete this step, those images would not worked (unless they are cached on the CDN and are yet to be cleared from there).
- Go to Image Settings > Security in your ImageKit dashboard.
- Enable the setting “Restrict Unnamed Image Transformations” and click on “Save”
- That’s it. Now, no one would be able to access random transformations of your images. You have the control of selectively allowing named transforms
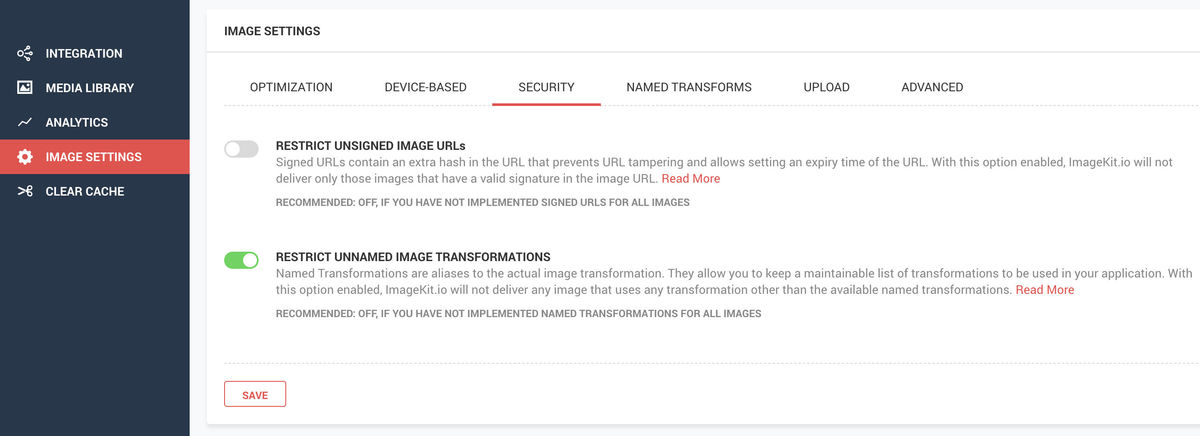
Named Transform Security Setting
Named Transforms are a really useful feature that would help you easily remember transformations, keep your code clean and manageable and achieve some basic security from unwarranted use of your images. All this in minutes!
Get started now in your dashboard!


