Image overlay is the technique of adding text or images over another base image. One of the simplest ways to add image or text overlay is using CSS properties and pseudo-elements.
In short, CSS overlay effects are achieved by using the following:
background-imageandbackgroundCSS properties to add image and linear-gradient overlay effect.position:absolute,top,bottom,right,leftCSS properties to control the position of overlay image or text.::afterand::beforeCSS pseudo-elements along withcontentCSS property to control the content in case of text overlay.
Here is an excellent example of overlay effect from the Airbnb website.
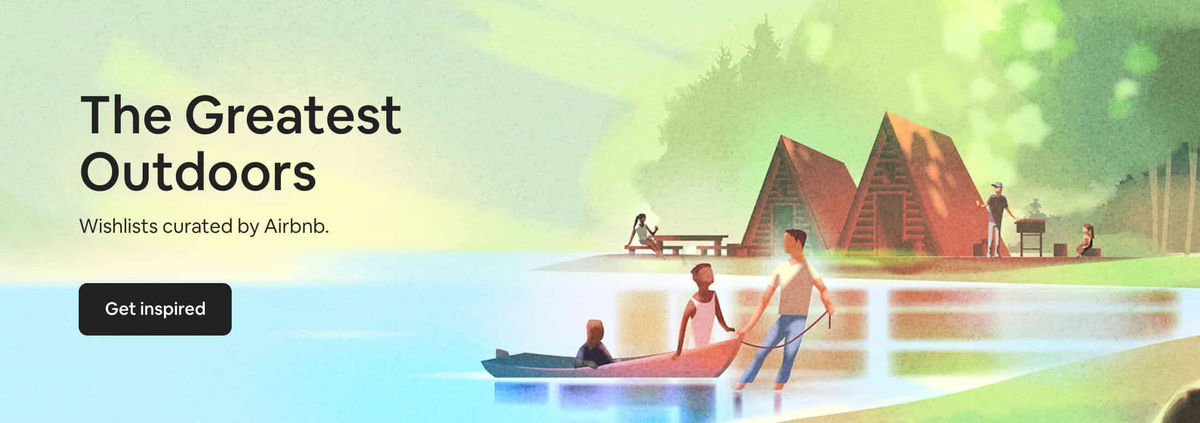
In the above example, two text snippets (The Greatest Outdoors and Wishlist curated by Airbnb) and one CTA (Get inspired) were added on top of a base image.
In this post, we will learn how to create similar image overlay effects.
There are two types of overlay:
- Image overlay - Adding image over an image, e.g., watermarked images where you see a logo on top of an image.
- Text overlay - Adding text over an image, e.g., hero images, marketing banners like above Airbnb example.
More specifically, we will talk about two techniques to create image overlay:
Text and image overlay using CSS
We will cover examples and code of how to add text overlay and image overlay using CSS. You can use these techniques on your website by copy-pasting code snippets provided in this post.
? This method is easy to understand and use.
? If the user downloads the image, they won't see the overlay effects.
? You will have to write separate code for desktop, mobile, iOS, and Android applications.
Quick links:
→ Text overlay examples
→ Image overlay examples(Recommended) Text overlay, image overlay, and visual effects using ImageKit.io
Here we will talk about how to simplify text and image overlay generation. We will create visual effects just by changing URL parameters, i.e.,
srcof image.This will allow you to use the same image across desktop, mobile, iOS, and Android applications. You won't have to write extra markup or code to achieve overlay effects in different platforms.
? Pre-generated images are rendered quickly on the client side.
? The same image URL works on mobile, desktop, iOS, and Android app.
? Not as powerful as native CSS and HTML but good for 90% use-case.
Quick links:
→ Simple text overlay using ImageKit.io
→ E-commerce product images labels
→ Watermark images
→ Dynamic marketing banners
Text overlay effects using CSS
Text overlay using a vanilla div element
We will add a text on top of the following base image:
https://ik.imagekit.io/ikmedia/accessories_banner.jpg?tr=w-1200,h-400

tr=w-1200,h-400is used to resize the image for this example using ImageKit.io.
We will add a text in the div element with class overlay. This is useful if the text is dynamic and coming from the backend as part of the initial HTML.
The HTML will look like:
<div class="example">
  <img  class="background-image" src="https://ik.imagekit.io/ikmedia/accessories_banner.jpg?tr=w-1200,h-400">
  <div class="overlay">
    Multi-line <br/>text
  </div>
</div>
We want this text to be placed on top of the image. Let's set the positive:absolute for div with class name overlay. And use top and right CSS property to control the position of this overlay text relative to the background image. The final CSS looks like this:
.example img {
  width: 100%;
  position: relative;
}

.example .overlay {
  position: absolute;
  top: 80px;
  right: 15px;
  font-weight: bold;
  text-align: right;
  font-size: 30px;
}
The final result:
<iframe width="100%" height="300" src="//jsfiddle.net/imagekit_team/7weapfkd/10/embedded/result,html,css/dark/" allowfullscreen="allowfullscreen" allowpaymentrequest="" frameborder="0">``</iframe>
Text overlay using CSS pseudo-element
We can also use ::after or ::before CSS pseudo-elements instead of creating a new div element. This means all the text will be stored in the CSS only. This solution is helpful if you want to overlay a fixed set of labels in multiple places on the website.
<iframe width="100%" height="300" src="//jsfiddle.net/imagekit_team/yh3vpqbj/52/embedded/css,html,result/dark" allowfullscreen="allowfullscreen" allowpaymentrequest="" frameborder="0">``</iframe>
Image overlay effects using CSS
Just like we added text on top of images, we can also add images over other images using native CSS properties.
Image gradient overlay effect
The gradient overlay effect is one of the commonly used overlay effects that you will see on landing pages.
Let's create the hero section of a landing page using the following hero image as background.
https://ik.imagekit.io/ikmedia/blog/hero-image.jpeg

The HTML looks like:
<header>
    <section class='hero-header'>
        <h1>Hero title</h1>
        <h2>Another landing page</h2>
        <button>Sign-up</button>
    </section>
</header>
We will use the background CSS property to create a linear gradient overlay effect over an image.
header {
    height: 400px;
    width: 100%;
    text-align: center;
    padding-top: 100px;
    color: white;
    overflow: hidden;
    background: #C04848;  /* fallback for old browsers */
    background: linear-gradient(rgb(72,0,72,0.8), rgb(192,72,72,0.8)), url("https://ik.imagekit.io/ikmedia/blog/hero-image.jpeg");  /* Chrome 10-25, Safari 5.1-6 */
    background: linear-gradient(rgb(72,0,72,0.8), rgb(192,72,72,0.8)), url("https://ik.imagekit.io/ikmedia/blog/hero-image.jpeg"); /* W3C, IE 10+/ Edge, Firefox 16+, Chrome 26+, Opera 12+, Safari 7+ */
    background-size: cover;
    background-repeat: no-repeat;
}
This will create a beautiful gradient overlay effect that you can use on your landing pages.
<iframe width="100%" height="500" src="//jsfiddle.net/imagekit_team/Lo16fr82/52/embedded/result,html,css/dark/" allowfullscreen="allowfullscreen" allowpaymentrequest="" frameborder="0">``</iframe>
If you are looking for more awesome images effect check out our guide on CSS Image Effects to nail your images!
Downsides of CSS image overlay using CSS
While creating image and text overlay effects using native CSS is pretty easy, it has some downsides.
- If the user saves the image or opens it in a new tab, they won't see the text or image that you added using CSS.
- You will have to write extra markup to generate these effects.
- The same code won't work for iOS and Android.
To overcome these problems, you can generate text and image overlay using an image CDN like ImageKit.io.
Overlay using ImageKit.io
ImageKit.io is an image CDN that allows you to resize, crop, rotate, change image format, add text, and image overlay using URL parameters. It also takes care of image optimization and serving assets using a global CDN.
You will need an ImageKit.io account to generate text and image overlays. Create a free account on ImageKit.io if you don't already have one. ImageKit.io offers a generous free plan that gives you up to 20GB of bandwidth, absolutely FREE, every month!
Let's dive into some examples.
Simple text overlay using ImageKit.io
Original image URL:https://ik.imagekit.io/demo/medium_cafe_B1iTdD0C.jpg
Now using text overlay layer,
- Let's add a text
overlays made easywith font size45pxand black color#000000. We will usel-text,i-overlays made easy,fs-45,co-000000,l-end, parameter in the URL. - With a transparent white background i.e.
#FFFFFF80. We will addbg-FFFFF80parameter in the URL. - With padding of
40pxusingpa-40parameter.
The final URL becomes:
The result image:

In this blog, we will cover a few examples. But you can learn about all the parameters from the text overlay layer documentation.
E-commerce use-case
You will often see specific promotional or information labels on the product image on an e-commerce website like this.

With ImageKit text overlay, it is pretty easy to create such images.
For example, the product image URL is:https://ik.imagekit.io/ikmedia/hoodie_white.png
Now, we want to add a 15% OFF label with a solid color background.
The final URL becomes:
You can use this URL in mobile, desktop, iOS, and Android applications, and the result will look the same.
Let's understand the different parts of this URL one by one:
w-394,h-540is basically resizing image to394x540dimension.l-textis for adding a text layer.i-15% OFFis adding15% OFFtext on the image.co-FFFFFFis setting the color of text overlay to white.bg-EF6823is setting background color to#EF6823.r-4is used to set the border-radius of the background to4px.pa-8_8is for setting top-bottom and left-right padding to8px.lxandlyare used to control the position of text overlay layer relative to background image.tgandfsare used to control the font typography and size.l-enddenotes the end of layer.
The resulting image:

Watermark images
Let's say the base image URL is - https://ik.imagekit.io/demo/medium_cafe_B1iTdD0C.jpg
Overlay image logo URL is:https://ik.imagekit.io/demo/logo-white_SJwqB4Nfe.png
Now to overlay this logo over the base image we will pass the path of overlay image i.e. logo-white_SJwqB4Nfe.png inside an image layer.
Final URL:
https://ik.imagekit.io/demo/medium_cafe_B1iTdD0C.jpg?tr=l-image,i-logo-white_SJwqB4Nfe.png,l-end
![]()
You can also control the position, width, and other attributes of the overlay image, all using URL parameters. Learn more from the image overlay layer documentation.
To control the position of the overlay image layer relative to the background image, we can use lfo parameter. lfo parameter accepts relative position values i.e. top, right, bottom, left, etc.
Top position:
https://ik.imagekit.io/demo/medium_cafe_B1iTdD0C.jpg?tr=l-image,i-logo-white_SJwqB4Nfe.png,lfo-top,l-end
![]()
Dynamic marketing banners
You can use a combination of image watermarks and text overlays to create irresistible personalized banners for users.
Example 1:
https://ik.imagekit.io/ikmedia/accessories_banner.jpg?tr=w-1200,h-400:l-text,ff-PlayfairDisplay-Bold.ttf,i-HI JOHN,co-0450D5,fs-24,lx-850,ly-120,l-end:l-text,ff-PlayfairDisplay-Bold.ttf,i-EPIC FASHION,fs-36,lx-850,ly-158,l-end:l-text,ff-PlayfairDisplay-Bold.ttf,i-SALE,fs-104,lx-850,ly-190,l-end:l-text,ff-PlayfairDisplay-Bold.ttf,i-2 DAYS TO GO,fs-38,lx-850,ly-294,l-end

Example 2:
https://ik.imagekit.io/ikmedia/white-canvas.png?tr=w-1000,h-667:l-image,i-site_graphics/girl_in_white_500.jpg,w-500,h-667,lx-0,ly-0,l-end:l-image,i-site_graphics/guy_in_yellow_500.jpg,w-500,h-667,lx-500,ly-0,l-end:l-text,i-HI JOHN‚ HERE ARE SOME RECOMMENDED PRODUCTS FOR YOU,bg-FFFFFF80,pa-20,fs-30,co-000000,tg-b,r-16,lx-15,ly-550,l-end

Photo collage
You can combine multiple photos together and create a beautiful dynamic collage.
Example:
https://ik.imagekit.io/ikmedia/white-canvas.png?tr=w-1245,h-1245:l-image,i-women-dress-1.jpg,lx-0,ly-0,w-600,h-600,b-15_FFFFFF,l-end:l-image,i-women-dress-2.jpg,lx-615,ly-0,w-600,h-600,b-15_FFFFFF,l-end:l-image,i-women-dress-3.jpg,lx-0,ly-615,w-600,h-600,b-15_FFFFFF,l-end:l-image,i-women-dress-4.jpg,lx-615,ly-615,w-600,h-600,b-15_FFFFFF,l-end:l-text,i-Women's Clothing,bg-00000080,pa-20,fs-60,co-FFFFFF,l-end:b-2_000000
You can check out how to create a photo collage tutorial to learn more.

Summary
- It is easy to create image and text overlay using native CSS. You can copy-paste the code from the above examples and start using them right away.
- Although CSS is powerful, creating overlay effects using CSS has some limitations, e.g., the same code doesn't work for all devices, and if the user downloads the image, the overlay effect is lost.
- Using an Image CDN like ImageKit.io simplifies the text and image overlay generation.
- You can create a free account and start creating beautiful visuals dynamically using URL-parameters.
- Setting up ImageKit only takes a few minutes. You can integrate your existing storage or any web server with a few clicks.


