


VP9 is an open-source and royalty-free video codec developed by Google, designed to address the growing demand for high-quality video delivery across web and mobile platforms. In this blog, we'll delve into the intricacies of VP9, its features, history, and how it stacks up against other popular codecs.
A few key points about VP9:
- VP9 is the successor to VP8, another video codec, and it competes primarily with MPEG’s High Efficiency Video Coding (HEVC/H.265). VP9 emerged from technology acquired when Google purchased On2 Technologies in February 2010.
- Initially, VP9 found its home on YouTube, where it was widely used for video playback. Another early adopter was Wikipedia for its multimedia content.
- The emergence of the Alliance for Open Media (of which Google is a part) and their support for the successor codec AV1 sparked growing interest in VP9.
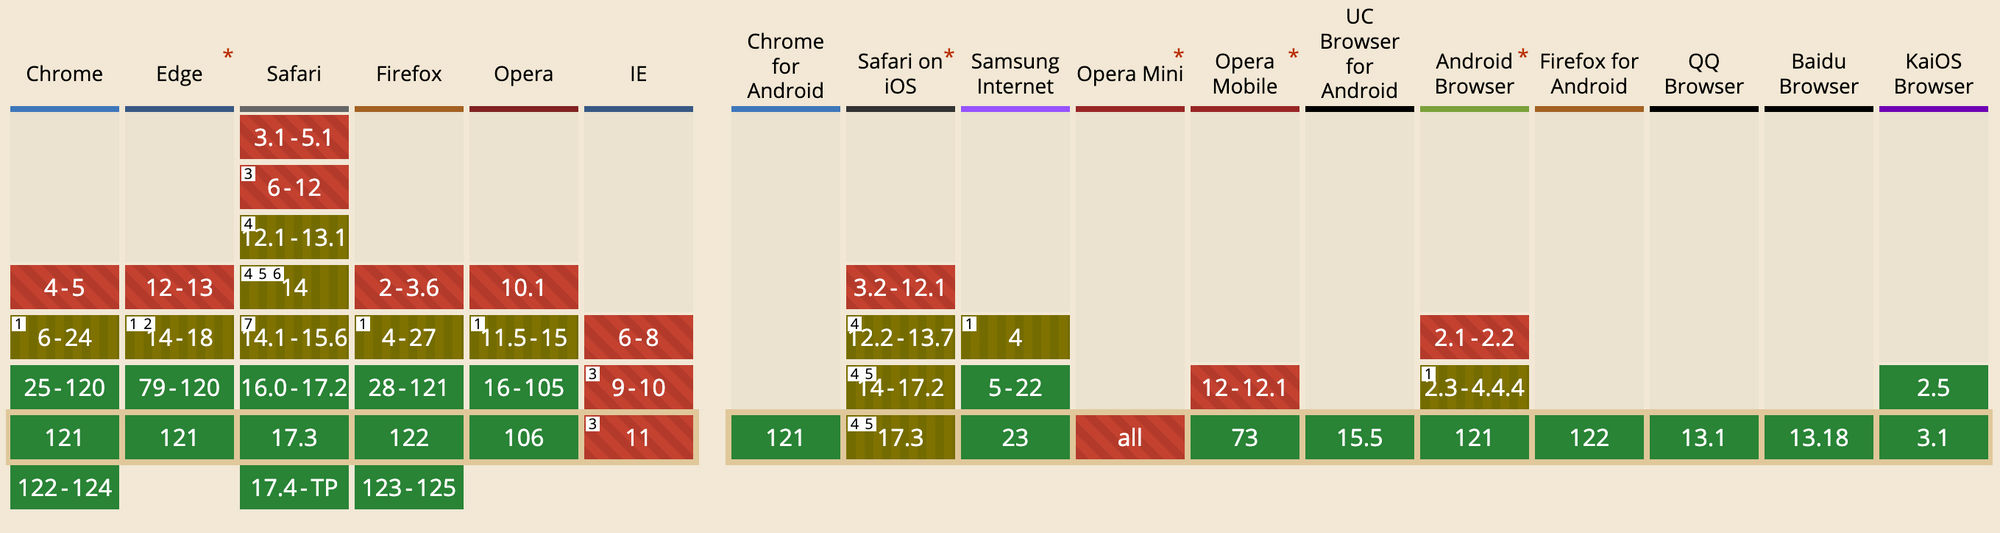
- Unlike HEVC, VP9 enjoys common support among modern web browsers, making it a popular choice for online video content.
- Android has supported VP9 since version 4.4 KitKat, and iOS/iPadOS added VP9 support in iOS/iPadOS 14. Virtually all browsers support VP9, trailing slightly behind H.264.
Key features of VP9:
- Compression efficiency: VP9 is highly efficient in compressing video, offering a significant improvement over VP8 and competing well with H.265/HEVC. It can reduce the bitrate by up to 50% compared to VP8, making it ideal for streaming high-resolution video.
- Quality: Despite the high compression ratio, VP9 maintains impressive video quality. It supports higher resolutions, including 4K and beyond, with additional support for 10/12-bit encoding and HDR, making it future-proof for emerging video technologies.
- Open and Royalty-Free: VP9 is an open format, meaning it doesn’t come with licensing fees or restrictions.
- Compatibility: As a web-centric codec, VP9 has strong support in modern web browsers like Google Chrome, Mozilla Firefox, and others. It is also supported on various hardware platforms, including many smartphones and streaming devices.
- Hardware integration: Google has collaborated with hardware vendors to ensure VP9 support in silicon. However, it is limited to hardware accelerated decoding only, hardware encoding has never really taken off.
A brief history of VP9:
- The development of VP9 began in the second half of 2011 under the names Next Gen Open Video (NGOV) and VP-Next.
- Design goals included reducing bit rates by 50% compared to VP8 while maintaining video quality.
- In June 2013, VP9’s “profile 0” was finalized, and Google’s Chrome browser added VP9 video playback support.
- Mozilla integrated VP9 into Firefox in March 2014.
- Google expanded VP9 with high bit depth profiles (profile 2 and profile 3) in 2014.
- Throughout its evolution, Google worked with hardware vendors to embed VP9 support into silicon.
- VP9 is the last of the VPx-based codecs to be released by Google.
VP9 vs Other Codecs - Quick comparison
Let’s compare VP9 with other popular video codecs: VP8, H.265 (HEVC), and AV1 in terms of compression efficiency, video quality, hardware support, and adoption. Each codec has its unique strengths and weaknesses, making them suitable for different applications.
VP9 vs. VP8
- Compression Efficiency: VP9 is a significant improvement over VP8 in terms of compression efficiency. It can compress video files to almost half the size of VP8 while maintaining the same quality.
- Video Quality: VP9 offers better video quality at lower bitrates compared to VP8, which is especially noticeable in higher resolutions like 1080p and 4K.
- Adoption and Support: VP9 has seen wider adoption than VP8, especially on platforms like YouTube. It's also better supported in modern web browsers and hardware devices.
- Encoding Speed: VP9 is generally slower in encoding compared to VP8. This is due to its more complex algorithms aimed at achieving higher compression and better quality.
- Overall: VP9 is an improvement over VP8 in terms of compression and compatibility.
VP9 vs. H.265 (HEVC)
- Compression Efficiency: H.265 is known for its superior compression capabilities, slightly outperforming VP9, especially at very low bitrates. However, the difference in efficiency is often marginal in typical usage scenarios.
- Encoding speed: VP9 leads in encoding speed, with lower encoding times compared to H.265 and AV1.
- Video Quality: Both codecs deliver high-quality video, but H.265 might have a slight edge in preserving details at lower bitrates.
- Licensing and Royalties: A major difference is in licensing. H.265 requires royalty payments, which can be a deterrent for widespread adoption, unlike VP9, which is royalty-free.
- Hardware Support: H.265 has broader hardware support, with many devices having dedicated decoding capabilities. VP9, while catching up, is not as universally supported in hardware.
VP9 vs. AV1
- Compression Efficiency: AV1 is designed to outperform VP9 and even H.265, offering up to 30% better compression than VP9. This makes it more efficient for streaming high-quality video.
- Video Quality: AV1 maintains high video quality at lower bitrates, which is a significant advantage over VP9, especially for streaming over limited bandwidth.
- Encoding speed: AV1 is slower in encoding time compared to VP9 and H.265.
- Adoption and Support: AV1 is relatively new and is still gaining support in terms of hardware and software. VP9, being older, has wider current support but may see competition from AV1 in the future.
- Development and Royalties: Both VP9 and AV1 are open-source and royalty-free, but AV1 benefits from being a collaborative effort by the Alliance for Open Media, which includes major tech companies.
How VP9 Works?
In this blog, we'll break down encoding concepts into easy-to-understand terms, helping you grasp the basics of encoding intuitively. Let's discuss step by step.
1. Basics - color and frames in video
Videos are made up of frames, and frames are made of color planes. Instead of using RGB (Red, Green, Blue) used in images, VP9 uses YUV (luma for brightness, and U/V for color). Since our eyes are better at seeing differences in brightness than color, encoder stores more detail for brightness and less for color. This helps in reducing the file size without losing much quality.
2. Breaking down the frames
Imagine your video frame as a big grid. VP9 starts by looking at a 64x64 pixel section of this grid. This is our 'big block'.
VP9 doesn't always process this big block as a whole. Instead, it breaks it down into smaller pieces, kind of like cutting a cake into smaller pieces to manage it better. This is called block decomposition.
There are four ways VP9 can cut this 64x64 block:
- None: Don't cut it, keep the block as it is.
- Horizontal: Cut the block horizontally into two pieces.
- Vertical: Cut the block vertically into two pieces.
- Recusive split: If VP9 chooses to split the block, each of the four new smaller blocks (now 32x32) can be split again following the same rules. This process can keep going, making the blocks smaller and smaller, until it reaches the smallest size VP9 handles, which is 4x4 pixels.
This is different from H.264, which uses a 16x16 block and, as a result, performs less well for high-resolution content.
In summary, block decomposition in VP9 is like taking a large section of your video, breaking it down into smaller, more manageable pieces, and then processing each piece based on how much detail it needs. This helps in efficiently compressing the video, ensuring that parts that need more detail get it while simpler parts are left with less detail, saving space.
3. Coding the blocks
After block decomposition, we have many terminal blocks (big and small) to deal with.
Each terminal block goes through a process where the encoder decides how to compress it. This involves several steps:
- Segment ID: This is like giving each block a special tag that tells the codec how much to adjust its quality and filtering. It's a bit like choosing different quality settings for different parts of the picture.
- Skip flag: If this is set to
true, it means this block doesn’t need any more detail added. It's like saying, "This part is fine as it is, don’t change it." - Intra flag: This decides how the block predicts what it should look like. It can either use information from within the same frame (intra) or use information from other frames (inter).
- Transform size: This sets how much the block will be transformed (changed) for compression. It's like choosing the size of the toolbox to fix up the block.
4. Predicting movement (Inter prediction)
Video is essentially a series of pictures (frames). Instead of looking at each frame individually, inter prediction finds similarities between frames. It’s like guessing what will happen in the next frame based on what happened in previous ones. It cleverly uses information from previous frames to avoid repeating data, which saves space and keeps the video flowing nicely. This process is called Inter Prediction. This technique is especially useful for parts of the video where things are moving or changing from one frame to the next.
Let's see how inter prediction works in VP9:
- Each part of the frame (block) tries to predict its pixels by looking at one or two frames that were shown before.
- It uses "motion vectors" which are directions telling where to look in the previous frames to find similar pixels.
- Think of it like saying, “This part of the picture moved three steps to the right and two steps up since the last frame.”
Motion vectors and resolution:
- These motion vectors are very precise, able to detect movement as small as 1/8th of a pixel.
- This helps in predicting movements smoothly, even when they're very subtle. This is the essence of motion that encoder needs to capture correctly.
Now what are different ways to predict? VP9 uses a few different methods to predict:
- Nearest and near motion vectors: It looks at motion vectors close to the current block.
- Zero motion vector: This is used when there's no movement at all.
- New motion vector: Sometimes, the block needs a completely new vector that's different from nearby ones.
Filtering for Smoothness:
- After finding the right pixels from previous frames, VP9 applies a filter to blend them smoothly.
- There are different filters to choose from, affecting how sharp or soft the edges look.
- This is important to make sure that moving parts of the video don't look jagged or unnatural.
Using Multiple References: VP9 can use one or two reference frames for prediction. If it uses two, it combines information from both to make a more accurate guess.
5. Handling static parts (Intra prediction)
Sometimes we can't use information from other frames to predict what a part of the current frame (a block) looks like. In such cases, we use Intra prediction. It's like making an educated guess about a block's contents based on the pixels around it, instead of looking at other frames.
In simple terms, Intra Prediction in VP9 is like filling in a coloring book using the colors from the edges of each section. It uses different patterns and techniques to guess the inside of a block based on its immediate surroundings
Types of Intra Predictors:
- Directional: This method uses different angles to predict. Imagine drawing lines in various directions from the edges to fill in the block.
- TM (True-Motion): This uses a formula where it adds the value of the top and left pixels but subtracts the top-left corner pixel. It's like averaging the surroundings but with a twist.
- DC (Direct Current): This one is simpler. It just takes an average of the top and left pixels. Think of it as blending the edges into the block.
VP9 has 10 different ways (modes) to do this Intra Prediction. This is more than some older codecs like H.264 but fewer than others like HEVC.
6. Dealing with differences (Residual coding)
So far, we tried to predict what each block will look like based on other frames or parts of the same frame. The "residual data" is the difference between what we predicted these blocks would look like and what they actually look like. We need to compress and store this residual data.
In summary, Residual Coding in VP9 involves identifying the differences between predicted and actual video blocks, processing these differences through mathematical transformations, simplifying the data for size reduction, and then organizing this data in a special pattern that prioritizes important information for better video quality and compression efficiency.
Transforming the residual data:
We take this residual data and apply a mathematical transformation to it. Think of this like folding a paper in a specific way to make it smaller. There are two main ways to fold this paper: DCT (Discrete Cosine Transform) and ADST (Asymmetric Discrete Sine Transform). Which folding method we use depends on where we got our prediction from (top, left, both, or other frames).
Quantization:
After transforming, we simplify the data. This is like rounding off the numbers to make them easier to handle. This step reduces the size of the data but loses some details (this is why it's called "lossy" compression).
Next we need to efficiently pack this data:
- Most codecs follow a zig-zag path. VP9 uses a unique path that's more like a quarter-circle.
- This path helps in finding important data points quickly and ignoring the less important ones.
Advantage of VP9's Method:
The way VP9 organizes and scans the data is especially good for larger blocks of data. It separates important and unimportant data more effectively than the zig-zag method used in other codecs.
7. Smoothen unintended hard edges (Loopfilter)
The loopfilter in VP9 is like a fine-tuning tool that comes in after the main compression work is done. It's like smoothing out the edges in a mosaic to make sure the whole picture looks cohesive and pleasing, without obvious lines showing where each piece ends and the next one begins. This helps make the compressed video look more natural and less like a patchwork of separate blocks.
8. VP9 Bitstream: Final Packing
In VP9 encoding, the final step of the process involves packing all the processed data into a format that can be easily stored or transmitted. This is where the concept of a VP9 bitstream comes into play.
All the steps in VP9 encoding, like block decomposition, prediction, residual coding, and loop filtering, produce various pieces of data. These pieces include motion vectors, prediction modes, residual data, and more. The bitstream packs all this information in a highly structured and efficient manner.
The VP9 bitstream generated is containerized with either IVF or WebM. IVF is extremely simple, and WebM is essentially just a subset of MKV. If no container is used at all, then it is impossible to seek to a particular frame without doing a full decode of all preceding frames. When a VP9 video is packaged into a WebM container, the bitstream (the encoded video data) is combined with other data like audio tracks, metadata (like title, duration), and potentially subtitles. The container ensures synchronization between audio and video during playback and also makes the file compatible with various media players and web browsers.
Conclusion
There's a trade-off between encoding speed and efficiency among these codecs. The choice depends on the specific requirements of the project, including the acceptable trade-off between encoding time and file size, as well as the availability of computational resources and hardware support.
In summary, VP9 strikes a balance between quality, efficiency, and compatibility. While AV1 leads in compression, VP9 remains a strong contender for delivering high-quality video content across platforms.
You can use ImageKit.io's robust real-time media encoding and transformation APIs to deliver videos encoded using the VP9 codec.
FAQs
How can I encode a video using vp9 codec?
You should use a full-fledged media processing platform like ImageKit.io. It offers a forever-free plan. However, if you are comfortable with command line tools and want to try things out using ffmpeg, use the below commands.
ffmpeg -i input.mp4 -c:v libvpx-vp9 output.webmWe are using libvpx-vp9 encoder. There are lots of parameters related to quality/compression, profile, etc, that you can modify. To learn more, refer to - https://trac.ffmpeg.org/wiki/Encode/VP9
See how the file size was reduced from 69MB to just 15 MB.
MacBook-Pro-4:Desktop manuchaudhary$ ls -la input.mp4
-rw-r--r--@ 1 manuchaudhary  staff  69434652 May  5  2023 input.mp4
MacBook-Pro-4:Desktop manuchaudhary$ ls -la output.webm
-rw-r--r--  1 manuchaudhary  staff  15368642 Feb 14 10:38 output.webm
How can I stream a video in vp9 format?
To stream a video encoded in VP9 to users on the web, your server must be capable of detecting the browser support. Though VP9 is widely supported, some devices/browsers still have partial support for WebM.
You can detect browser support using a library like caniuse-lite. It parses the User-Agent and provides developer-friendly methods to expose different feature support.
If you are using a CDN in front of the server, which you should be, then the CDN must be configured to cache content separately based on browser support.
This can quickly become tricky. That is where a tool like ImageKit.io shines. It will allow you to serve optimized videos on existing URLs through a CDN.
What is the difference between vp9 and WebM?
VP9 is a video format. Another example is H.264.
WebM is a container format that VP9 goes into. It is equivalent to the MP4 container format for the H.264 video format.
Is it really royalty-free?
Parts of the format are covered by patents held by Google. The company grants free usage of its own related patents based on reciprocity, i.e. as long as the user does not engage in patent litigations.