Everything you need in an Imgix alternative to switch
Unlimited transformations and origin assets. Simple bandwidth-based pricing. Better feature set, similar parameters, and simple migration.

Why choose ImageKit as Imgix alternative?
ImageKit gives you the same image transformation and optimization capabilities as Imgix with a much simpler, economical pricing structure. Plus, it offers video streaming, and a built-in DAM. It works directly with your existing storage like S3 and Google Cloud, and an Imgix URL rewriter makes migration straightforward.
Let's see why ImageKit is a suitable alternative for Imgix.
ImageKit vs Imgix Quick Comparison
Here is a quick side-by-side comparison of ImageKit and Imgix across image processing, video capabilities, and digital asset management.
| Image API Features Skip to detailed comparison | ImageKit | Imgix |
|---|---|---|
| Resize and Crop Images | ||
| Object-aware Cropping | ||
| Image Optimization with AVIF | ||
| Adding Overlay In Images | ||
| Effects and Enhancements | ||
| Vector and Animated Images | ||
| Conditional and Arithmetic Transformations | Limited capability for watermarking and upscale operations only | |
| Video API Features Skip to detailed comparison | ImageKit | Imgix |
| Video API availability | Available in all plans starting from the Forever Free plan | Only in custom plans |
| Video Optimization | Control quality, codec and format using parameters and dashboard | Codec and bitrate parameters available |
| Automatic Video Format Conversion MP4/WebM | ||
| Resize and Crop videos | 10+ crop modes including AI-powered smart crop with face and object detection | Limited parameters |
| Video smart crop | Available, but premium feature | |
| Video face crop | ||
| Video object crop | ||
| Overlays in video | Overlays to add Images, video, text, logos and subtitles | Available, but premium feature |
| Background, rotate, add border to videos | ||
| Adaptive Bitrate Streaming | Both HLS and MPEG-DASH | Both HLS and MPEG-DASH |
| Video webhooks | ||
| Video thumbnail generation | ||
| Multi-language video captions | AI-generated subtitles in 100+ languages | |
| Video seekbar thumbnails | ||
| DAM Features Skip to detailed comparison | ImageKit | Imgix |
| Image and Video Storage | ||
| Native app for seamless creative workflow | ||
| Access Control and Sharing | ||
| Media Collection | ||
| Asset Versioning | ||
| Password-protected public link | ||
| Commenting on Images and Videos | ||
| Image Editor | ||
| AI background removal | Charged separately | |
| Custom Metadata | ||
| Semantic search with AI | Charged separately | |
| Advanced search with filters | ||
| Audit Logs | ||
| Granular access control | Yes. View, contribute, and manage access. User groups also available. | Yes. View and manage access. No user groups. |
| Media Management APIs | ||
| Seamless migration from other storages | ||
| Pricing Comparison Skip to detailed comparison | ImageKit | Imgix |
| Forever free plan | ||
| Unlimited Transformations | ||
| Unlimited Origin Images | ||
| First paid plan | $9 for 40GB bandwidth and 10GB storage. $89 for 225 GB bandwidth, 5000 video processing units, 225 GB storage, a custom domain, and more. Overage on all plans. | $25 capped at 100GB bandwidth, 50GB media. No overages allowed. Custom domain in $75 plan. |
| Additional Usage Pricing | Overage available on individual billing parameters - bandwidth, storage, user seats, etc. | Credit-based pricing for transformations, caches, bandwidth, and more. |
| Powerful DAM | Only in custom pricing | |
| AI-powered tagging and background removal | Only in custom pricing |
ImageKit vs Imgix Feature Comparison
ImageKit Image API vs Imgix Rendering API
ImageKit’s ImageKit API and Imgix's rendering APIs have been around for quite some time, covering all possible image processing needs in your development workflow. They offer the same level of compression using industry-standard encoding algorithms and a similar set of transformations.
However, there are subtle differences between the two products.
Let’s dive into them.
Automatic format conversion
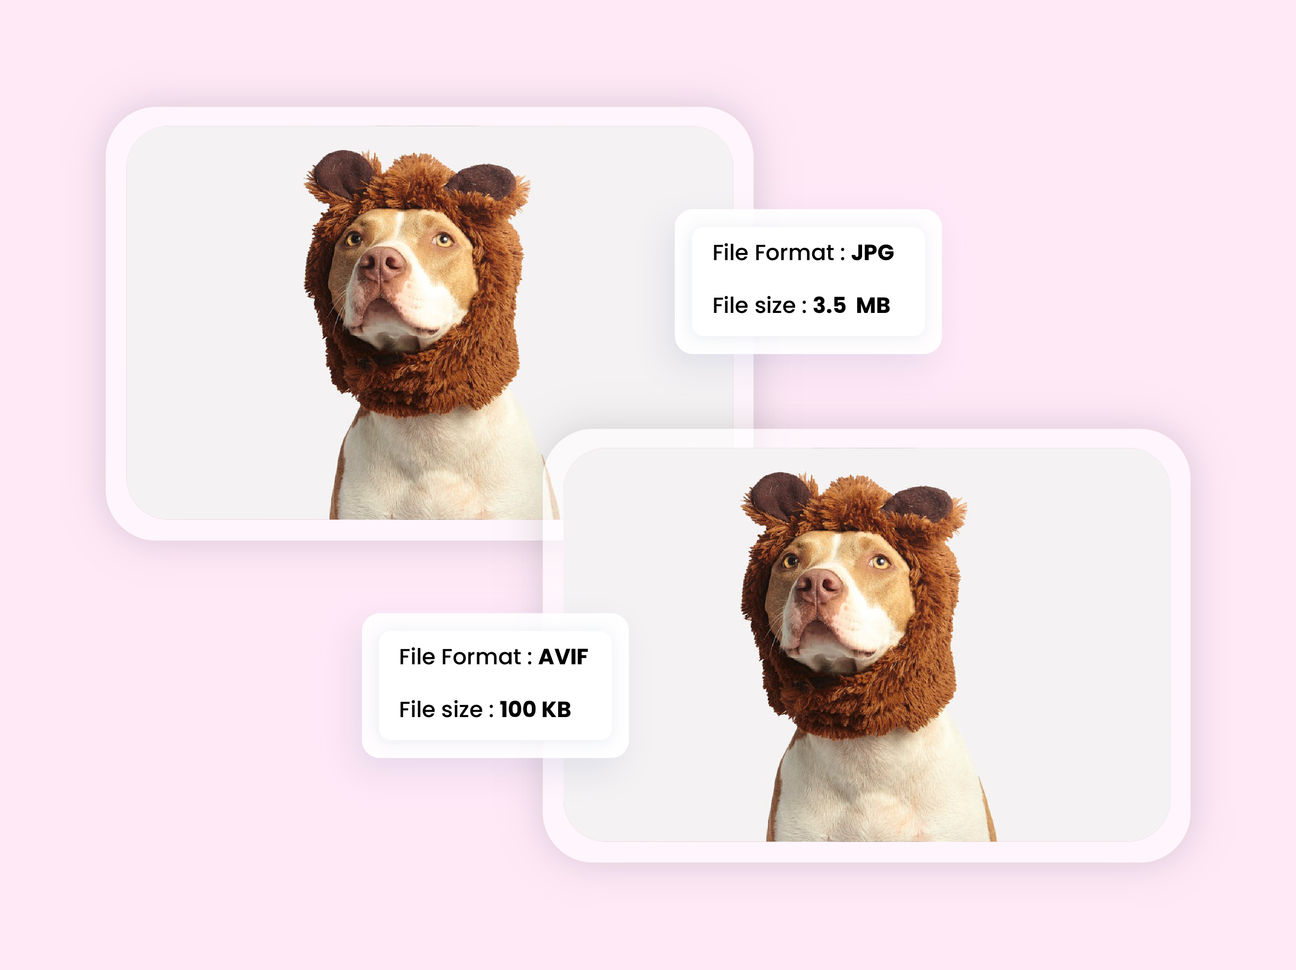
Delivering an image correctly starts with the format. ImageKit takes a more developer-friendly approach by compressing images by default, so you don't need to change the URL to benefit from automatic media optimization. In contrast, Imgix requires you to add the auto=format parameter in every URL to deliver optimized images by default. Without this, the format won't change based on browser support.
Moreover, setting auto=format as a default isn't available on Imgix's free plan. On the other hand, ImageKit offers complete image optimization across all its plans, providing more value and convenience.
Handling complex transformations
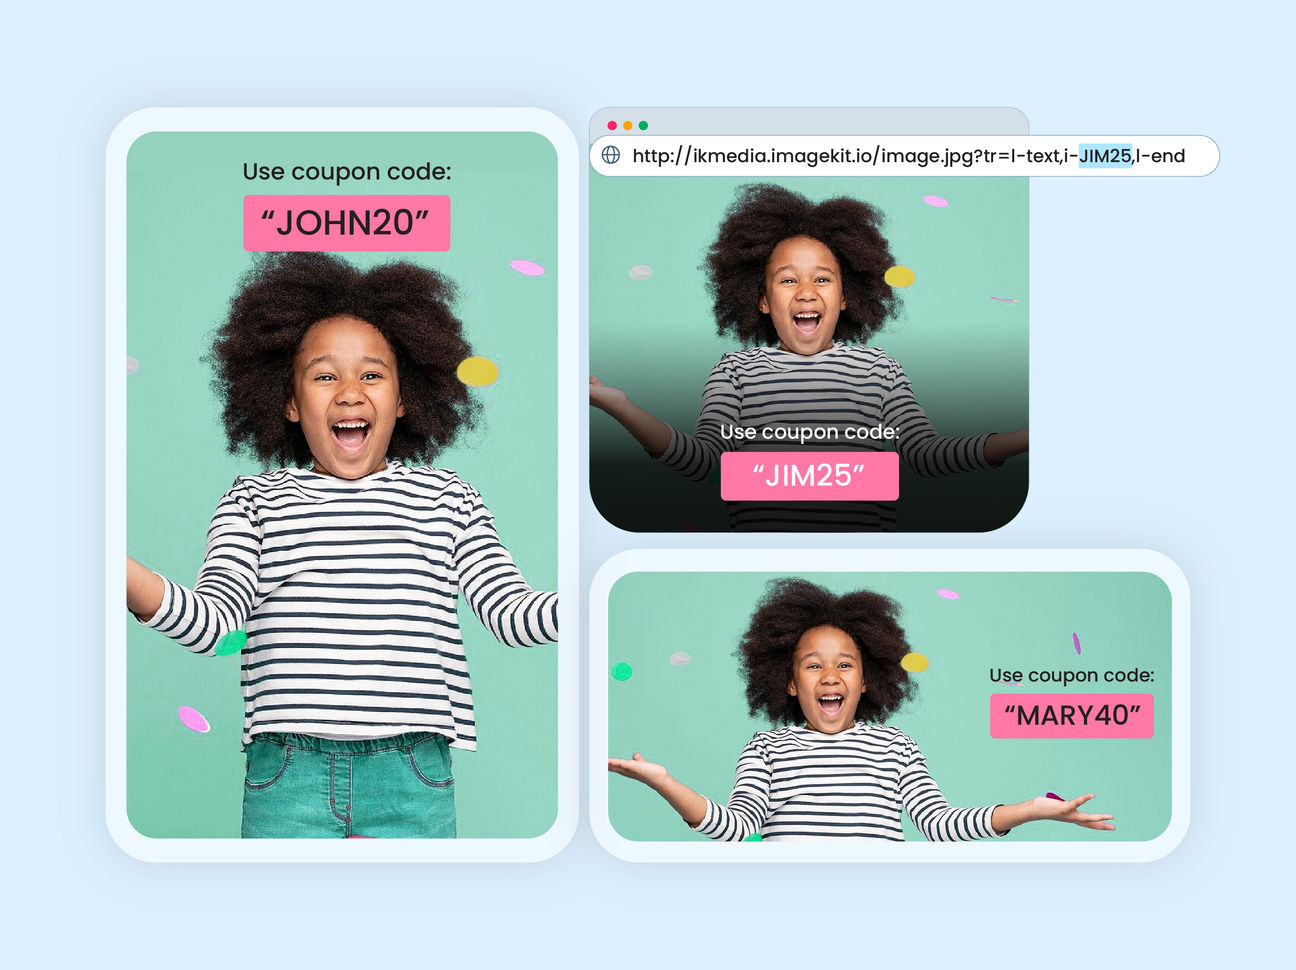
ImageKit also stands out with its ability to handle complex transformations for your images. With conditional transformations, you can specify when a particular transformation should be applied. These can be part of larger chained transformations, using the output of one as the input for another. This makes implementing complex transformations seamless and efficient, saving a lot of development effort.
Additionally, ImageKit allows the use of arithmetic expressions in dimension and position-related parameters, adding even more flexibility. This means you don't have to hard-code specific values, perfect for scenarios where exact dimensions or positions aren't known beforehand or need adjusting based on other parameters.
Unlike ImageKit, Imgix does not support these complex transformations.
AI-powered object-aware cropping
Another advanced feature that sets ImageKit apart from Imgix is its object-aware cropping.
This functionality allows you to set the fo-object name value to an object from our supported list, ensuring the focus remains on a specific object while cropping. ImageKit can intelligently crop images based on the objects detected within them, making your transformations more precise and contextually relevant.
You can combine object-aware cropping with maintain ratio or extract crop features to adjust or extract parts of the image as needed
| Image API Features | ImageKit | Imgix |
|---|---|---|
| Resize and Crop Images | ||
| Object-aware Cropping | ||
| Image Optimization with AVIF | ||
| Adding Overlay In Images | ||
| Effects and Enhancements | ||
| Vector and Animated Images | ||
| Conditional and Arithmetic Transformations | Limited capability for watermarking and upscale operations only |
High-quality images at the smallest possible size:


Perfect images for every requirement in real-time:


The above analysis shows that ImageKit offers a more comprehensive solution for handling Images.
Let’s now understand how both the solutions handle videos.
ImageKit Video API vs Imgix Video API
While Imgix offers a Video API for optimizing and transforming videos, it falls significantly short compared to ImageKit's Video API. Imgix lacks essential features such as real-time resizing, cropping, and personalization that engage users and deliver visually enriching experiences. These limitations make achieving the same functionality and streamlined video processing that ImageKit provides impossible. The imgix video API is also unavailable on free or standard paid plans.
Here’s a quick comparison of how ImageKit’s API is better.
| Video API Features | ImageKit | Imgix |
|---|---|---|
| Video API availability | Available in all plans starting from the Forever Free plan | Only in custom plans |
| Video Optimization | Control quality, codec and format using parameters and dashboard | Codec and bitrate parameters available |
| Automatic Video Format Conversion MP4/WebM | ||
| Resize and Crop videos | 10+ crop modes including AI-powered smart crop with face and object detection | Limited parameters |
| Video smart crop | Available, but premium feature | |
| Video face crop | ||
| Video object crop | ||
| Overlays in video | Overlays to add Images, video, text, logos and subtitles | Available, but premium feature |
| Background, rotate, add border to videos | ||
| Adaptive Bitrate Streaming | Both HLS and MPEG-DASH | Both HLS and MPEG-DASH |
| Video webhooks | ||
| Video thumbnail generation | ||
| Multi-language video captions | AI-generated subtitles in 100+ languages | |
| Video seekbar thumbnails |
Video optimization
Imgix doesn't offer control over the video codec, which directly impacts the video's quality and compression level. In contrast, ImageKit provides complete control over the codec and video quality. You can choose between H.264, VP9, and AV1 or let ImageKit automatically deliver the appropriate format and codec based on the original video, browser support, and other factors.
With ImageKit, you can manage both format and quality from the dashboard or using URL parameters, offering high flexibility for video optimization.
Video transformation
Resizing and cropping with progressive streaming are common needs for developers. ImageKit simplifies this with over 10 crop modes, allowing developers to transform and stream videos on the fly. Beyond basic resizing, ImageKit offers AI-powered smart crop that automatically tracks faces, people, or any of 80+ objects throughout your video, making it effortless to create vertical social media content from landscape footage. You can also handle functions like video trimming, adding backgrounds and borders to videos, converting to a vertical video, and more. ImageKit's Video API also supports overlays, enabling you to add images, videos, text, and even subtitles using URL parameters.
Imgix's video API does not have these video transformations, making ImageKit the more comprehensive solution.
Adaptive Bitrate Streaming (ABS)
With ABS, you can deliver videos to your users with minimal buffering, fast start time, and a smooth experience regardless of their connection quality.
Unlike Imgix, which only supports HLS, ImageKit supports both HTTP Live Streaming (HLS) and Dynamic Adaptive Streaming over HTTP (MPEG-DASH) streaming protocols for Adaptive Bitrate Streaming.
With its dual-protocol support, ImageKit ensures a seamless streaming experience for all users.
This reliability and quality make ImageKit a superior choice for adaptive video streaming, setting it apart from Imgix.
Optimize and stream videos:


Transform and personalize at scale:

With your images and videos handled let’s take a look at how both the products fair when it comes to managing your media storage.
With the number of stakeholders and media assets constantly increasing, arming your team with the right features ensures a frictionless workflow and thus reduces your go-live time.
ImageKit Media Library vs Imgix Asset Manager - DAM Comparison
While Imgix offers an asset manager, it is not comprehensive, and most of its features are gated, even in its basic paid plan. ImageKit, on the other hand, offers a complete digital asset management solution built to help you manage your assets seamlessly, starting from its forever-free plan.
Here’s what ImageKit's DAM offers:
| DAM Features | ImageKit | Imgix |
|---|---|---|
| Image and Video Storage | ||
| Native app for seamless creative workflow | ||
| Access Control and Sharing | ||
| Media Collection | ||
| Asset Versioning | ||
| Password-protected public link | ||
| Commenting on Images and Videos | ||
| Image Editor | ||
| AI background removal | Charged separately | |
| Custom Metadata | ||
| Semantic search with AI | Charged separately | |
| Advanced search with filters | ||
| Audit Logs | ||
| Granular access control | Yes. View, contribute, and manage access. User groups also available. | Yes. View and manage access. No user groups. |
| Media Management APIs | ||
| Seamless migration from other storages |
Manage
-
Easy-to-use User Interface: ImageKit offers a simple drag-and-drop interface for quick uploads and developer-friendly APIs and SDKs, making bulk file uploads and advanced file management a breeze.
-
Organizing with tags & custom metadata: When dealing with a large repository organizing assets the right way is crucial. ImageKit offers manual and AI-powered tagging and custom metadata to create an organizational schema that best suits your workflow. Imgix does offer these; however, they are priced separately and are not part of the base plan, while ImageKit offers these features in all its plans.
Search
-
AI-powered search: ImageKit leverages AI to help you find assets faster. The search bar gives you suggestions as you type the file name and gives you results based on your text or image inputs.
-
Advanced search: You can combine multiple asset parameters, such as tags, custom metadata, file type, file size, etc., to pinpoint the exact asset you need in seconds, making your search lightning-fast and incredibly efficient. Imgix offers a semantic search, but the advanced search is less detailed than ImageKit.
Collaborate
Imgix does not offer anything when it comes to sharing and collaboration, while ImageKit’s DAM is built to enhance collaboration in creative teams. Here are some features that are unique to ImageKit:
-
Granular access control: ImageKit lets you control who can view, contribute, and manage your asset storage. It also allows you to create groups for easy sharing and access control. Need to share users outside your organization? The password-protected public links let you share assets without adding users to storage.
-
Folder-level governance with path policies: ImageKit offers path policies to create programmable governance rules at the folder level. Enforce metadata standards for different teams, validate uploads with custom naming conventions, protect critical assets from modifications, and automate workflows with AI extensions. These policies cascade to subfolders automatically, ensuring consistent governance across your organization without manual intervention.
-
Versioning and Commenting: Centralize all your asset feedback, comments, and approvals on the DAM platform to avoid scattered communication across multiple channels. ImageKit makes collaboration easy by allowing you to gather feedback, track iterations, and monitor activity logs—all in one place
-
Image Editor & AI background removal: Need to quickly edit your assets without relying on your design team? ImageKit’s image editor and AI-powered background remover make it easy to edit your assets on the fly, reducing dependency and go-live time.
-
Media Collection: Media collections are a unique and handy way to ship assets to respective teams without exposing the entire storage or duplication; any change in the master asset is reflected across all collections.
ImageKit's DAM also integrates with the media processing features.
You can directly copy the URLs of assets from the media library and use them on your website and apps, combining them with 50+ URL transformations and optimizations for a stunning visual experience.
From the above, it is clear that Imgix's asset manager offers minimal asset storage and operations functionalities when compared to ImageKit's DAM.
Here’s a sneak peak in ImageKit’s DAM
Read more about ImageKit Digital Asset Management here.
ImageKit vs Imgix Infrastructure Comparison
ImageKit has a multi-region core processing network, which decreases the response time for new transformations and increases overall uptime.
| CDN and infrastructure | ImageKit | Imgix |
|---|---|---|
| CDN | CloudFront | Fastly |
| Core processing regions | 7 regions available on all plans (North California, North Virginia, Singapore, Frankfurt, Sydney, Mumbai, Montreal) | Only US |
| Custom CDN integration | Akamai, CloudFlare, Fastly, Azure, Google CDN, Alibaba Cloud CDN, Zenedge or Limelight. Minimum billing $500. | No mention in documentation. |
Here's how ImageKit ensures exceptional service:
-
ImageKit leverages an AWS CloudFront CDN node network of 700+ nodes, ensuring a high cache-hit ratio and performance.
-
ImageKit is entirely built on AWS and uses the same CDN globally, ensuring consistent performance worldwide.
-
The multi-region core processing network, with co-located storage across seven different regions, offers three key benefits:
-
Improved First Fetch Timings: Processing servers are located in the same AWS region as the stored media, minimizing download times and ensuring your data remains within the AWS data center.
-
Enhanced Availability: Faster fallback when a region experiences downtime, making ImageKit more reliable.
-
GDPR Compliance: If you choose the Frankfurt region, your assets will be stored exclusively in Frankfurt, aiding in GDPR compliance.
-
ImageKit vs Imgix Pricing Comparison
Imgix's pricing plan varies based on your origin images, the need for a video API, and the feature depth of its asset manager. In contrast, ImageKit offers a straightforward and predictable pricing model. Here are some reasons why ImageKit provides greater value:
- No origin image restriction: ImageKit does not charge for origin images and offers unlimited transformations. Thus, you can focus on your business needs, adding new images and delivering them without worrying about costs. While Imgix doesn’t cap transformations, it has restrictions on origin images in all its plans. For example, let's say you implemented the solutions on your e-commerce site. For a business like e-commerce, adding new images every month is the norm. Old product images are still being requested, but very rarely. With ImageKit implemented on your website, you only pay for the viewing bandwidth. But with Imgix, you will also have to pay for the new and old origin images, even if the old image is accessed only once.
- Unlimited transformations: ImageKit does not charge for storing generated transformations of any media file. You only pay for uploads to the media library. If you use ImageKit with your own storage, then ImageKit does not charge for storage at all.
- Predictable billing: The base plan includes some of each component, and then each component has completely separate additional usage pricing. If only your bandwidth grows, your storage billing remains unchanged. If only the number of new videos processed goes up, then your bandwidth and storage costs remain unchanged. This brings transparency and simplicity to billing, making it easy to choose the best plan.
- Pay-as-you-go model: It is common for businesses to incur additional bandwidth. If there is an overage on bandwidth in Imgix, you will be at risk of being limited in serving new images. However, In ImageKit, if you have additional bandwidth usage, if your usage grows, your bill grows in small increments with ImageKit. For example, you pay only $9 per 20GB of extra bandwidth or 100GB of storage.
| Pricing Comparison | ImageKit | Imgix |
|---|---|---|
| Forever free plan | ||
| Unlimited Transformations | ||
| Unlimited Origin Images | ||
| First paid plan | $9 for 40GB bandwidth and 10GB storage. $89 for 225 GB bandwidth, 5000 video processing units, 225 GB storage, a custom domain, and more. Overage on all plans. | $25 capped at 100GB bandwidth, 50GB media. No overages allowed. Custom domain in $75 plan. |
| Additional Usage Pricing | Overage available on individual billing parameters - bandwidth, storage, user seats, etc. | Credit-based pricing for transformations, caches, bandwidth, and more. |
| Powerful DAM | Only in custom pricing | |
| AI-powered tagging and background removal | Only in custom pricing |
Both solutions offer a forever-free plan; while Imgix restricts the plan to 1000 images, a basic asset manager, and no video API, ImageKit offers the best forever-free option in the market with a generous 25GB bandwidth and 5GB storage with unlimited images and transformations, 500 video processing unites with an enterprise-grade DAM.
Migrate from Imgix to ImageKit in minutes
If you are using Imgix, migrating to ImageKit is straightforward and can be done without changing your existing URLs.
-
ImageKit integrates with the same types of external storage as Imgix. So, to get started, you just have to replicate the same setup in ImageKit's dashboard.
-
ImageKit offers a unique URL rewriter that understands imgix transformation parameters, internally translates them to ImageKit parameters, and delivers the expected transformations. This reduces your development effort as no URL changes need to be made now.
Here’s a quick look at how it works:
ImageKit vs Imgix Uptime and SLA Comparison
ImageKit has had fewer downtimes in the past. 7 image processing regions act as failovers for each other if one region goes down. This type of distributed architecture improves the TTFB for the first image fetch and makes ImageKit more available.
Also, based on the status pages, ImageKit is more transparent about incidents, faces very few of them, and quickly resolves these. Imgix, on the other hand, faces frequent issues and takes a lot of time to resolve these issues. This can be found on their publicly available status page on the internet.
Here’s the latest info on ImageKit’s uptime
ImageKit vs Imgix Integration Comparison
Here's a quick overview of ImageKit vs Imgix Integration:
| Integrations | ImageKit | Imgix |
|---|---|---|
| No URL change integration | ||
| Remote URL fetch | ||
| Multiple object storage like S3, Azure, Google Cloud, Firebase, Wasabi and other S3 compatible | ||
| HTTP server like Shopify, Magento, WordPress |
Both products offer similar levels of integration. With ImageKit, though, you can setup and start delivering minutes with your existing infrastructure; here are some advantages to using ImageKit:
- No URL change required: Setup the same custom domain and start delivering optimized images. No need to add auto format or auto compression parameters to the URL.
- Connect with any object storage: Native integration with Amazon S3, DigitalOcean Spaces, Google Cloud Storage, Akeneo, Firebase, Ali storage, Wasabi, and other S3 compatible storages. Available on all plans.
- Integrate with any web server: Attach any public server or load balancer e.g. Magento, WordPress, Shopify, AWS EC2 or ELBs. Available on all plans.
- Fetch any remote URL: Optimize & transform any public image through ImageKit using Web Proxy origin. Available on all plans.
- Manage multiple websites in the same account: Add multiple external storage and access them on unique URL endpoints. Available on all plans.
- Use in-built AWS CloudFront or your CDN: Integrate with your own CDN like Akamai, CloudFlare, Fastly, Azure, Google CDN, Alibaba Cloud CDN or Limelight on enterprise plans.
SDKs for developers
ImageKit offers SDKs for all popular programming languages to quickly implement URL generation and file upload with a few lines of code, making it easy for your technology team to get started in minutes.
You can quickly implement media URL generation and file uploads with a few lines of code.
// In order to use the SDK, you need to provide it with a few configuration parameters.
// The configuration parameters can be applied directly to the IKImage component or using
// an IKContext component.

<IKContext
	publicKey="your_public_key"
	urlEndpoint="your_url_endpoint"
	transformationPosition="path"
	authenticationEndpoint="http://www.yourserver.com/auth"
>

	// Image component
	<IKImage path="/default-image.jpg" transformation={[{
		"height": "300",
		"width": "400"
	}]} />

	// Image upload
	<IKUpload fileName="my-upload" />
</IKContext>
// In order to use the SDK, you need to provide it with a few configuration parameters.
// The configuration parameters must be passed to the ImagekitioAngularModule module
// in your app.module.ts file.
@NgModule({
declarations: [
AppComponent
],
imports: [
BrowserModule,
AppRoutingModule,
ImagekitioAngularModule.forRoot({
publicKey: "your_public_key", // or environment.publicKey
urlEndpoint: "your_url_endpoint", // or environment.urlEndpoint
authenticationEndpoint: "http://www.yourserver.com/auth" // or environment.authenticationEndpoint
})
],
providers: [],
bootstrap: [AppComponent]
})
// Image render using path
<ik-image path="/default-image.jpg" transformation={[{
"height": "300",
"width": "400"
}]}></ik-image>
// Simple upload
<ik-upload fileName="my-upload" /></ik-upload>
// Upload using callbacks and other parameters of upload API
<ik-upload
fileName="test_new"
[useUniqueFileName]="false"
[isPrivateFile]="true"
(onSuccess)="handleUploadSuccess($event)"
(onError)="handleUploadError($event)"
></ik-upload>
// In order to use the SDK, you need to provide it with a few configuration parameters.
// The configuration parameters can be applied directly to the IKImage component or using an IKContext component.

<IKContext
	publicKey="your_public_key"
	urlEndpoint="your_url_endpoint"
	transformationPosition="path"
	authenticationEndpoint="http://www.yourserver.com/auth"
>

	// Image component
	<IKImage path="/default-image.jpg" transformation={[{
		"height": "300",
		"width": "400"
	}]} />

	// Image upload
	<IKUpload fileName="my-upload" />
</IKContext>
import com.imagekit.android.ImageKit;
ImageKit.init(
context = applicationContext,
publicKey = "your_public_key",
urlEndpoint = "your_url_endpoint",
transformationPosition = TransformationPosition.PATH,
authenticationEndpoint = "http://www.yourserver.com/auth"
)
// your_url_endpoint/default-image.jpg?tr=h-400.00,ar-3-2
ImageKit.getInstance()
.url(
path = "default-image.jpg",
transformationPosition = TransformationPosition.QUERY
)
.height(400f)
.aspectRatio(3, 2)
.create()
// File upload
ImageKit.getInstance().uploader().uploadImage(
file = bitmap!!
, fileName = filename
, useUniqueFilename = false
, tags = arrayOf("nice", "copy", "books")
, folder = "/dummy/folder/"
, imageKitCallback = this
)import com.imagekit.android.ImageKit;
ImageKit.Companion.init(
getApplicationContext(),
"your_public_key",
"your_url_endpoint",
TransformationPosition.PATH,
"http://www.yourserver.com/auth"
);
// your_url_endpoint/default-image.jpg?tr=h-400.00,ar-3-2
ImageKit.Companion.getInstance()
.url(
"default-image.jpg",
TransformationPosition.QUERY
)
.height(400f)
.aspectRatio(3, 2)
.create()
// File upload
ImageKit.Companion.getInstance().uploader().uploadImage(
bitmap,
filename,
false, // useUniqueFilename
new String[]{"nice", "copy", "books"}, // tags,
"/dummy/folder/",
imageKitCallback
)// SDK initialization
var imagekit = new ImageKit({
publicKey : "your_public_key",
urlEndpoint : "your_url_endpoint",
authenticationEndpoint : "http://www.yourserver.com/auth",
});
// URL generation
var imageURL = imagekit.url({
path : "/default-image.jpg",
transformation : [{
"height" : "300",
"width" : "400"
}]
});
// Upload function internally uses the ImageKit.io javascript SDK
function upload(data) {
var file = document.getElementById("file1");
imagekit.upload({
file : file.files[0],
fileName : "abc1.jpg",
tags : ["tag1"]
}, function(err, result) {
console.log(arguments);
console.log(imagekit.url({
src: result.url,
transformation : [{ height: 300, width: 400}]
}));
})
}# SDK initialization
from imagekitio import ImageKit
imagekit = ImageKit(
private_key='your_private_key',
public_key='your_public_key',
url_endpoint='your_url_endpoint'
)// SDK initialization
var ImageKit = require("imagekit");
var imagekit = new ImageKit({
publicKey : "your_public_key",
privateKey : "your_private_key",
urlEndpoint : "your_url_endpoint"
});# Add this code to config/initializers/imagekitio.rb
ImageKitIo.configure do |config|
if Rails.env.development?
config.public_key = 'your_public_key'
config.private_key = 'your_private_key'
config.url_endpoint = 'your_url_endpoint' # https://ik.imagekit.io/your_imagekit_id
end
config.service = :carrierwave # replace with ':active_storage' if using ActiveStorage for uploads
# config.constants.MISSING_PRIVATE_KEY = 'custom error message'
end
#make sure to replace the your_public_key, your_private_key and your_url_endpoint with actual values
# following sections only apply if you're using the ActiveStorage functionality
# run the following commands on terminal in your project directory
rails active_storage:install
rails db:migrate
# add the following to config/storage.yml
imagekitio:
service: ImageKitIo
# add the following to config/environments/development.rb
config.active_storage.service = :imagekitio
// Create a config.properties file inside src/main/resources of your project.
// And put essential values of keys (UrlEndpoint, PrivateKey, PublicKey), no need to use quote
// in values. Then you need to initialize ImageKit with that configuration.

// UrlEndpoint=your_url_endpoint
// PrivateKey=your_private_key
// PublicKey=your_public_key

import io.imagekit.sdk.ImageKit;
import io.imagekit.sdk.config.Configuration;
import io.imagekit.sdk.utils.Utils;

class App {
   public static void main(String[] args) {
       ImageKit imageKit=ImageKit.getInstance();
       Configuration config=Utils.getSystemConfig(App.class);
       imageKit.setConfig(config);
   }
}
// SDK initialization
use ImageKit\ImageKit;
$imageKit = new ImageKit(
"your_public_key",
"your_private_key",
"your_url_endpoint"
);// SDK initialization
using Imagekit;
Imagekit.Imagekit imagekit = new Imagekit.Imagekit("your_public_key", "your_private_key", "your_url_endpoint", "path");Security and Support
ImageKit ensures your media assets are protected and your operations meet industry standards.
Here’s how:
- ISO 27001 Compliance: ImageKit is compliant with ISO 27001, with our processes, systems, and policies audited by an independent third-party accreditation body.
- GDPR Compliance: We ensure that all data protection standards are met, aligning with GDPR requirements.
- Regular Penetration Testing: Our systems undergo regular penetration testing by third parties to identify and address any potential vulnerabilities.
- AWS Advanced Technology Partner: As an AWS Advanced Technology Partner, ImageKit has successfully completed AWS's Foundational Technical Review, validating best practices in cloud deployments and security.
Read more about ImageKit’s compliance and security
ImageKit ensures your team is fully onboarded and promptly resolves any issues that may arise during your journey via Email, detailed documentation, Chat, Phone, or Slack.
Well, if you've read this far, we are sure that you'd see more value in ImageKit as an Imgix alternative.
But if you scrolled too quickly, here is what you need to know:
- Choose ImageKit for a unified API for image and video transformation and optimization, comprehensive media storage, and a predictable pricing plan that will help you save dollars.
- Choose Imgix if you are ok with a product focused only on images and you have very few origin images, and you are sure that these images will not be accessed infrequently in any given month.
Learn more from case studies
How different organizations utilize ImageKit to optimize and transform images to deliver a great user experience