Looking for a
Cloudinary alternative?
Spend over 40% less with ImageKit. Get a world-class media processing & DAM
that ALSO works with your own storage.

Why choose ImageKit as Cloudinary alternative?
Navigating through numerous options to find the ideal solution can be challenging. Let us simplify the process for you by providing a concise comparison of how we compare (and surpass) Cloudinary across a number of parameters.
Cloudinary has long been a key player in the industry but discover why ImageKit is a far better choice for businesses looking for media optimization and progrmmatic transformations. Discover the key reasons why ImageKit is the best Cloudinary alternative.
ImageKit vs Cloudinary: Pricing comparison
ImageKit's pay-as-you-go pricing model is ideal for rapidly scaling businesses. Instead of upgrading to higher plans like in Cloudinary, you can simply pay for overages.
First let's understand broadly how costing works differently in both platforms:
| Pricing Highlights | ImageKit | Cloudinary |
|---|---|---|
| Billing parameters | A few billing parameters, i.e., optimized output bandwidth and a one-time charge of video processing units, make this more suitable for a simple media delivery and optimization use case. Only pay for storage if you actually upload assets to ImageKit's Media Library. | A complex credit-based system with numerous billing parameters, i.e., output bandwidth, generated assets storage, number of transformation requests, and video processing units. |
| Consume over 1TB bandwidth or storage? | Enterprise plans in ImageKit at 30%+ discounts that get economical with scale A dedicated customer success person and solution engineer to ensure correct product usage and optimized billing. | High costs, lack of dedicated attention, and slow issue resolution are also the top reasons customers migrate to ImageKit from Cloudinary! |
| Overage | A small increment in monthly costs with our usage-based pricing. Overage available on individual billing items, e.g., bandwidth, user seats, etc. | Rigid pricing plans significantly increase monthly costs. You must shift to the next plan, which costs $249 per month. |
| Free plan | ||
| Custom domain name on the first paid plan | ||
| Pay as you go pricing for video transformations | ||
| Unlimited image transformation requests | ||
| Unlimited master images | ||
| Unlimited generated assets storage |
To understand how cost will grow with usage, let’s compare the paid plans:
| Paid Plan Comparison | ImageKit | Cloudinary |
|---|---|---|
| Monthly Cost | $89 | $99 |
| Media Delivery Bandwidth | 225GB bandwidth included every month, usage-based pricing after that | 225 shared credits with other billable parameters |
| DAM storage | 225GB storage included, usage-based pricing after that | 225 shared credits with other billable parameters |
| Image Processing Requests | Unlimited | 225 shared credits with other billable parameters |
| Video Processing Units | 5,000 units/mo included, usage-based pricing after that | 225 shared credits with other billable parameters (considered a part of transformations) |
| Extension Units | 4,000 units/mo included, usage-based pricing after that | Available as a paid add-on |
| User Seats | 5 users (more users can be added at $9/mo) | 3 users (hard-limit) |
| Custom Domain Name | 1 included ($9/mo for additional domain names) | Not available (Available with $249/mo plan) |
| Additional Usage Pricing | Overage available on individual billing parameters - bandwidth, storage, user seats, etc. | No overage. Upgrade to next paid plan i.e. $249/mo. |
| Support | Docs, Emails with guaranteed 24-hour SLA | Docs, Forums, Emails with no mention of SLA. Additional support levels available for additional charge. |
Cloudinary's credit-based pricing model complicates billing. Credits cover storage that you upload to Cloudinary, storage generated by image and video transformations, bandwidth consumption, and total number of transformations done, making it challenging to predict credit consumption and expenses as your traffic scales.
For example, you launched a new app version with slightly different image sizes or implemented responsive images on the web. The new image sizes increase the generated storage (you cannot predict how much this will be beforehand) and transformation count, leaving you with fewer credits against bandwidth and uploaded storage.
In contrast, ImageKit offers a simple pay-as-you-go pricing.
- ImageKit does not charge for image transformations at all. You can focus on delivering the right image on each device without worrying about costs.
- ImageKit does not charge for storing generated transformations of any media file. Only if you upload something to the Media Library do you pay for storage. If you use ImageKit with your own storage, then ImageKit does not charge for storage at all.
- The base plan has some inclusion for each component, and then each component has a completely separate additional usage pricing. If only your bandwidth grows, your billing for storage remains unchanged. If only the number of new videos processed goes up, then your bandwidth and storage costs remain unchanged. This brings transparency and simplicity to billing which makes it easy to choose the best suited plan.
- Instead of being forced to upgrade to a higher plan, if your usage grows, your bill grows in small increments with ImageKit. For example, you pay only $9 per 20GB of extra bandwidth or 100GB of storage.
- Additionally, ImageKit offers volume discounts if your bandwidth or storage requirement exceeds 1TB, providing further cost savings as your business grows.
ImageKit vs Cloudinary: Feature comparison overview
For businesses seeking a Cloudinary alternative, this is a crucial question.
In just over 7 years, ImageKit has revolutionized media optimization, delivery, and management. Trusted by over 2,000 businesses in 80+ countries, ImageKit sets new standards in features and capabilities, making it the ideal choice for high-growth companies.
Leading brands like Swiggy, Leroy Merlin, Groupe Dubreuil, Tata Croma, and Homify trust ImageKit with their media delivery and management requirements.
This is how ImageKit stacks up against Cloudinary's key capabilities:
| Media Processing | ImageKit | Cloudinary |
|---|---|---|
| Automatic format conversion | Requires URL change. Using f-auto parameter. | |
| Real-time image resizing | ||
| AVIF, WebP & animated WebP support | ||
| Image, text & video overlays | ||
| DPR transformation | ||
| Border, background, radius, rotate | ||
| Real-time video resizing & optimization | ||
| Video streaming | ||
| Video smart crop | ||
| Video face crop | ||
| Video object crop | ||
| Conditional transformations | ||
| Option to use query parameters for transformation | ||
| Digital Asset Management | ImageKit | Cloudinary |
| Media library | ||
| Native app for seamless creative workflow | ||
| Video storage | ||
| Media Collection | ||
| Programmable folder-level governance (Path policies) | ||
| Auto-tagging | Available as a paid add-on | |
| Comments on assets | Enterprise-only | |
| Asset versioning | Enterprise-only | |
| Draft assets | ||
| Audit Logs | Enterprise-only | |
| Media library backup | ||
| Integrations & Infrastructure | ImageKit | Cloudinary |
| Custom Domain Name | Available on $89/mo plan | Available on $249/mo plan |
| Basic optimizations without any URL change | ||
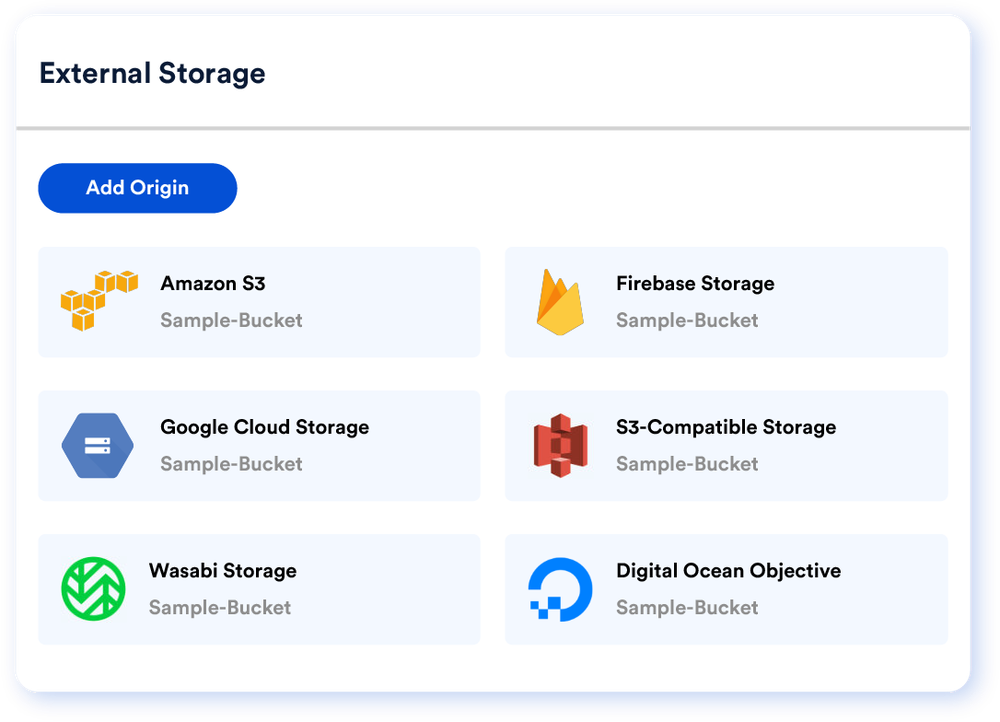
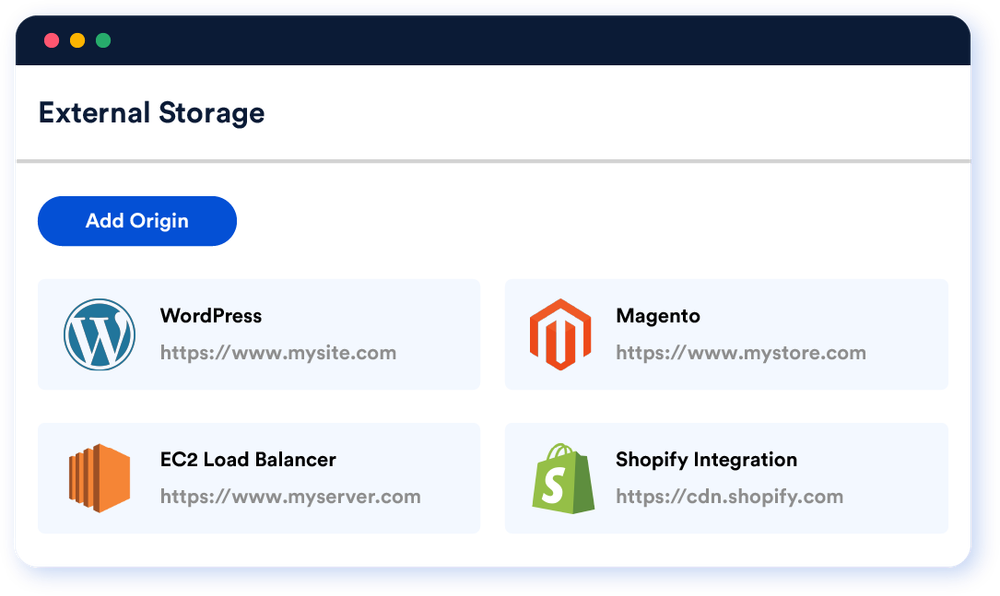
| Works with external storage like S3, Azure, Google Cloud, Firebase, Wasabi and other S3 compatible | ||
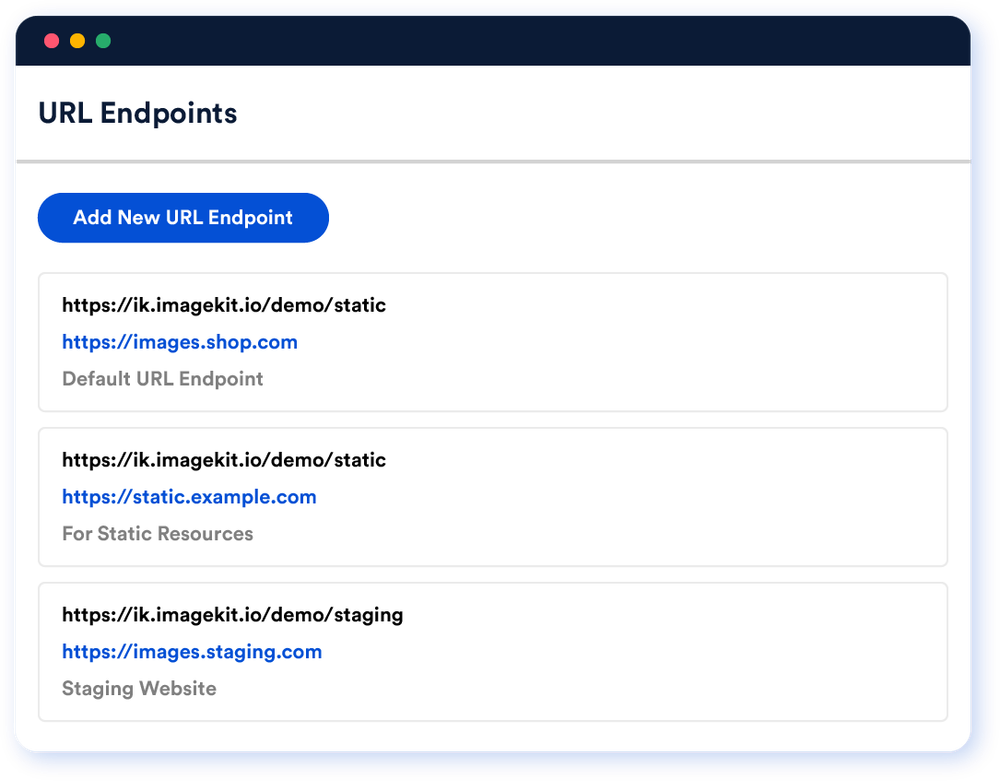
| Same account for multiple websites | ||
| Remote URL-fetch | ||
| Works with HTTP (web-server) origins | ||
| Custom CDN integration | ||
| Core processing regions | 7 regions available on all plans (North California, North Virginia, Singapore, Frankfurt, Sydney, Mumbai, Montreal) | US by default. Enterprise accounts can request different location i.e. Europe and Asia Pacific. |
Media optimization
-
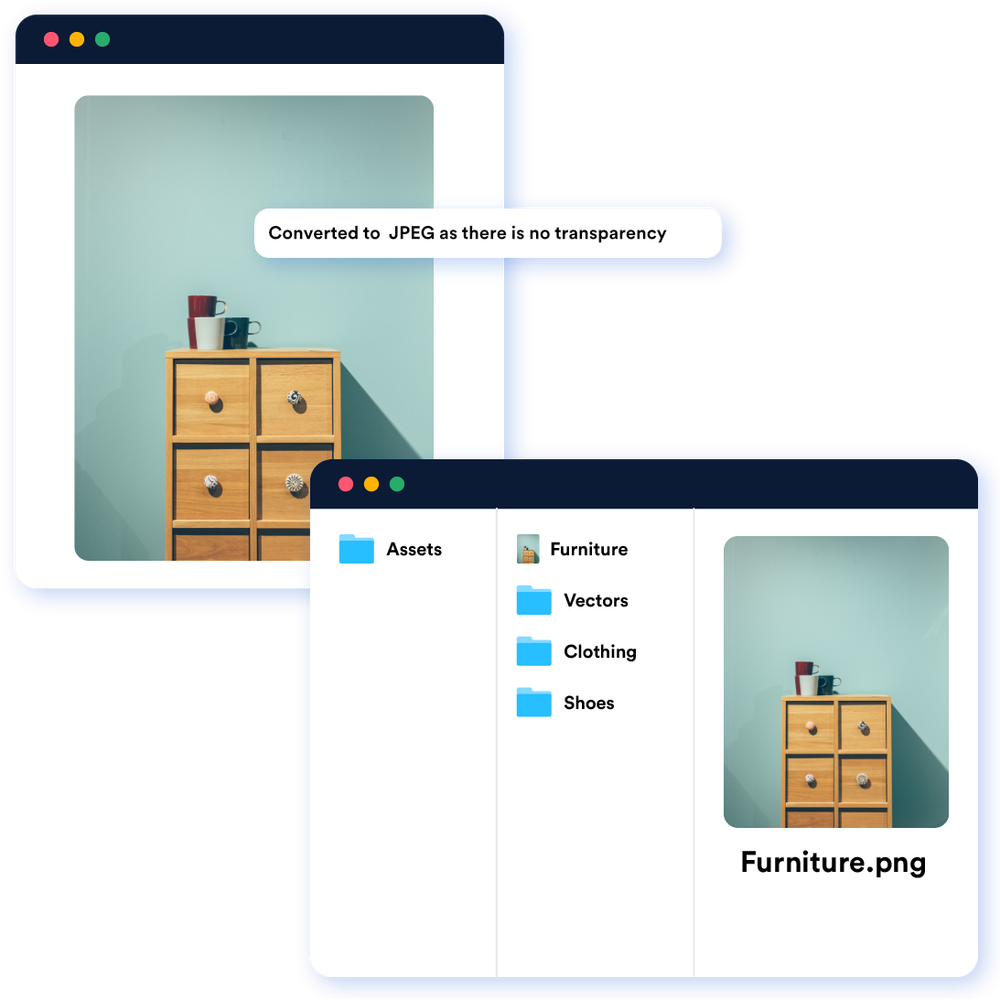
ImageKit offers faster go-live times and prevents accidental delivery of large, unoptimized files in wrong formats with auto-optimized images and videos, unlike Cloudinary, where you need to manually add the "f-auto" parameter to change media formats.
-
ImageKit's default image compression is at par if not better than Cloudinary's, which ensures optimal bandwidth consumption and ensures quick asset retrieval.


Media transformation
-
ImageKit offers over 50+ URL-based transformations, including simple resizing, auto-cropping, object-aware cropping, watermarking, text overlays, and more. These capabilities put ImageKit on par with Cloudinary's key transformations.
-
You can add transformation string as part of the query parameter in addition to the URL param. This is useful when you don't want to change URL structure.
<!-- In Imagekit.io, both will work-->
<img src="https://ik.imgkit.net/demo/image.jpg?tr=w-300"></img>
<img src="https://ik.imgkit.net/demo/tr:w-300/image.jpg"></img>

<!-- In Cloudinary, only one will work -->
<img src="https://res.cloudinary.com/demo/image/upload/w_300/image.jpg"></img>- Unlike Cloudinary, ImageKit doesn't charge for transformations or storage of variations created during transformations. This enables businesses to adopt best-in-class practices like Responsive Images and Lazy Loading without incurring extra costs or managing complex credit systems. Learn more about how ImageKit’s pricing compares with Cloudinary and why ImageKit is the ideal choice for high-growth companies.


Digital Asset Management
ImageKit offers a full-featured, enterprise-ready Digital Asset Management (DAM) platform to all its users. With ImageKit DAM, your team can efficiently manage your digital asset repository, collaborate seamlessly from a central hub, and deliver approved assets in optimized formats and sizes directly.
Try the ImageKit DAM interactive demo:
Why ImageKit is better?
-
Enhanced Collaboration: With ImageKit, you can add contextual comments on images and videos, enhancing collaboration. While Cloudinary allows comments on media, it lacks the ability to make them contextual. This means users must manually add timestamps to indicate which video frame needs changes or provide detailed explanations for specific image alterations. screenshot of contextual comments.
-
Desktop DAM app: ImageKit offers a desktop DAM app for Windows and Mac users, enabling easy drag-and-drop uploads and seamless asset management. The app streamlines your creative workflow and you don't have to leave the Adobe or any other application you are working on to get assets from DAM. This is not available in Cloudinary.
-
AI-Powered Features: Leverage AI capabilities like background removal and auto-tagging to streamline asset editing and organization. These features are included in ImageKit plans, whereas Cloudinary offers them only as paid add-ons.
-
Seamless Migration: If you're using a DAM solution or cloud storages like Google Drive, Dropbox, Box, etc., and want to migrate to ImageKit, we provide integration with Rclone for easy migration. You can also use our APIs to bulk upload assets to ImageKit DAM. Learn more about how to upload assets to ImageKit.
-
Granular Access Control: ImageKit fosters a collaborative environment by allowing you to grant team members access based on their roles, ensuring secure and efficient collaboration. For frequent collaboration with external stakeholders like agencies, use features such as Media Collections (asset sharing without duplication) and public links (password-protected, time-bound access) to share and receive assets for campaigns and initiatives.
-
Advanced Folder-Level Governance with Path Policies: ImageKit offers path policies, an enterprise-grade capability that Cloudinary doesn't have. With path policies, you can enforce folder-level rules to maintain content governance across your organization. Automatically enforce metadata standards for different teams, validate uploads with custom naming conventions and file size limits, protect critical assets from accidental modifications, automate AI tagging and background removal during upload, and control asset movement across folders. This programmable governance framework ensures your DAM scales with your business needs while maintaining consistency and security.
-
User-Friendly Interface: ImageKit DAM features an interactive and intuitive UI, making it easy for users to get started without extensive guidance. We also offer a dedicated desktop app for easier asset management and collaboration.
Read more about ImageKit Digital Asset Management here.
Integration comparison
ImageKit is built to integrate with your existing tech stack in minutes, by providing native integrations with a variety of object storages.
Only enterprise customers of Cloudinary can choose to store their raw assets on their own cloud storage. It does not offer native integration with object storages.


Effortless Migration from Cloudinary to ImageKit
If you're currently using Cloudinary for media delivery and storage, migrating to ImageKit is a seamless process that, in many cases, doesn't require changing existing URLs. ImageKit’s advanced features for migration have enabled companies to switch in days instead of months, all with zero downtime.
Discover how ImageKit offers a better, more cost-effective alternative and easy migration steps in this video.
As highlighted in the video, ImageKit offers the following features to facilitate a smooth and swift migration from Cloudinary:
-
Works with your storage and even Cloudinary Backup Storage: Unlike Cloudinary, which requires you to move all assets to their Media Library, ImageKit works with popular external storage like AWS S3 and also with the Cloudinary backup bucket that contains backup of assets stored in the Cloudinary media library. This saves significant time that would otherwise be spent migrating assets to initiate media delivery.
-
URL Rewriter: ImageKit's Cloudinary URL Rewriter allows you to continue using the same transformations and versioning in your existing media delivery URLs. ImageKit delivers the same output asset without you having to change the code. This feature saves considerable time in migration.
You can also use the Upload APIs and the Storage Migration CLI to seamlessly transition to ImageKit's Media Library. If you choose a Custom Plan with ImageKit, you can benefit from Managed Migration Support.
You can read more about migrating from Cloudinary here.
Not convinced? More reasons to choose ImageKit over Cloudinary
Over 2,000 high-growth businesses across 80+ countries trust ImageKit for their media delivery and management needs. In addition to the comprehensive features and capabilities mentioned above, the following benefits make ImageKit the perfect choice for your business:
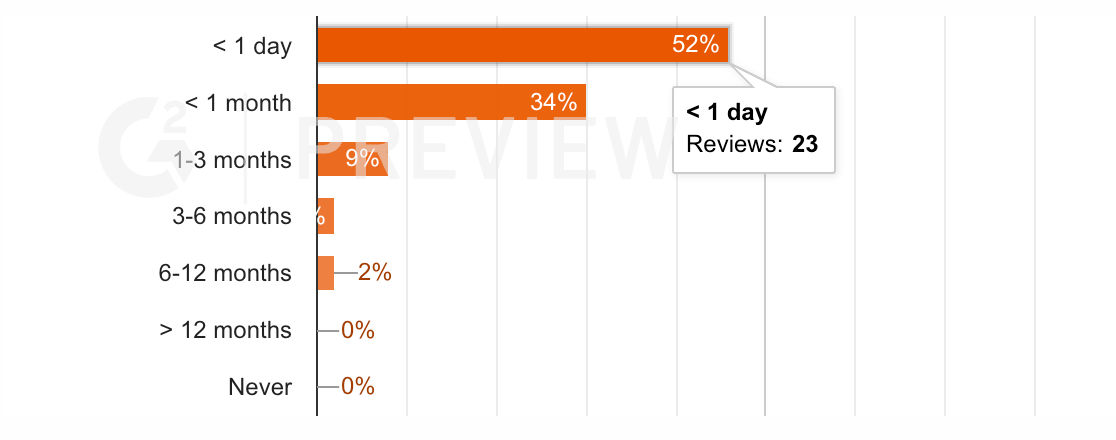
Time to go-live
With ImageKit, over 50% of our customers go live in less than a day. Our platform seamlessly integrates with existing infrastructure and offers built-in image and video optimization, with custom domains included in all paid plans. This enables engineering teams to effortlessly deliver and transform media files. ImageKit's agility ensures zero-downtime migrations with rollback options that preserve URLs, ensuring a smooth and efficient transition.
Additionally, if you need to migrate your assets from existing storage, you can do so easily using our APIs or with our Rclone integration.
Cloudinary, however, requires migrating all existing media assets to their Media Library, which can take weeks or months, with complex rollback procedures.
Compliance and security
When it comes to security and compliance, ImageKit goes above and beyond to ensure your media assets are protected and your operations meet industry standards. Here’s how:
- ISO 27001 Compliance: ImageKit is compliant with ISO 27001, with our processes, systems, and policies audited by an independent third-party accreditation body.
- GDPR Compliance: We ensure that all data protection standards are met, aligning with GDPR requirements.
- Regular Penetration Testing: Our systems undergo regular penetration testing by third parties to identify and address any potential vulnerabilities.
- AWS Advanced Technology Partner: As an AWS Advanced Technology Partner, ImageKit has successfully completed AWS's Foundational Technical Review, validating best practices in cloud deployments and security. Read more about ImageKit’s compliance and security.
Uptime and support
When comparing ImageKit and Cloudinary, several key factors highlight ImageKit's superior support and reliability:
- High Uptime and Regional Failover: Both platforms ensure high uptime, but ImageKit offers the additional advantage of seven processing regions for failover, resulting in better Time To First Byte (TTFB) globally and improved availability. ImageKit's status history is publicly available.
- Dedicated Support: ImageKit provides live-chat support and assigns a dedicated Customer Success Manager to all Enterprise Accounts. You also get access to actual software engineers to help implement ImageKit correctly or talk about best practices of media delivery.
- Custom SLAs and Incident Response: ImageKit offers custom response and uptime Service Level Agreements (SLAs) on specific enterprise plans. Enterprise customers also benefit from an on-call incident response team, if needed.
- Support Options: While Cloudinary offers premium support options at an additional charge, ImageKit’s robust support structure is built into the service for enterprise customers.
SDKs and plugins
ImageKit has SDKs available for all popular programming languages to help you integrate ImageKit into your tech stack quickly.
You can quickly implement media URL generation and file uploads with a few lines of code.
// In order to use the SDK, you need to provide it with a few configuration parameters.
// The configuration parameters can be applied directly to the IKImage component or using
// an IKContext component.

<IKContext
	publicKey="your_public_key"
	urlEndpoint="your_url_endpoint"
	transformationPosition="path"
	authenticationEndpoint="http://www.yourserver.com/auth"
>

	// Image component
	<IKImage path="/default-image.jpg" transformation={[{
		"height": "300",
		"width": "400"
	}]} />

	// Image upload
	<IKUpload fileName="my-upload" />
</IKContext>
// In order to use the SDK, you need to provide it with a few configuration parameters.
// The configuration parameters must be passed to the ImagekitioAngularModule module
// in your app.module.ts file.
@NgModule({
declarations: [
AppComponent
],
imports: [
BrowserModule,
AppRoutingModule,
ImagekitioAngularModule.forRoot({
publicKey: "your_public_key", // or environment.publicKey
urlEndpoint: "your_url_endpoint", // or environment.urlEndpoint
authenticationEndpoint: "http://www.yourserver.com/auth" // or environment.authenticationEndpoint
})
],
providers: [],
bootstrap: [AppComponent]
})
// Image render using path
<ik-image path="/default-image.jpg" transformation={[{
"height": "300",
"width": "400"
}]}></ik-image>
// Simple upload
<ik-upload fileName="my-upload" /></ik-upload>
// Upload using callbacks and other parameters of upload API
<ik-upload
fileName="test_new"
[useUniqueFileName]="false"
[isPrivateFile]="true"
(onSuccess)="handleUploadSuccess($event)"
(onError)="handleUploadError($event)"
></ik-upload>
// In order to use the SDK, you need to provide it with a few configuration parameters.
// The configuration parameters can be applied directly to the IKImage component or using an IKContext component.

<IKContext
	publicKey="your_public_key"
	urlEndpoint="your_url_endpoint"
	transformationPosition="path"
	authenticationEndpoint="http://www.yourserver.com/auth"
>

	// Image component
	<IKImage path="/default-image.jpg" transformation={[{
		"height": "300",
		"width": "400"
	}]} />

	// Image upload
	<IKUpload fileName="my-upload" />
</IKContext>
import com.imagekit.android.ImageKit;
ImageKit.init(
context = applicationContext,
publicKey = "your_public_key",
urlEndpoint = "your_url_endpoint",
transformationPosition = TransformationPosition.PATH,
authenticationEndpoint = "http://www.yourserver.com/auth"
)
// your_url_endpoint/default-image.jpg?tr=h-400.00,ar-3-2
ImageKit.getInstance()
.url(
path = "default-image.jpg",
transformationPosition = TransformationPosition.QUERY
)
.height(400f)
.aspectRatio(3, 2)
.create()
// File upload
ImageKit.getInstance().uploader().uploadImage(
file = bitmap!!
, fileName = filename
, useUniqueFilename = false
, tags = arrayOf("nice", "copy", "books")
, folder = "/dummy/folder/"
, imageKitCallback = this
)import com.imagekit.android.ImageKit;
ImageKit.Companion.init(
getApplicationContext(),
"your_public_key",
"your_url_endpoint",
TransformationPosition.PATH,
"http://www.yourserver.com/auth"
);
// your_url_endpoint/default-image.jpg?tr=h-400.00,ar-3-2
ImageKit.Companion.getInstance()
.url(
"default-image.jpg",
TransformationPosition.QUERY
)
.height(400f)
.aspectRatio(3, 2)
.create()
// File upload
ImageKit.Companion.getInstance().uploader().uploadImage(
bitmap,
filename,
false, // useUniqueFilename
new String[]{"nice", "copy", "books"}, // tags,
"/dummy/folder/",
imageKitCallback
)// SDK initialization
var imagekit = new ImageKit({
publicKey : "your_public_key",
urlEndpoint : "your_url_endpoint",
authenticationEndpoint : "http://www.yourserver.com/auth",
});
// URL generation
var imageURL = imagekit.url({
path : "/default-image.jpg",
transformation : [{
"height" : "300",
"width" : "400"
}]
});
// Upload function internally uses the ImageKit.io javascript SDK
function upload(data) {
var file = document.getElementById("file1");
imagekit.upload({
file : file.files[0],
fileName : "abc1.jpg",
tags : ["tag1"]
}, function(err, result) {
console.log(arguments);
console.log(imagekit.url({
src: result.url,
transformation : [{ height: 300, width: 400}]
}));
})
}# SDK initialization
from imagekitio import ImageKit
imagekit = ImageKit(
private_key='your_private_key',
public_key='your_public_key',
url_endpoint='your_url_endpoint'
)// SDK initialization
var ImageKit = require("imagekit");
var imagekit = new ImageKit({
publicKey : "your_public_key",
privateKey : "your_private_key",
urlEndpoint : "your_url_endpoint"
});# Add this code to config/initializers/imagekitio.rb
ImageKitIo.configure do |config|
if Rails.env.development?
config.public_key = 'your_public_key'
config.private_key = 'your_private_key'
config.url_endpoint = 'your_url_endpoint' # https://ik.imagekit.io/your_imagekit_id
end
config.service = :carrierwave # replace with ':active_storage' if using ActiveStorage for uploads
# config.constants.MISSING_PRIVATE_KEY = 'custom error message'
end
#make sure to replace the your_public_key, your_private_key and your_url_endpoint with actual values
# following sections only apply if you're using the ActiveStorage functionality
# run the following commands on terminal in your project directory
rails active_storage:install
rails db:migrate
# add the following to config/storage.yml
imagekitio:
service: ImageKitIo
# add the following to config/environments/development.rb
config.active_storage.service = :imagekitio
// Create a config.properties file inside src/main/resources of your project.
// And put essential values of keys (UrlEndpoint, PrivateKey, PublicKey), no need to use quote
// in values. Then you need to initialize ImageKit with that configuration.

// UrlEndpoint=your_url_endpoint
// PrivateKey=your_private_key
// PublicKey=your_public_key

import io.imagekit.sdk.ImageKit;
import io.imagekit.sdk.config.Configuration;
import io.imagekit.sdk.utils.Utils;

class App {
   public static void main(String[] args) {
       ImageKit imageKit=ImageKit.getInstance();
       Configuration config=Utils.getSystemConfig(App.class);
       imageKit.setConfig(config);
   }
}
// SDK initialization
use ImageKit\ImageKit;
$imageKit = new ImageKit(
"your_public_key",
"your_private_key",
"your_url_endpoint"
);// SDK initialization
using Imagekit;
Imagekit.Imagekit imagekit = new Imagekit.Imagekit("your_public_key", "your_private_key", "your_url_endpoint", "path");Infrastructure
ImageKit stands out with its robust infrastructure and commitment to delivering high performance and reliability. Here's how ImageKit ensures exceptional service:
- ImageKit leverages an AWS CloudFront CDN node network of 700+ nodes that ensure high cache-hit ratio and performance, putting it at par with Cloudinary.
- ImageKit is entirely built on AWS and uses the same CDN globally, ensuring consistent performance worldwide. In contrast, Cloudinary's performance may vary based on the CDN used in different regions.
- ImageKit employs a multi-region core processing network with co-located storage across seven different regions, offering three key benefits:
- Improved First Fetch Timings: Processing servers are located in the same AWS region as the stored media, minimizing download times and ensuring your data remains within the AWS data center.
- Enhanced Availability: Faster fallback when a region experiences downtime, making ImageKit more reliable. Access live status reports here.
- GDPR Compliance: If you choose the Frankfurt region, your assets will be stored exclusively in Frankfurt, aiding in GDPR compliance.
Testimonials
/Screenshot%202024-08-09%20at%201.23.23%E2%80%AFPM.png?updatedAt=1723190175984&tr=w-1400)
/Screenshot%202024-08-09%20at%201.22.58%E2%80%AFPM.png?updatedAt=1723190175759&tr=w-1400)
/Screenshot%202024-08-09%20at%201.23.42%E2%80%AFPM.png?updatedAt=1723190175501&tr=w-1400)
Success Stories: Switching from Cloudinary to ImageKit

