
Managing a handful of assets in a DAM is easy. Managing thousands across multiple teams, each with their own naming conventions, metadata requirements, and approval workflows? That's where things fall apart.
Marketing wants campaign and target_audience fields on every banner. Product needs product_id and version. And someone on the creative team just uploaded 200 images to the wrong folder with zero metadata. Sound familiar?
This is the kind of problem that path policies in ImageKit's DAM solve. Instead of relying on team-wide rules that either don't fit everyone or get ignored entirely, you attach specific rules to specific folders. Each folder gets its own governance — metadata enforcement, upload automation, asset protection — and those rules cascade down to every subfolder and file within.
What is a path policy?
A path policy is a set of rules you attach to a folder in your Media Library. Once attached, those rules apply to all files and subfolders inside it automatically.
You can think of it as a way to say: "Everything that goes into this folder must follow these rules." No exceptions, no manual enforcement needed.
With a path policy, you can:
- Control which metadata fields are available, required, or read-only for files in that folder
- Modify or validate uploads before they're processed using a custom JavaScript function
- Block destructive operations like deletions, renames, or modifications using a validate function
You create and manage path policies from the ImageKit dashboard. Give the policy a name and description, configure metadata field behavior, and optionally write custom JavaScript for upload and validate functions. Then assign the policy to a folder — either from the policy page or by right-clicking any folder and selecting the policy from a dropdown.
Path policies are available on custom enterprise plans and are currently in beta.
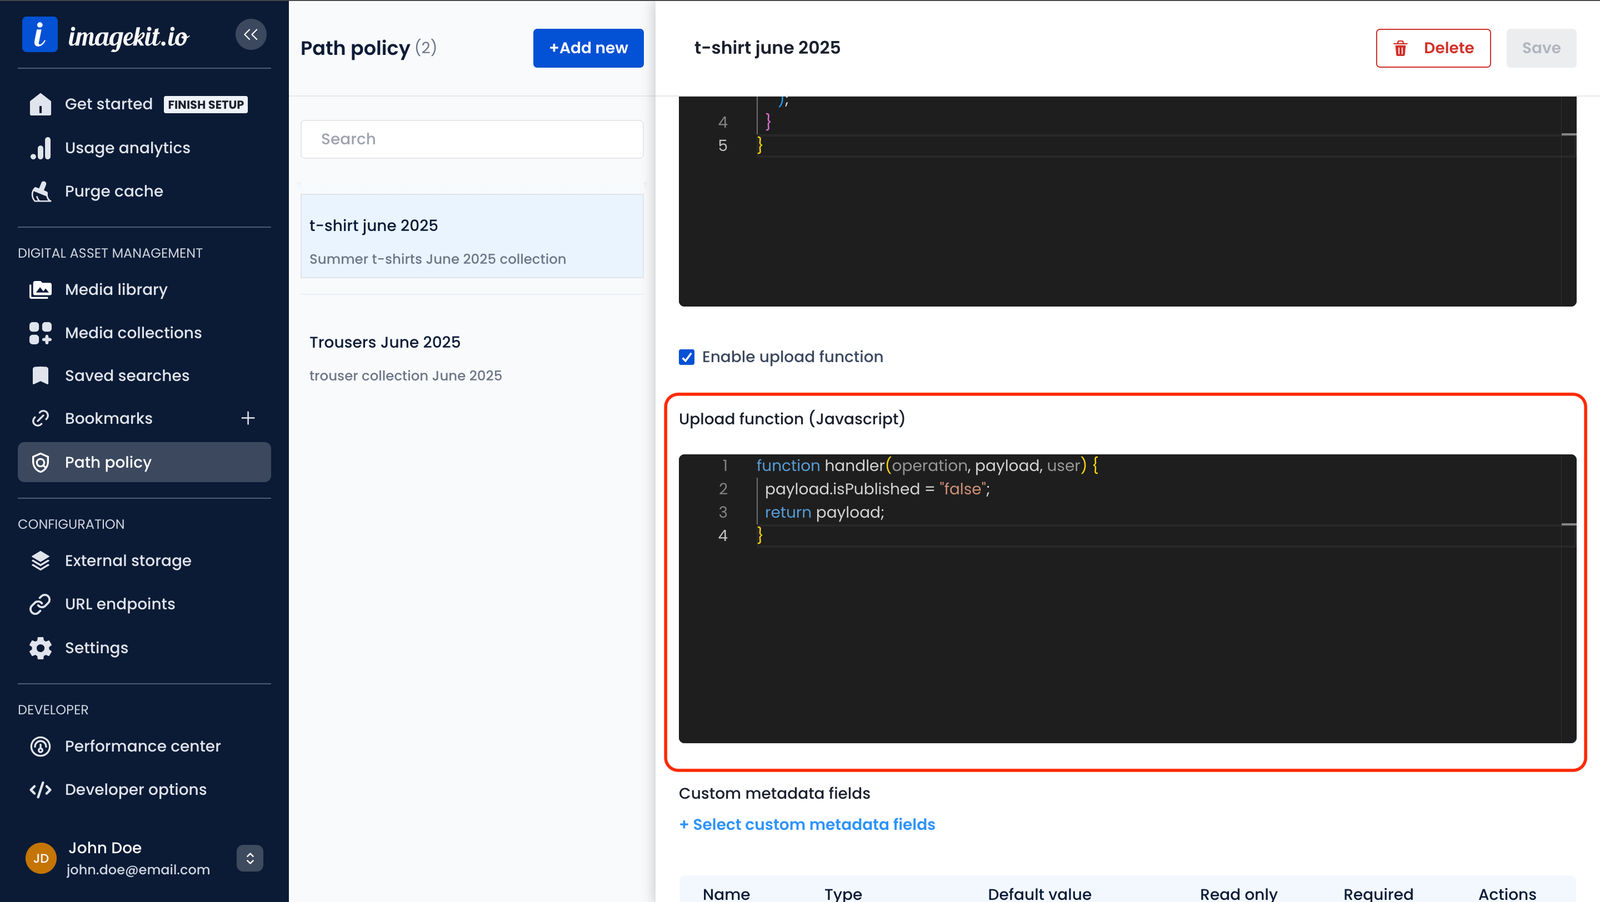
How folder assignment works
A few things to know about how policies apply to folders:
- One policy per folder. A folder can only have one path policy at a time.
- Cascading by default. When you assign a policy to a folder, it cascades to all subfolders. The effective policy for any given folder is determined by the nearest parent that has one assigned. So if
/productshas a policy and/products/shoesdoes not, then/products/shoesinherits the/productspolicy. But if/products/shoeshas its own policy, that one takes precedence. - Folder moves break the link. If you move or delete a folder, the path policy becomes ineffective. You'll need to reapply it to the new location.
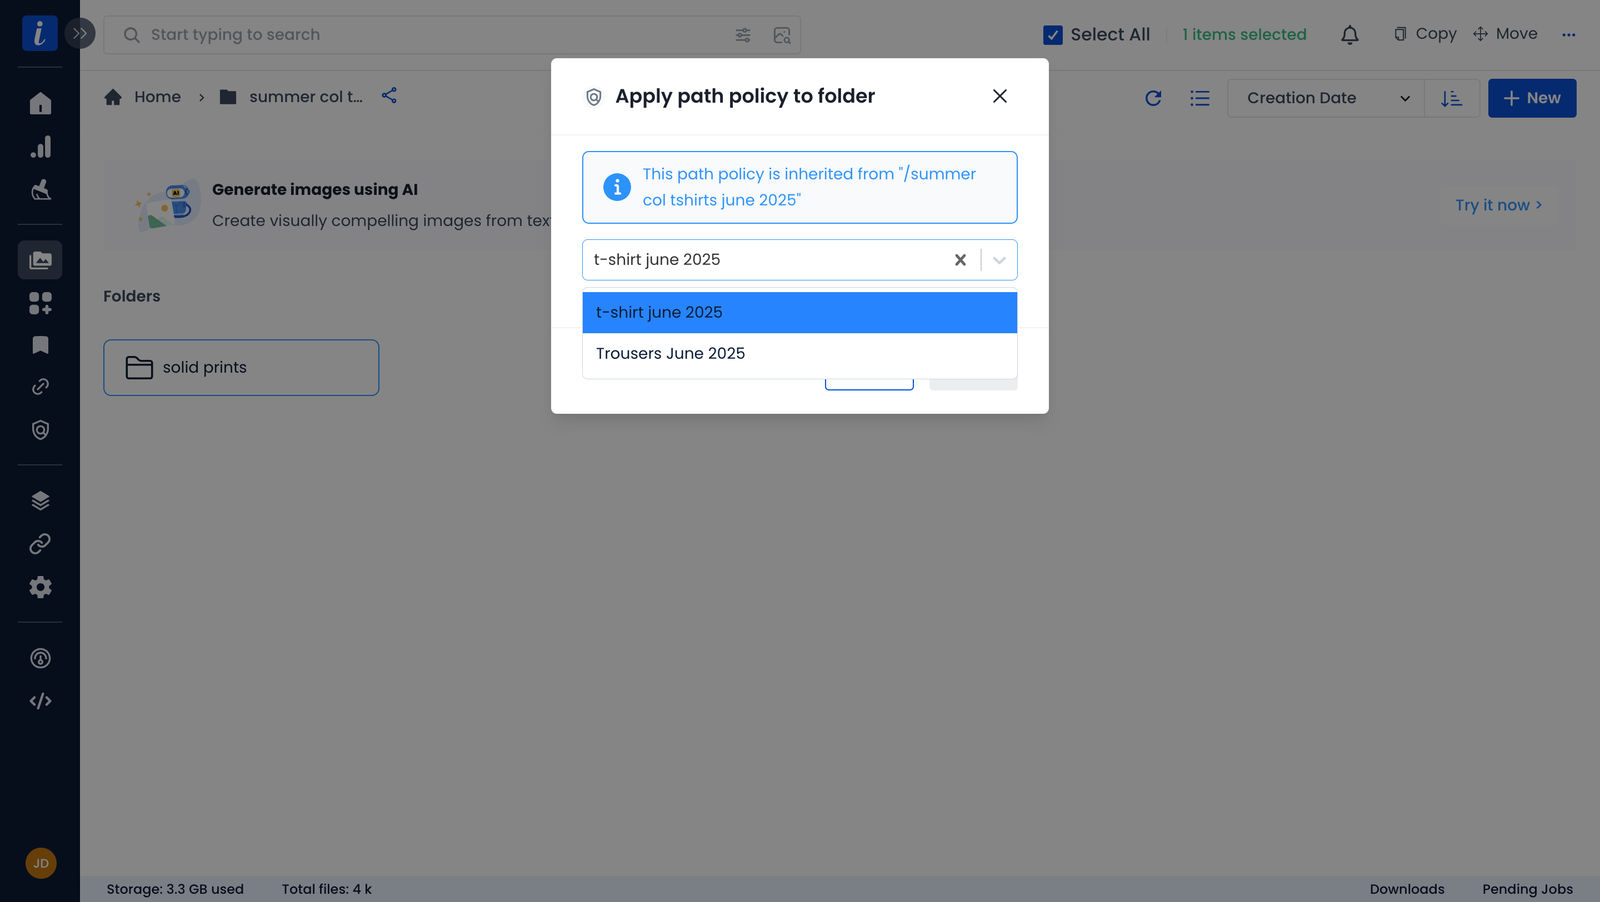
Custom metadata fields configuration
One of the most useful things you can do with a path policy is control how custom metadata fields behave inside a folder. For each field, you can configure:
- Required — The field must always be filled in. You can't save an asset without it.
- Read only — The field's value is locked. Users can see it but can't change it.
- Default value — A pre-filled value that applies when no other value is provided.
These settings override the global configuration for custom metadata fields, giving you folder-level control. This is what makes it possible to have different metadata requirements for different teams — marketing's folder can require campaign while product's folder requires product_id, all without stepping on each other.
Here's an important detail: only the custom metadata fields you select in the policy will be available for assets within that folder, both in the Media Library and through the API. If you select none, custom metadata is effectively disabled for that folder. Also note that these settings apply to files in the folder, not to the folders themselves.
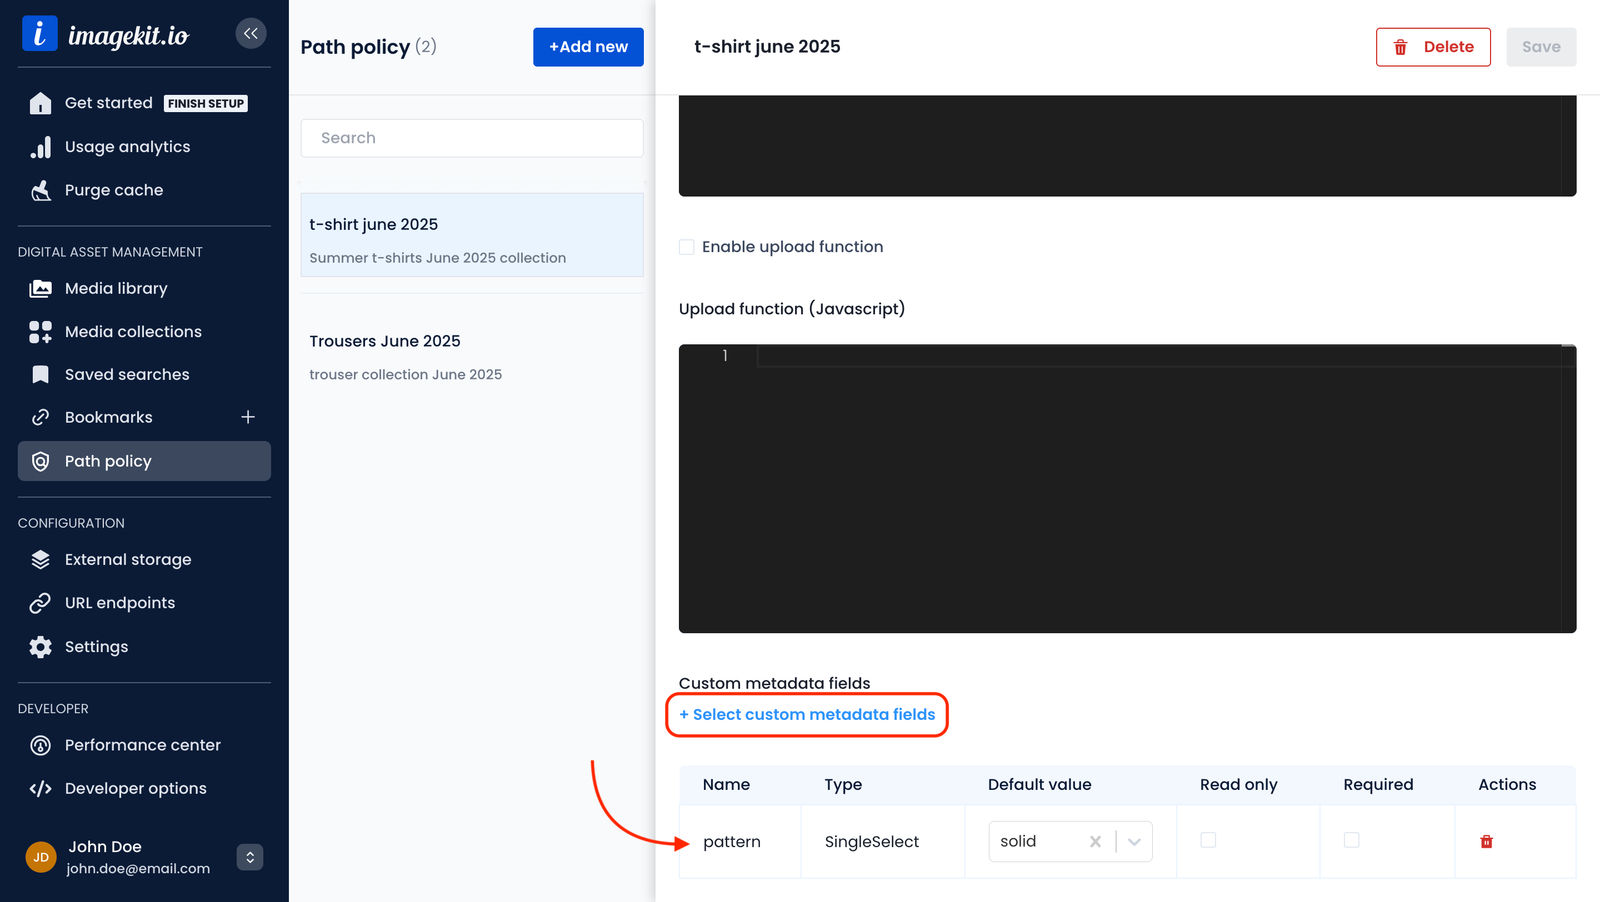
The upload function
The upload function is a custom JavaScript function that runs before a file upload is processed. You can use it to validate requests, modify upload parameters, or enforce rules at the point of entry.
Function signature
function handler(operation, payload, user) {
  // operation is always "Upload"
  // payload matches the Upload API request spec (all values are strings)
  // user has userId, userName, userEmail (and userGroups for restricted users)
  // for dashboard uploads; it is undefined for API uploads
  return payload;
}
A few things to keep in mind:
- The
payload.folderpath is read-only — you can't redirect uploads to a different folder. - Since the Upload API uses multipart form data, every value in
payloadis a string, including numbers and booleans. If you modify a field, convert it back to a string before returning. - The function must complete within 300ms and use no more than 8MB of memory.
- No external modules, network requests, or async operations — plain JavaScript only.
Example: Enforce naming conventions and file size limits
Say you want every file uploaded to your product images folder to follow a strict naming pattern and stay under 5MB:
function handler(operation, payload, user) {
  // Enforce filename pattern: product-id_variant.ext
  const validNameRegex = /^[a-z0-9-]+_[a-z0-9]+\.[a-z]{3,4}$/;
  if (!validNameRegex.test(payload.fileName)) {
    throw new Error(
      "Invalid filename. Must follow the pattern 'product-id_variant.ext'."
    );
  }

  // Restrict to JPEG/PNG and max 5MB
  payload.checks = '"file.mime" IN ["image/jpeg","image/png"] AND "file.size" <= 5242880';

  return payload;
}
If the filename doesn't match, the upload is rejected with your custom error message.
Example: Auto-generate video streaming outputs on upload
For a video-heavy workflow, you can use the upload function to automatically generate Adaptive Bitrate Streaming manifests right at upload time:
function handler(operation, payload, user) {
  payload.transformation = '{"post":[{"type":"abs","value":"sr-240_360_480_720_1080","protocol":"hls"},{"type":"thumbnail"}]}';
  return payload;
}
Every video uploaded to this folder will automatically get HLS streaming assets and a thumbnail generated — no separate transformation requests needed.
Example: Auto-enable AI tagging and captioning
You can attach extensions to every upload in a folder, so every asset gets auto-tagged and described without anyone having to remember to toggle it on. The same approach works for business-specific tagging with AI tasks:
function handler(operation, payload, user) {
  payload.extensions = JSON.stringify([
    {
      name: "aws-auto-tagging",
      maxTags: 10,
      minConfidence: 80,
    },
    {
      name: "ai-auto-description",
    },
  ]);

  return payload;
}
Example: Upload in draft state
For folders where assets need review before going live, you can auto-set everything as unpublished:
function handler(operation, payload, user) {
  payload.isPublished = "false";
  return payload;
}
Example: Prevent accidental overwrites
function handler(operation, payload, user) {
  payload.overwriteFile = "false";
  payload.useUniqueFileName = "true";
  return payload;
}
The validate function
The validate function runs before any Media Library operation — not just uploads. It inspects the operation and payload, and if the operation shouldn't be allowed, throws an error to block it.
Function signature
function handler(operation, payload, user, asset) {
  // Inspect the operation, payload, and the existing asset
  // Throw an error to reject. No return value needed.
}The validate function takes four parameters. Since June 8, 2026, any new or updated validate function must declare all four — handler(operation, payload, user, asset) — or it will fail. A mismatched signature blocks all operations on folders where the policy is applied. (The upload function still takes three.)
The operation parameter tells you what's happening. It can be any of: UpdateFile, DeleteFile, CopyFile, MoveFile, RenameFile, DeleteFileVersion, RestoreFileVersion, CreateFolder, DeleteFolder, CopyFolder, RenameFolder, MoveFolder, AddTags, RemoveTags.
The payload varies by operation and contains the relevant details (file ID, paths, tags, metadata, etc.). The user is the person performing the operation from the dashboard (undefined for API calls), and asset is the existing file or folder being acted on (undefined for CreateFolder, since there's nothing there yet).
Example: Block modifications and deletions in a folder
For critical live assets like production banners, block edits and deletions:
function handler(operation, payload, user, asset) {
  if (operation === "DeleteFile" || operation === "UpdateFile") {
    throw new Error(
      "Files in this folder are protected and cannot be modified or deleted."
    );
  }
}
This doesn't cover everything — renames, moves, tag operations (AddTags, RemoveTags), and version operations are separate and still allowed. Add them to the check if you need a fully locked folder. Also note that UpdateFile includes applying extensions, so this policy also prevents running AI tasks on existing files in the folder.
Example: Prevent renaming
To maintain a strict folder and file structure:
function handler(operation, payload, user, asset) {
  if (operation === "RenameFile" || operation === "RenameFolder") {
    throw new Error("Renaming is not allowed in this directory.");
  }
}
Example: Block folder deletion but allow file operations
function handler(operation, payload, user, asset) {
  if (operation === "DeleteFolder") {
    throw new Error("Folder deletion is not allowed under this policy.");
  }
}
Example: Protect specific tags from being removed
The asset argument lets you compare the file's current state with the incoming change. This example blocks removal of any tag starting with verified-:
function handler(operation, payload, user, asset) {
  if (operation === "UpdateFile") {
    const existingTags = asset.tags || [];
    const isClearingAllTags = payload.tags === null;
    const newTags = Array.isArray(payload.tags) ? payload.tags : null;

    const protectedTags = existingTags.filter(
      (t) =>
        t.startsWith("verified-") &&
        (isClearingAllTags || (newTags && !newTags.includes(t)))
    );
    if (protectedTags.length > 0) {
      throw new Error(
        `The following tags are protected and cannot be removed: ${protectedTags.join(", ")}`
      );
    }
  }
}
You can combine these checks in a single validate function, checking for multiple operations and building rules as complex as your workflow needs.
Real-world scenarios
Here are some concrete ways teams use path policies in practice:
Multi-team metadata governance
Your marketing team has a /marketing folder, and your product team has /products. Each folder gets its own path policy:
- Marketing policy: requires
campaign,target_audience, andlaunch_datefields. Defaultstatusis "draft". - Product policy: requires
product_id,sku, andversionfields.product_idis read-only once set.
Neither team has to deal with the other's metadata fields. Each team sees only what's relevant to their workflow.
Automated transformation pipeline
Assign a path policy to your /raw-uploads folder that automatically applies background removal, generates thumbnails, and runs AI tagging on every upload. The upload function handles all of this, so the person uploading doesn't need to configure anything.
Asset protection for live content
Your /live-banners folder contains assets that are actively served on your website. A validate function blocks all modifications and deletions. When you need to update a banner, you update it in a staging folder first, then move it into /live-banners after review.
Restricting operations by user
Since the user parameter includes the email of the person performing the operation, you can restrict certain operations to specific people:
function handler(operation, payload, user, asset) {
  const adminEmails = ["admin@company.com", "lead@company.com"];
  if (operation === "DeleteFile" && user && !adminEmails.includes(user.userEmail)) {
    throw new Error("Only admins can delete files in this folder.");
  }
}
Keep in mind that user is undefined for API calls made with your private key, so the user && check above lets API deletions through. That's usually what you want for trusted backend systems — but if API deletions should be blocked too, throw when !user as well.
Limitations to be aware of
- Functions must finish within 300ms and use no more than 8MB of memory, or the request fails with a 400 error.
- Only plain JavaScript is supported — no imports, network calls, or async code.
- The signature must be exact. Invalid syntax or a missing parameter blocks API calls and all operations on folders where the policy is applied. Test carefully before assigning a policy to a busy folder.
- Each policy has one upload function and one validate function, each with a single handler.
- Metadata field sync is manual. If you change a global custom metadata field (like modifying a dropdown list), update any path policies referencing it.
- A custom metadata field can't be deleted while it's referenced in any path policy.
Getting started
- Create your custom metadata fields first, if you haven't already. Go to Settings → Media Library → Custom Metadata Fields.
- Create a path policy in the dashboard. Give it a clear name and description, select the metadata fields you want to control, and optionally write upload and validate functions.
- Assign it to a folder — either from the policy page or by right-clicking any folder.
- Test it by uploading a file and trying the operations you've restricted. Make sure your error messages are clear.
Start simple. A path policy that just requires two metadata fields on uploads is already a huge improvement over relying on people to remember. You can add upload automation and validate rules as your workflows mature.
For the full API reference and all supported operations, check out the path policy documentation.


